Warning, Maintenance instruction, Proper storage – Dustless HEPAPack User Manual
Page 4: Electrical cord care, Caring for your vacuum, Filter maintenance
4
10. Loosen the waist
belt latch and
chest belt latch.
In an open area,
lift the vacuum by
one shoulder strap
and slide your free
arm into the other
strap. (Figure D)
11. Adjust the shoulder straps to allow
the waist belt to be buckled around
your waist.
12. Fasten the waist belt and chest belt
snugly and
make sure the
weight is resting
comfortably on
your hips. NOTe:
The back-plate
is adjustable
up or down by
removing the
four screws (No.
27) that attach to
the vacuum’s body. (Figure H)
13. Attach tools to the handle and make sure
the two ends are tightly connected.
Proper Vacuuming Motion for
Large area with Direct suction
tools
1.
Begin with the wand parallel to
your body.
2. Draw the top of the wand in towards
your waist and twist at the waist
walking back and forward (a side-to-
side motion).
3. The motion is similar to mopping
and keeps the upper body and arms
from tiring.
MaiNtENaNCE iNstrUCtiON
WarNiNG -
The following
information is for use by qualified
service personnel only and is to provide
guidance for troubleshooting and
maintenance.
• UNPLUG the vacuum when working on
the motor or any electrical part.
• CHECK the condition of all electrical
cords before each use.
• DO NOT lubricate the motor; it is
equipped with sealed bearings.
• The appliance has NO user serviceable
parts.
PrOPEr stOraGE
When the vacuum is not in use, it should
be stored in a dry place.
ELECtriCaL COrD CarE
NeveR stretch the cord tightly between
the vacuum and the outlet. A cord that is
stretched or pulled will not function prop-
erly and creates a danger. After vacuuming,
unplug the cord and wind it up loosely.
DO NOT wind the cord up by wrapping it
around our hand and elbow.
CariNG FOr YOUr
VaCUUM
1. every time you finish vacuuming, shake
out the cloth and dust bags (No. 31 and
No. 32).
2. each week, rinse, dry and return the
foam (No. 21) at the bottom of the ap-
pliance below the motor.
3. After each shift, wipe the inside and
outside of the vacuum with a household
cleaning agent.
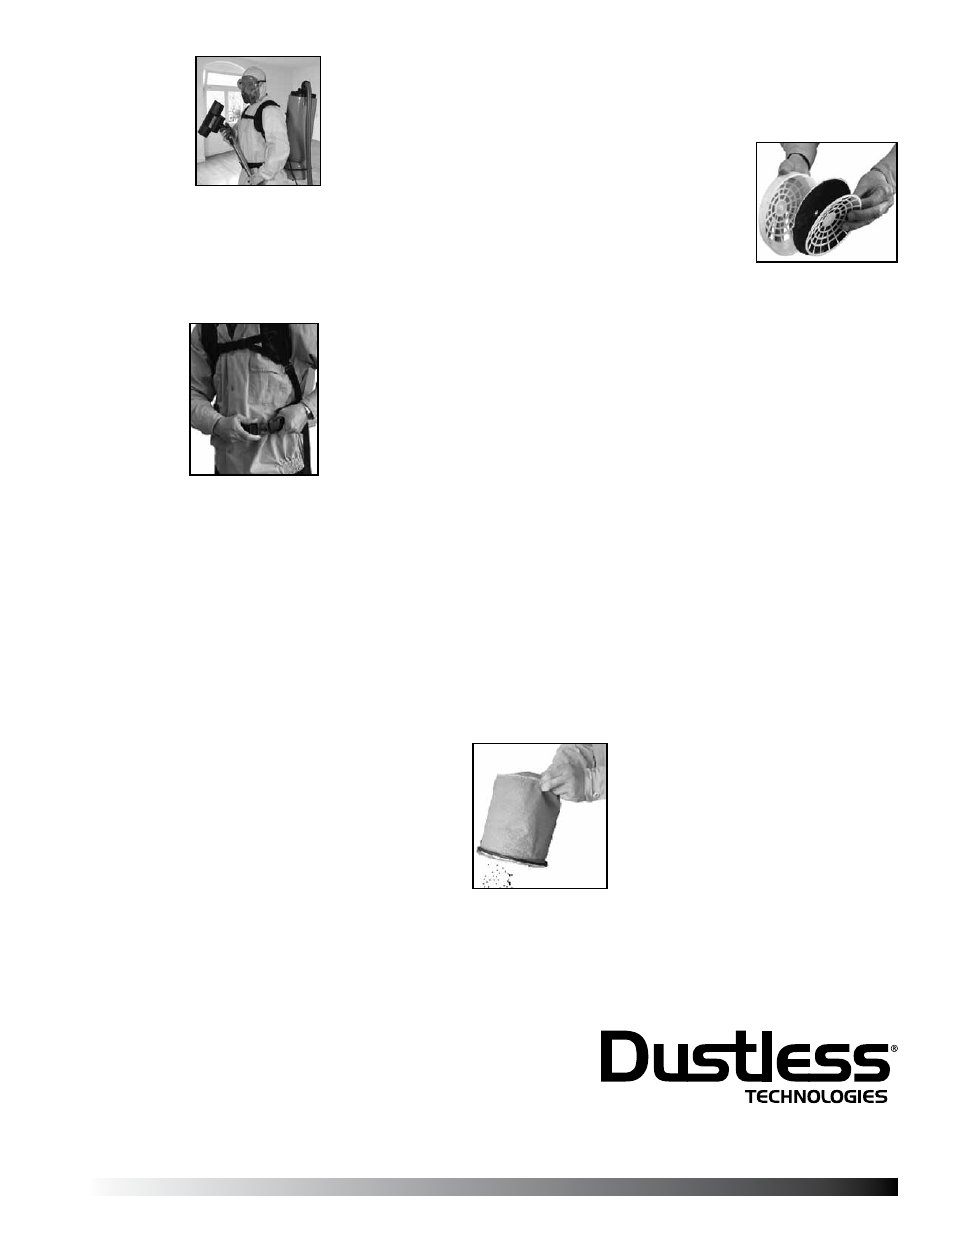
FiLtEr MaiNtENaNCE
1. Check the dust bag (No. 32) each
time you start and finish vacuuming.
A clogged and dirty dust bag restricts
airflow and results in reduced suction
and overheating.
2. While vacuum-
ing throughout
a building, stop
every two hours
or as needed to
shake out the
dust bag (No.
32). Replace the
dust bag when
necessary. (Figure J).
NOtE: Lift both
dust bag and cloth bag out at the same
time to avoid ripping the dust bag,
especially when it is full.
3. Once a month (or more often if neces-
sary) hand or machine wash the cloth
dust bag (No. 31) and let it LINe DRY.
(Do not put it in the dryer)
4. Once a month
(or more often
if
necessary)
clean the
filter (No. 2)
between the
motor guards,
located inside the vacuum under the
paper and cloth dust bag. (Figure K)
a. Pull the top piece of the motor guard
(No. 1) off and remove the foam
media (No. 2). Shake it out, rinse it
and let it air dry thoroughly.
b. Before the next use, return the foam
media (No. 2) to its place. Replace
with new foam media if necessary.
c. Firmly snap the top piece of the mo-
tor guard (No. 1) into place.
5. each week rinse, air dry, and return the
foam filter (No. 22) at the bottom of the
appliance below the motor.
a. Pull out the round rubber support
(No. 21) and take foam filter (No.
22) out, rinse it and let it air dry
thoroughly.
b. Before the next use, return the foam
filter (No. 22) to its place.
c. Put the round rubber support (No.
22) into the canister to support the
foam filter from falling down.
Figure H
Manual110810
1285 East 650 South, Price, Utah 84501
p
435.637.5885
f
435.637.5895
www.dustlesstools.com
Figure J
Figure K
Figure D