Great Plains 20P Series Drill Assembly Instructions User Manual
General information, Assembly instructions, Small seeds box and rear drive assembly
1
Installation Instructions
Great Plains Mfg., Inc.
© Copyright 1999 Printed 08/16/2005
Used with:
•
•
133-187M
15P and 20P Series Drill
Small Seeds Option and
Walkboard Update
1510P and 1520P Drills
2010P and 2020P Drills
General Information
These instructions explain how to install the small-seeds attach-
ment and walkboard update. The small-seeds attachment
mounts behind the main drill box and allows you to evenly seed
very fine seeds.
These instructions apply to:
133-171A
15P 7 1/2” Small Seeds Option
133-172A
15P 10” Small Seeds Option
133-173A
20P 7 1/2” Small Seeds Option
133-174A
20P 10” Small Seeds Option
133-176A
15P Small Seeds Update, for drills built prior to Nov.
2001 without a flip-up walkboard.
133-183A
20P Small Seeds Update, for drills built prior to Nov.
2001 without a flip-walkboard.
133-184A
15P Small Seeds Update, for drills built prior to Nov.
2001 with a flip-up walkboard.
133-185A
20P Small Seeds Update, for drills built prior to Nov.
2001 with a flip-up walkboard.
Manual Update
Refer to the drill operator’s manual for detailed information on
safely operating, adjusting, troubleshooting and maintaining the
small-seeds attachment. Refer to the parts manual for part iden-
tification.
•15P Series Drill Operator’s Manual . . . . . . . . .118-732M
•20P Series Drill Operator’s Manual . . . . . . . . .118-740M
•15P Series Drill Parts Manual . . . . . . . . . . . . . 118-732P
•20P Series Drill Parts Manual . . . . . . . . . . . . . 118-740P
Definitions
Right and left as used in this manual are determined by facing
the direction the drill will travel in the field.
Assembly Instructions
For drills without flip up walkboards it will be necessary
to first install a walkboard update kit. Refer to the infor-
mation at the left of to determine which kit applies to
your drill then follow the instructions starting on page 7
to update your walkboards.
Small Seeds Box and Rear Drive
Assembly
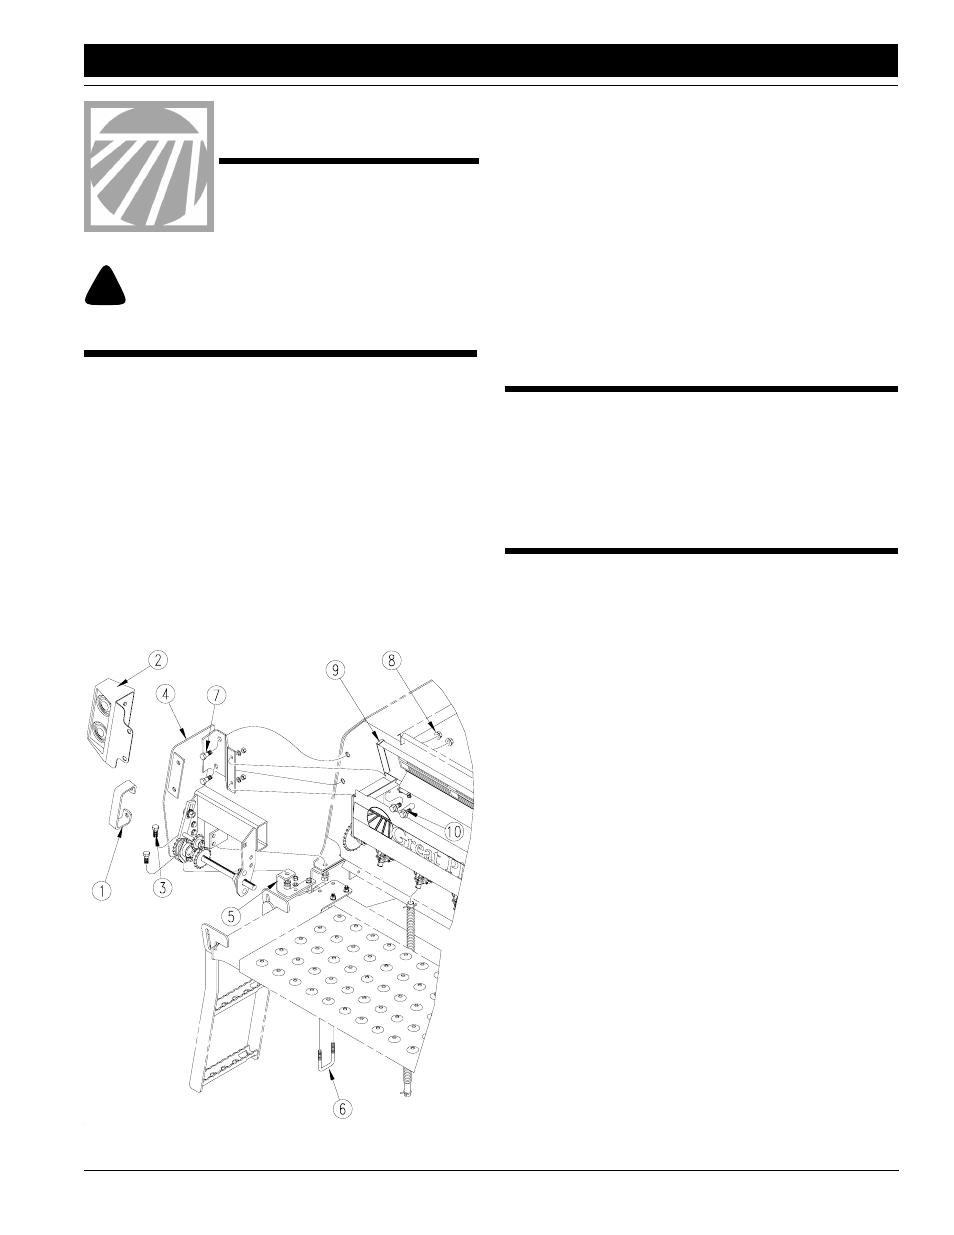
Refer to Figure 1
1.
Working at left-hand side of drill remove handle (1)
and light assembly (2) from back side of main drill box
and set aside. Keep hardware for later use. Remove
and save 1/2” x 1 1/4” bolt (3), lock washer and nut
which joins main drill box to drill frame.
2.
Remove nuts and lock washers on the outside U-bolt
(6) and attach mount channel (5).
3.
Fasten top of mount (4) using 1/2” x 1 1/4” bolts (7)
supplied with kit, and 1/2” flange nuts (8) removed in
step 1 to the rear of main drill box at the holes where
the handle and light assembly were removed.
4.
Attach lower part of mount (4) to the back hole of the
mount channel (5) using 1/2” x 1 1/4” bolt, 1/2” lock
washer and 1/2” nut supplied in kit. At the front hole
mount to main drill box and drill frame using 1/2” x 1
1/4” bolt, lock washer and nut removed in step 1.
Refer to Figure 2 page 2
5.
Remove 3/8” x 1" bolts (1) and 3/8” flange nuts (2)
from main drill box and set aside for later use. (see fig-
ure 2, page 2)
Refer to Figure 1
6.
Attach the left-hand side of the small seeds box (9) to
the mount (4) using 3/8” x 1" hex flange bolt (10), 3/8”
When you see this symbol, the subsequent instructions and
warnings are serious - follow without exception. Your life and
the lives of others depend on it!
!!
Figure 1
Small Seeds Box LH