Using your speakers – Revel C560DT User Manual
Page 7
7
In-Ceiling Architectural Loudspeaker
Instruction Manual
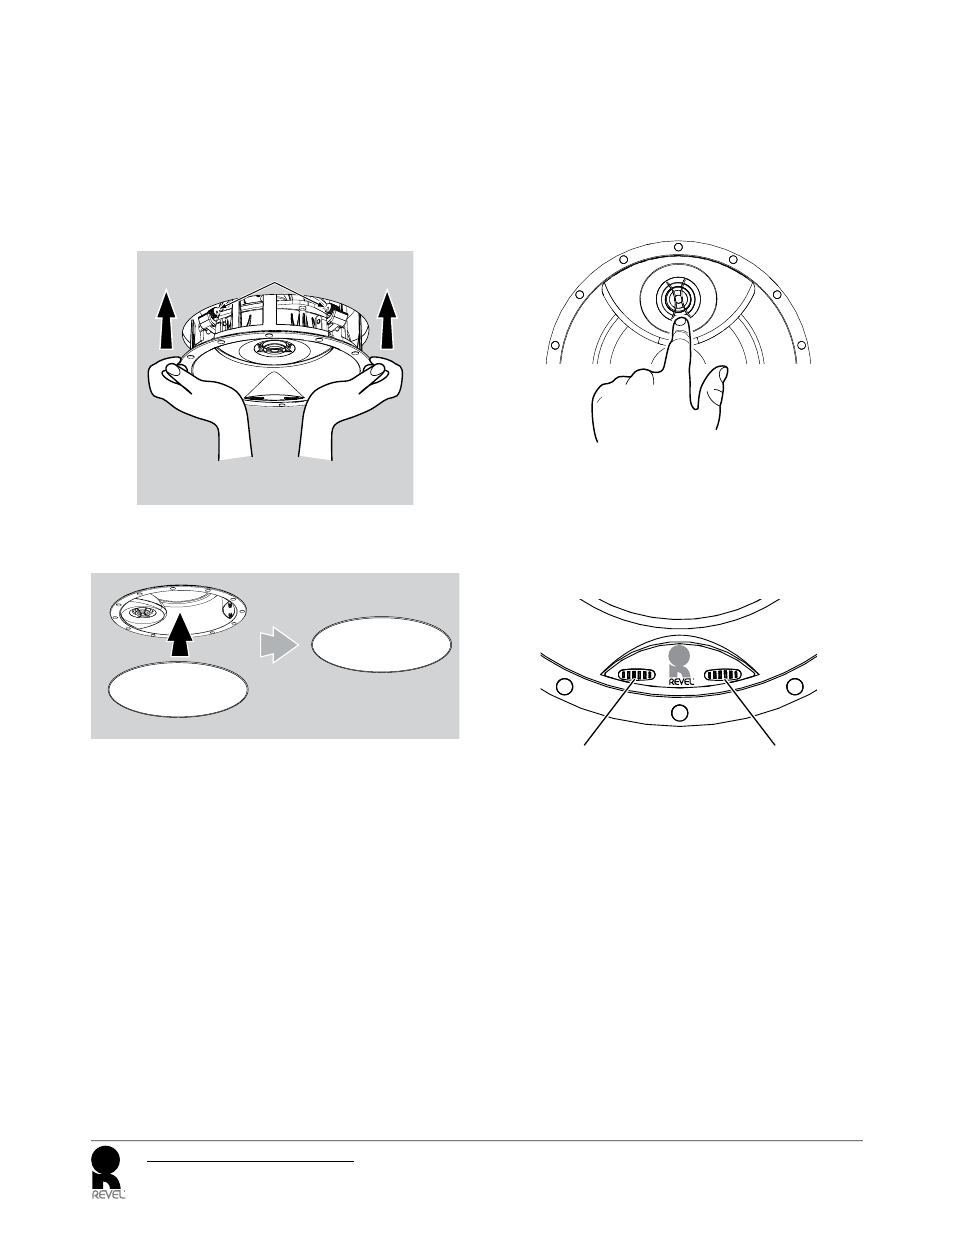
7. Using two hands, carefully insert the speaker into the mounting
opening, pressing evenly around the baffle. Ensure that the RollerLock
tool-less mounts are in their locked, ready-to-mount, position and that
none have accidentally been pushed outside the mounting opening.
As you insert the speaker, the RollerLocks will rotate into the locking
position and will firmly clamp the speaker into the mounting opening.
IMPORTANT: Be sure to insert the speaker straight into
the opening. Do not tilt the speaker while inserting it.
Use Both Hands to
Insert Speaker Straight Into
Mounting Opening
RollerLocks Inside
Mounting Opening
8. Attach the supplied round or square grille. Powerful magnets in the
speaker frame will securely hold the grille in place.
Attach Supplied Grille
Painting the Grille
Revel architectural loudspeaker grilles can be painted to match any
décor. If you wish to change the grille’s color, its satin finish will function
as a primer coat. For the best results follow this procedure:
1. Gently remove the scrim cloth from the back side of the grille before
painting.
2. Use a high-quality spray paint and apply a thin coat of color. Ensure
that the grille perforations remain free of paint. Filling them with
paint will diminish the speaker’s sound quality. If any perforations are
plugged, use compressed air to blow the paint out of the perforations.
Note: If you find any grille perforations that are plugged with paint
after the paint has dried, carefully use a straight pin or sewing
needle to remove the paint.
3. We have included round and rectangular replacement scrim cloths.
After the paint has dried, apply a light coat of spray adhesive to
the inside of the perforated grille and attach a new scrim cloth.
IMPORTANT: Never spray adhesive on the cloth.
uSing YouR SpeAkeRS
AdjuStmentS
Adjustable Angle Tweeter (C780/C760/C580/C560/C380/C360)
Most Revel in-ceiling speaker models allow you to adjust the angle of
the tweeter. To change the angle, press on the tweeter’s outer ring as
shown in the illustration below. Be careful not to touch the tweeter
diaphragm or suspension.
Boundary Compensation Control (C780/C760)
The Boundary Compensation control reduces the speaker’s bass output
level to compensate for the greater reflection of bass energy when the
speaker is placed near a wall.
When possible, avoid mounting the speaker within 2 ft (0.6m) of a
wall. If such placement is unavoidable, set the Boundary Compensation
control to the “On” position.
Boundar y
Compensatio n
High Frequen cy
Level
OFF
ON
0 +
–
High-
Frequency
Level Control
Boundary
Compensation
Control
High-Frequency Level Control (C780/C760/C580/C560)
The High-Frequency Level control lets you fine-tune the speaker’s high-
frequency output to compensate for various acoustical environments.
The control has three settings:
+: Increases high-frequency output. Set the switch to this position
if the room has many features that absorb high-frequency sound energy,
such as thick carpeting, drapes and fabric-covered furniture.
0: Normal high-frequency output. Set the switch to this position for
most installations.
–: Decreases high-frequency output. Set the switch to this position
if the room has many features that reflect high-frequency sound energy,
such as large uncovered windows, bare tile floors and large expanses of
bare walls, or if the speakers are used without grilles.