Batteries: (3) 377 – LaserLyte LT-C556 - Large Rez Size User Manual
Page 2
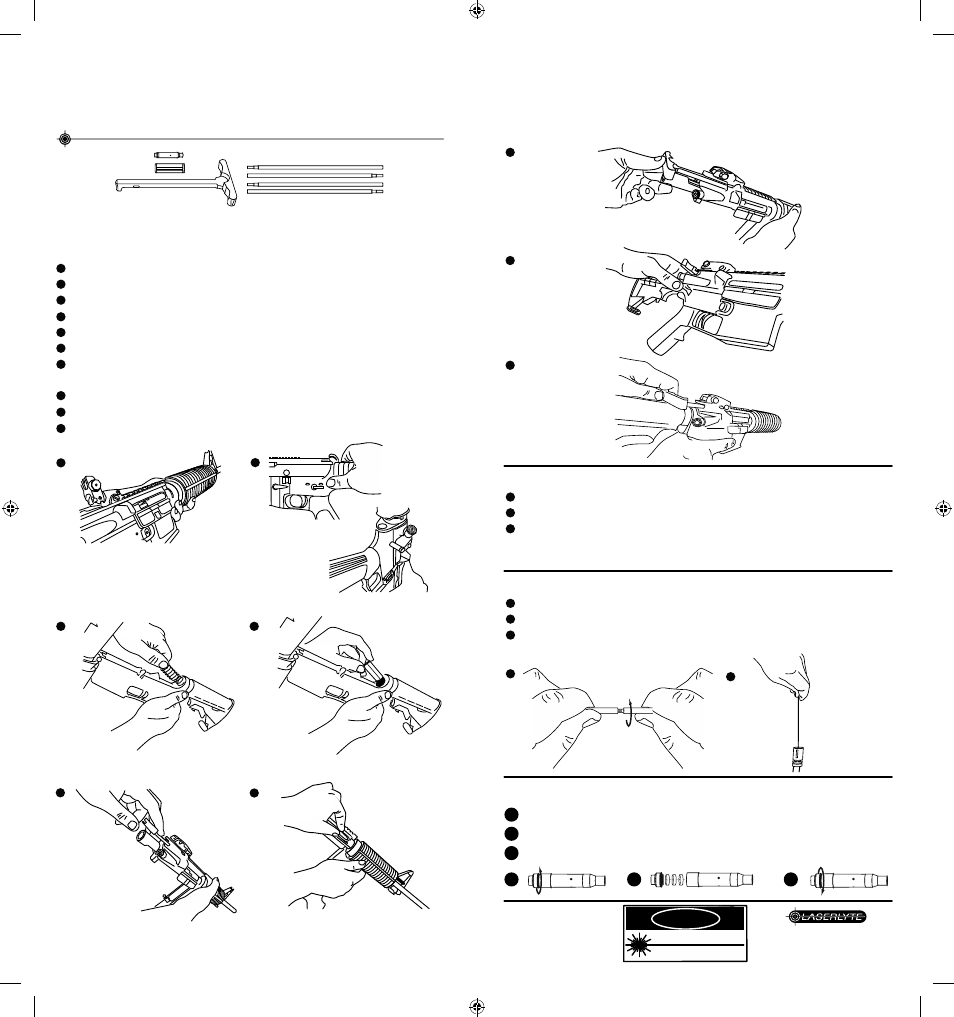
AR TRAINING KIT
NEVER FIRE LIVE AMMO WITH TRAINING PARTS
NEVER FIRE LIVE AMMO WITH TRAINING PARTS
NEVER FIRE LIVE AMMO WITH TRAINING PARTS
NEVER FIRE LIVE AMMO WITH TRAINING PARTS
LT-C556
1
1
2
4
8
9
5
6
2
3
4
5
6
7
1
1
2
3
8
9
10
INSTALLATION:
Unload Firearm. Follow all firearm safety guidlines.
Push out takedown pin. Separate upper and lower receivers.
Depress buffer retainer and remove buffer and spring.
Install LaserLyte buffer block and reinstall buffer and spring.
Remove bolt carrier group and charging handle.
Insert LT-223 into chamber.
Install LaserLyte red charging handle and original bolt carrier
group.
Reassemble upper and lower receivers. Push in takedown pin.
Use charging handle to reset firing pin.
Pull trigger and engage target.
2
4
3
1
2
3
ACTIVATION:
Pull charging handle to reset firing pin.
Pull trigger.
Repeat.
Assemble the push rods.
Gently push out laser trainer.
Reverse the Installation steps for all other parts.
REMOVAL:
DANGER
LASER LIGHT AVOID DIRECT EYE EXPOSURE
POWER OUTPUT < 5mw WAVELENGTH 630-670mm
CLASS IIIa PRODUCT
WARRANTY:
Three Year Limited
Warranty.
®
30 N. Alamos Drive - Cottonwood, AZ 86326
Phone 928-649-3201 - Fax 928-649-3970
www.LaserLyte.com
1
1
2
3
2
3
Unscrew the back of the laser located near the rim of the cartridge.
Take out old batteries and insert new batteries with positive (+) facing out.
Screw the cap back on all the way.
Batteries: (3) 377
7
LT-223 Laser Trainer
Buffer Block
Push Rods
Charging
Handle
LTC556.indd 3-4
12/4/13 9:18 AM