Front panel and remote back panel – Krell Cipher User Manual
Page 2
2
Krell CIPHER
Krell CIPHER 3
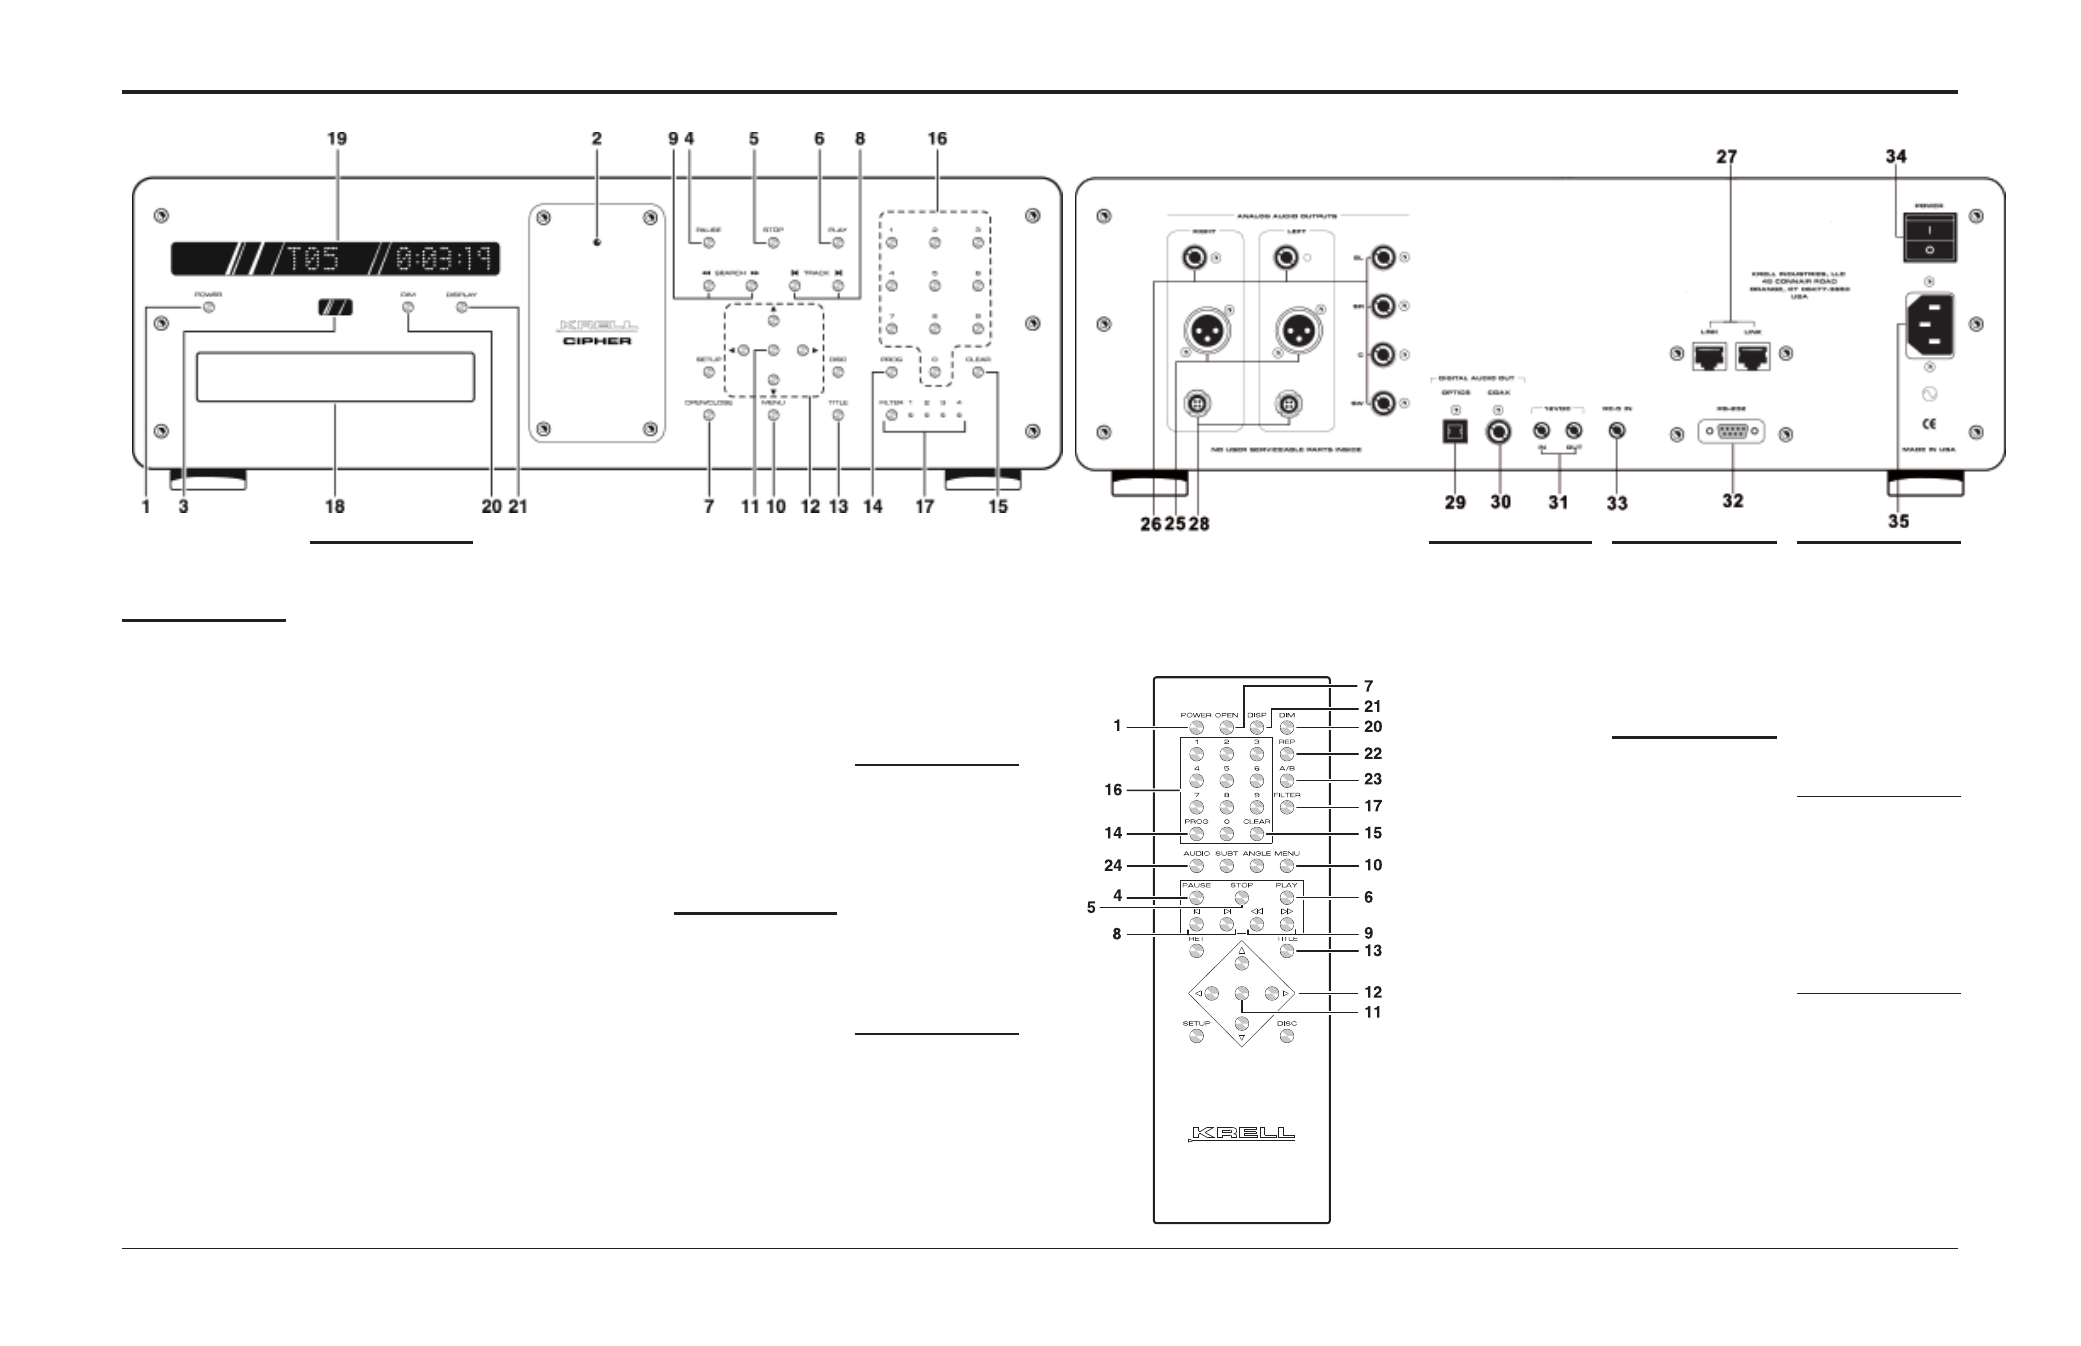
Figure 1 The CIPHER Front Panel
Figure 3 The CIPHER Remote
Figure 2 The CIPHER Back Panel
This product is manufactured in the United States of America. Krell
®
is a registered trademark of Krell Industries, LLC., and is restricted for use
by Krell Industries, LLC. its subsidiaries, and authorized agents. TosLink
®
is a trademark of Toshiba Corporation. All other trademarks and
trade names are registered to their respective companies.
© 2011 by Krell Industries, LLC., All rights reserved
Front Panel
and Remote
Back Panel
TRANSPORT
4 Pause
Temporarily suspends
playback of a track.
To resume playback at
the point pause was
engaged, press play.
5 Stop
Stops disc playback.
6 Play
Starts playback from the
beginning of the disc.
7 Open/Close Button
Opens and closes the
disc transport.
8 Track Forward and
Back
Track Forward.
Selects
the track that follows the
current track.
Track Back. Selects the
track that precedes the
current track.
Search. Press repeated-
ly (do not hold) to skip
multiple tracks.
9 Search Forward and
Back
Press to scroll forward or
backward in the current
track. Press play (6) to re-
turn to normal playback.
10 Menu
Access 5 menu choices:
1) Info, 2) Disc Text, 3)
SACD Default, 4) System
Info, and 5) SPDIF con-
trol options.
POWER
1 Power
Switches the CIPHER
between stand-by and
operational modes.
2 Stand-by and Power
LED
Stand-by. The red
stand-by LED illumi-
nates when the CIPHER
is switched on from the
back panel, indicating
that the player is in the
stand-by mode and
ready to be switched to
the operational mode.
Power. The blue power
LED illuminates when
the CIPHER is in the
operational mode.
3 Infrared Sensor
Receives commands
from the CIPHER remote
control. For proper
remote control operation,
do not obstruct the
infrared sensor.
11 Enter
Press to select one of
the 4 menu choices list-
ed above (10).
12 Directional Arrows
Press the up or down
arrows to navigate the 3
menu choices.
13 Title
Selects the format:
conventional CD (
CD
),
two-channel SACD
(
SACD Stereo
), or multi-
channel SACD
(SACD
Multi
). The default format
is
SACD Multi.
The current-
ly selected format
appears in the front
panel display (19) imme-
diately after being
selected. Each format is
selectable in the menu.
14 Prog
Press
PROG
to begin pro-
gramming a sequence
of tracks. If a disc is
playing, press
STOP
(5)
and then press
PROG.
To set up a program.
Press
PROG
(14) then
enter a track number
and press
ENTER
(11).
Repeat until all desired
tracks are entered.
Press
PLAY
(6) to begin
the program.
To exit the program
mode. Open the trans-
port (18) or press
STOP
(5) and then press
PROG
(14) twice.
15 Clear
Press to delete an un-
wanted entry in a pro-
gram sequence.
16 Direct Track Access
Use buttons or keys
1 through 9 to access
each track in a disc
directly.
If tracks consist of 2
digits, press the buttons
or keys within 2 sec-
onds of each other.
17 Filter
Selects filter responses
for disc formats.
1 - 4 for SACD
1 - 2 for CD
18 Disc Transport
Holds the disc.
DISPLAY
19 Front Panel Display
Shows disc type and
format, and the current
status of the disc. The
phrase
CHANGING LAYER
appears in the front
panel display while the
disc moves between
conventional CD and
SACD layers.
20 Dim
Reduces the illumination
of the front panel display
(19).
21 Display
Cycles the front panel
display between 4
choices: remaining track
time, elapsed track time,
elapsed time on the
disc, and remaining disc
time.
REMOTE ONLY
22 Repeat
Replays selected track
or entire disc until new
feature is selected.
23 Repeat A/B
Loop between 2 prede-
termined points within
a single track or sequen-
tial tracks.
24 Audio
Cycles between the
stereo and multi-channel
layers of a SACD disc.
INACTIVE
Front Panel.
SETUP
and
DISC
buttons are inactive.
Remote.
SUBT, ANGLE, RET,
SETUP,
and
DISC
keys are
inactive.
ANALOG AUDIO
OUTPUTS
25 L and R Balanced
Analog Audio Outputs
One pair of balanced
outputs with XLR con-
nectors.
26 Multi-channel Single-
ended Analog Audio
Outputs
For connection to a
multi-channel receiver,
with RCA connectors:
L, R = left and right
channel connections.
C = center channel
connection.
SW= subwoofer
connection.
SL, SR = left and right
surround channel
connections.
27 CANLink
Each CIPHER has two
RJ-45 link connectors,
connected in parallel.
These connectors are
used to operate the
CIPHER in link mode,
with other Evolution
products.
28 CAST Audio Outputs
One pair of CAST out-
puts with 4-pin bayonet
connectors, for use with
Krell CAST-equipped
preamplifiers.
DIGITAL AUDIO
OUTPUTS
29 Optics Output
One EIAJ fiber optical
digital output with a
TosLink connector.
30 Coax Output
One S/PDIF coaxial digi-
tal output with an RCA
connector.
BACK PANEL REMOTE
CONNECTIONS
31 12 VDC In/Out
(12 V Trigger)
Out. Activates a 12 VDC
signal when the player is
in the operational mode
that may be used to turn
on other devices
equipped with a 12V trig-
ger input.
In.Sets the player in the
operational mode when
a 12 VDC signal is
applied to this connec-
tion.
32 RS-232
The RS-232 communica-
tion port allows you to
send and receive opera-
tional instructions to and
from the CIPHER via an
external computer con-
trol system.
33 RC-5 In
Accepts baseband RC-5
input commands from
hardwired remote con-
trollers.
POWER
34 Back Panel Power
Switch
Use this switch to
change the CIPHER
from off to stand-by.
35 IEC Connector
Use the provided IEC
standard 15 amp power
cord. The switch should
remain unobstructed for
ease of operation and in
case of an emergency.
IMPORTANT
Do not attach enhance-
ment accessories such as
rings, mats, or dampers
to individual discs. These
accessories may interfere
with the disc transport,
resulting in erratic play-
back and/or poor sound.
Note
The CIPHER incorporates
an advanced suspension
system and does not
require additional mass
coupling or isolation. You
may experiment with feet or
cones as long as they are
not permanently affixed to
the unit. Any unauthorized
modifications to the unit or
electronics voids the war-
ranty.