Lr l r – E-flite Clipped Wing Cub 250 ARF User Manual
Page 24
24
EFL Clipped Wing Cub
1
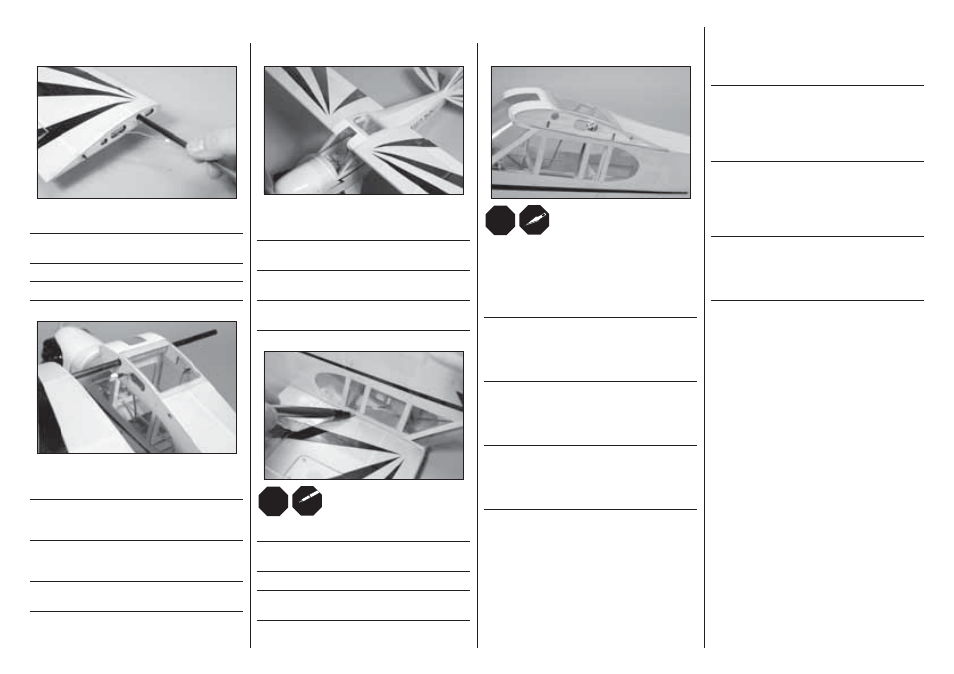
Slide the wing tube into the wing tube socket.
Schieben Sie den Flächenverbinder in die Öffnung an
der Tragfl äche.
Faire la clé d’aile dans le réceptacle du tube de l’aile.
Inserire il tubo nella sua sede nell’ala.
2
Slide the wing panel into position, guiding the extensions
from the wing into the fuselage.
Schieben Sie die Tragfl äche in die richtige Position.
Führen Sie dabei die Verlängerungen vom Flügel in
den Rumpf.
Mettre en place le panneau de l’aile en le faisant glisser
et en veillant à guider les rallonges provenant de l’aile
dans le fuselage.
Far scorrere in posizione la semiala, guidando le
prolunghe dall’ala all’interno della fusoliera.
5
L
R
L
R
Carefully remove the covering from the side of the
fuselage 3/32 inch (2mm) above the line drawn in the
previous step, and 3/32 inch (2mm) below the top edge
of the fuselage to expose the underlying wood. Use a
paper towel and rubbing alcohol to remove the line once
the covering has been removed.
Entfernen Sie vorsichtig die Bespannung von der
Rumpfseite 2mm unter der gezeichneten Linie auf der
Innenseite. Entfernen Sie mit Reinigungsalkohol und
einem Papiertuch die gezeichnete Linie nach dem
Bespannung entfernt wurde.
Retirez délicatement l’entoilage à 2 mm au dessus de la
ligne précédemment tracée et à 2mm en dessous de la
partie supérieur du fuselage. Utilisez de l’alcool dénaturé
et du papier absorbant pour nettoyer la surface qui était
sous l’entoilage.
Con attenzione togliere il rivestimento sul fi anco della
fusoliera fi no a 2mm sopra alla riga tracciata prima e
2mm sotto al bordo superiore della fusoliera per esporre
il legno sottostante. Fatto questo usare un fazzoletto di
carta e alcol per cancellare la riga tracciata prima.
3
With both wing panels in position, make sure they fi t
tightly against the fuselage.
Bitte stellen Sie sicher, dass beide Tragfl ächen sauber
am Rumpf anliegen.
Avec les 2 ailes en position, assurez-vous qu’elles
s’ajustent parfaitement contre le fuselage.
Dopo aver posizionato le due semiali, accertarsi che si
adattino perfettamente alla fusoliera.
4
L
R
L
R
Trace the outline of the bottom of the wing on the fuselage.
Markieren Sie die Aussenlinie auf der Unterseite
der Tragfl äche.
Tracez le contour inférieur de l’aile sur le fuselage.
Tracciare sulla fusoliera il contorno della parte
inferiore dell’ala.
Î NOTICE: Do not cut into the underlying wood.
This will weaken the structure and could cause failure
in flight. As an option, use a soldering iron or hot
knife with light pressure to carefully melt the covering
and avoid the potential of cutting into the wood.
Î HINWEIS: Schneiden Sie nicht in das
darunterliegende Holz. Das schwächt die Struktur
und könnte zum Ausfall während des Fluges führen.
Verwenden Sie alternativ ein Bügeleisen oder heisses
Messer mit etwas Druck und schmelzen damit die
Bespannung, ohne die Gefahr das Holz zu zerschneiden.
Î REMARQUE: Ne coupez pas dans le
bois. Cela affaiblirait la structure pouvant aller
jusqu’à la rupture en vol. Une solution possible
est d’utiliser un fer à souder ou un couteau
chaud avec une légère pression pour découper
l’entoilage et éviter de couper dans le bois.
Î AVVISO: si raccomanda di non tagliare
il legno per non indebolire la struttura e avere
possibili cedimenti in volo. Come opzione si
può usare un saldatore o una lama riscaldata
per non premere troppo sul legno.
WING INSTALLATION•MONTAGE DER TRAGFLÄCHEN•INSTALLATION DE L’AILE•MONTAGGIO DELL’ALA