The hdelight, Uncompressed 1080p beam- to -tv kit, Quick installation guide – brite-View HDelight BV-1222 Quick Installation Guide User Manual
Page 2: Part 4 limited warranty, Part 3 operation, Activate the bv-1222 and set up the link, Bv-1222
Part 4 Limited Warranty
This limited warranty (hereinafter the Warranty) is valid for the BV-1222 (hereinafter the Product). The Warranty is only valid in the country where the Product
was originally purchased.
The Warranty only covers manufacturing defects, and excludes defects caused by the inappropriate use or storage of the Product.
The Warranty is issued by Xpike Innovation. Inc. to the end purchaser (hereinafter the Customer) of the Product.
In accordance with the Warranty, the Customer has a sole claim to demand repair or replacement of the Product but may not assert claims or seek compensation again
st the manufacturer/retailer for further losses (including, but not limited to, the indirect loss of data or profit).
The Warranty provides coverage over a period of 12 months, commencing from the initial purchase date of the Product by the Customer of Xpike Innovation. Subsequent
changes of ownership do not extend the warranty period.
The Warranty is valid with the proviso that the Product is shipped to Xpike Innovation within the warranty period. In the event of any faults or defects with the Product,
it must be shipped back to Xpike Innovation. Products will be repaired or exchanged at Xpike Innovation's own discretion. The warranty period is not extended for any
repaired or replaced Products. Exchanged parts are the property of Xpike Innovation .Inc.
The Warranty is valid solely on the condition that the original proof of purchase issued is presented with the Product.
, the brite-View logo, are trademarks of Xpike Innovation Inc., registered in USA.
or visit
for tech support.
www.brite-viewforum.com
For detailed operating instructions, please visit
to download the user manual.
www.brite-view.com
1 2 3 4
DC IN
HDMI OUT
High Def. Flat-panel TV
Y/Pb/Pr
Video
RGB
S-Video
HDMI
SERVICE
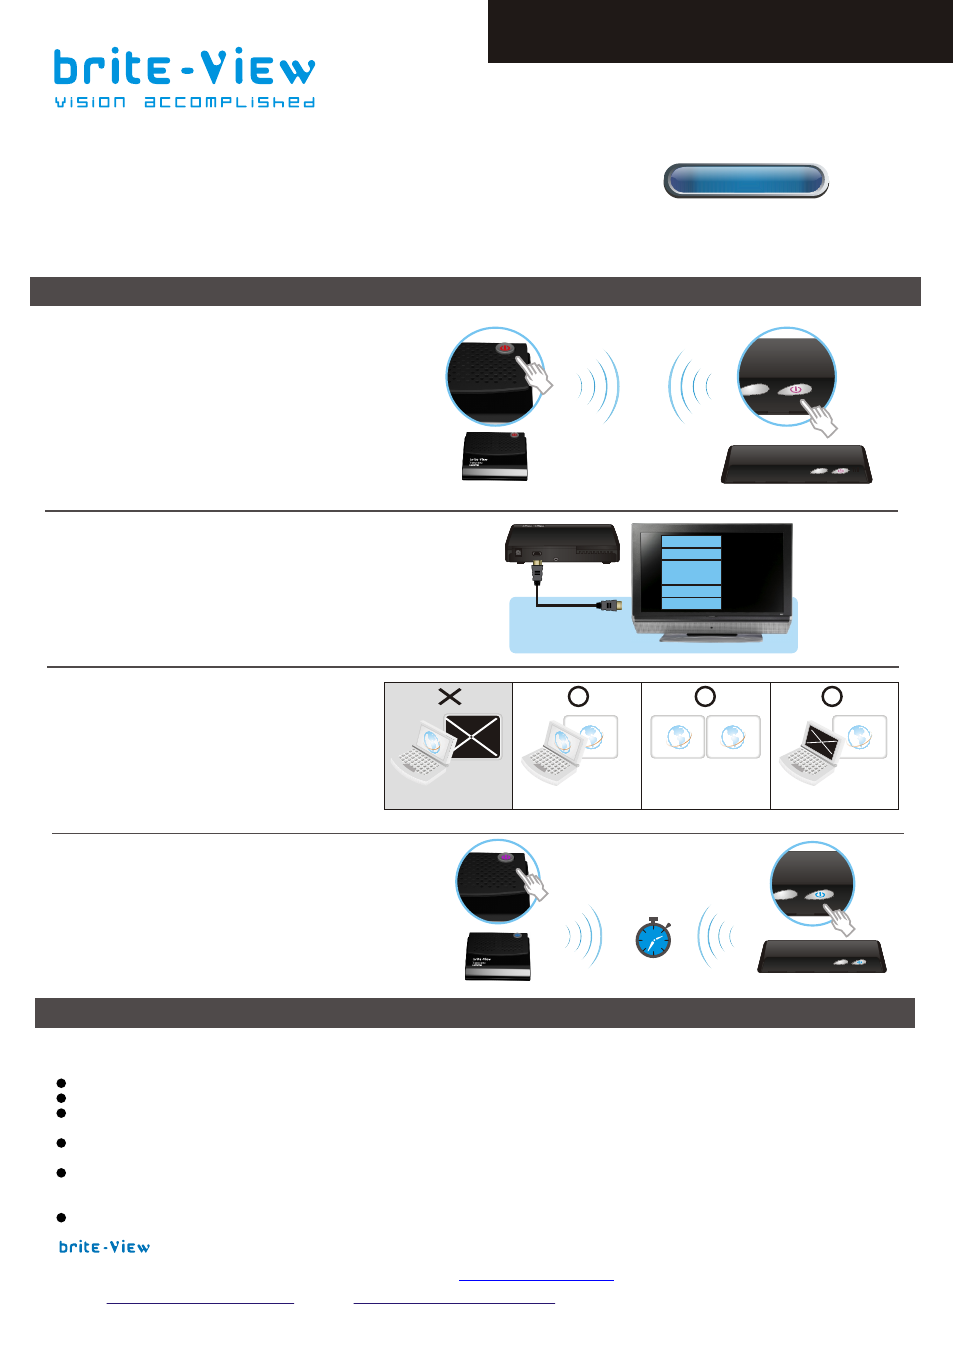
Part 3 Operation
Once the power adapters to both the BV-1222T
and the BV-1222R are plugged it, the HDelight
will be turned on automatically.
Press the POWER button on the top of the
BV-1222R and BV-1222T to turn them on again
when the POWER LEDs are red.
Power on your TV set and go to the
source menu under the settings menu
of your HDTV set.
Then select the HDMI input to which
the BV-1222 receiver is connected
Whenyou connect the PC to transmitter,
make sure the display of your HDMI-ready
computer is set to be in "Duplicate",
"Extend" or "Project only" for image on
the external display.
If all operation is normal, the POWER LED and
SOURCE LED will be lit in solid blue, and the user can
press the INFO./CHANNEL button on the top of the
BV-1222R box to check the status of signal quality
and related information.
Activate the BV-1222
and Set up the Link
IB03820199 Rev.B
BV-1222
Quick Installation Guide
The HDelight
Internet
Inte
rne
t
Inte
rne
t
Internet
Internet
Internet
Computer only
Duplicate
Extend
Projector only
Uncompressed 1080p Beam- to -TV Kit