Quick setup, D2 setup guide – AudioEngine D2 24-BIT WIRELESS DAC User Manual
Page 5
D2 setup guide
6
7
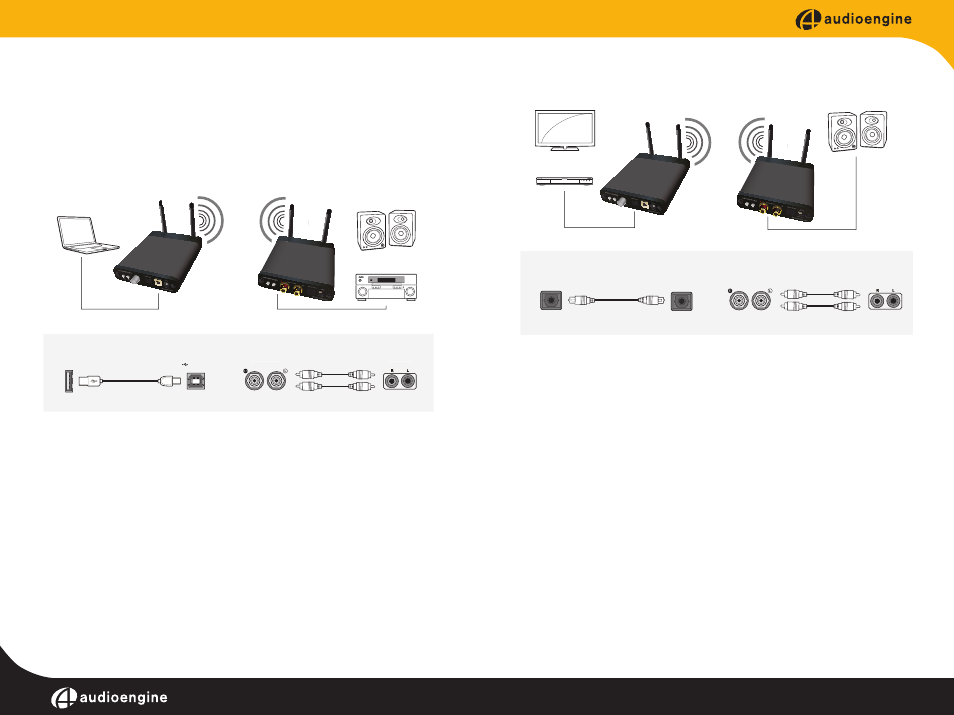
Quick Setup
The following diagrams show the most common configurations for D2
Setup.
Note: For maximum range, ensure that both antennae are upright.
USB from your computer
Step 1 -- Connect the D2 Sender to your computer USB port.
For PC, the D2 should be recognized automatically.
For Mac, under System Preferences/Sound, select “Audioengine D2”
Step 2 –- Connect the analog output of your D2 Receiver to any audio
input of your active speakers, stereo, etc.
Step 3 -- Connect the D2 power adapter to the D2 Receiver, and to an
AC power source.
Optical Source
Step 1 -- Connect an optical output of your computer, TV, Blu-Ray, DVD,
etc. to the optical input of the D2 Sender.
Step 2 -- Connect the D2 power adapter to the D2 Sender, and to an AC
power source.
Note: Verify that your source is set to PCM Stereo.
Step 3 –- Connect the analog output of your D2 Receiver to any audio
input of your active speakers, stereo, etc.
Step 4 -- Connect the D2 power adapter to the D2 Receiver, and to an
AC power source.
For advanced setup and other tips visit: audioengineusa.com
Analog Output
Analog Input
Analog Output
Analog Input
Computer
Computer
D2 Receiver
A5+ or AV Receiver
D2 Sender
USB Audio Input
Analog Audio Output
A5+ Powered Speakers
AV Receiver
OR
�
➊
➋
➊
➋
USB Input
D2 Sender
D2 Receiver
Audioengine D2 - Config A
OR
A5+ Powered Speakers
➋
TV
Blu-Ray/DVD/CD Player
Optical Audio Input
➊
➊
Optical Output
Optical Input
TV/Blu-Ray/DVD
D2 Sender
D2 Receiver
D2 Sender
Audioengine D2 - Config B
Analog Output
Analog Input
D2 Receiver
A5+ or AV Receiver
Analog Audio Output
➋