ATIK Cameras EFW2 User Manual
Electronic filter wheel 2 - user’s manual
Electronic Filter Wheel 2 - User’s manual
Thank you for purchasing the Atik Electronic Filter wheel 2 (EFW2) with USB. With it, you will be able to easily change filters without
touching the telescope. This is specially important when imaging, as it often happens that, when using manual wheels, autoguiders
tend to lose their guide star, due to shaking and/or backlash. With the Atik EFW2, you can change filters without disturbing autogu-
iding. Additionaly, and when using Atik Capture software or the Ascom driver, filter changing can be fully automatic, allowing for
unattended imaging sessions. Optional filter disks are available in different configurations, from 1.25” to 50.8mm, and can be easily
interchangeable by the user. Also, the optional Off-axis Guider module can be directly attached to the wheel itself.
Knowing your wheel
The EFW2 was designed to be easy to use. Adding filters is very simple as well as changing the internal disks. Additionally, you can
rotate the camera to the desired position without the need for extra adapters that add to the back focus distance. The following pic-
tures provide an overview of the EFW2 components:
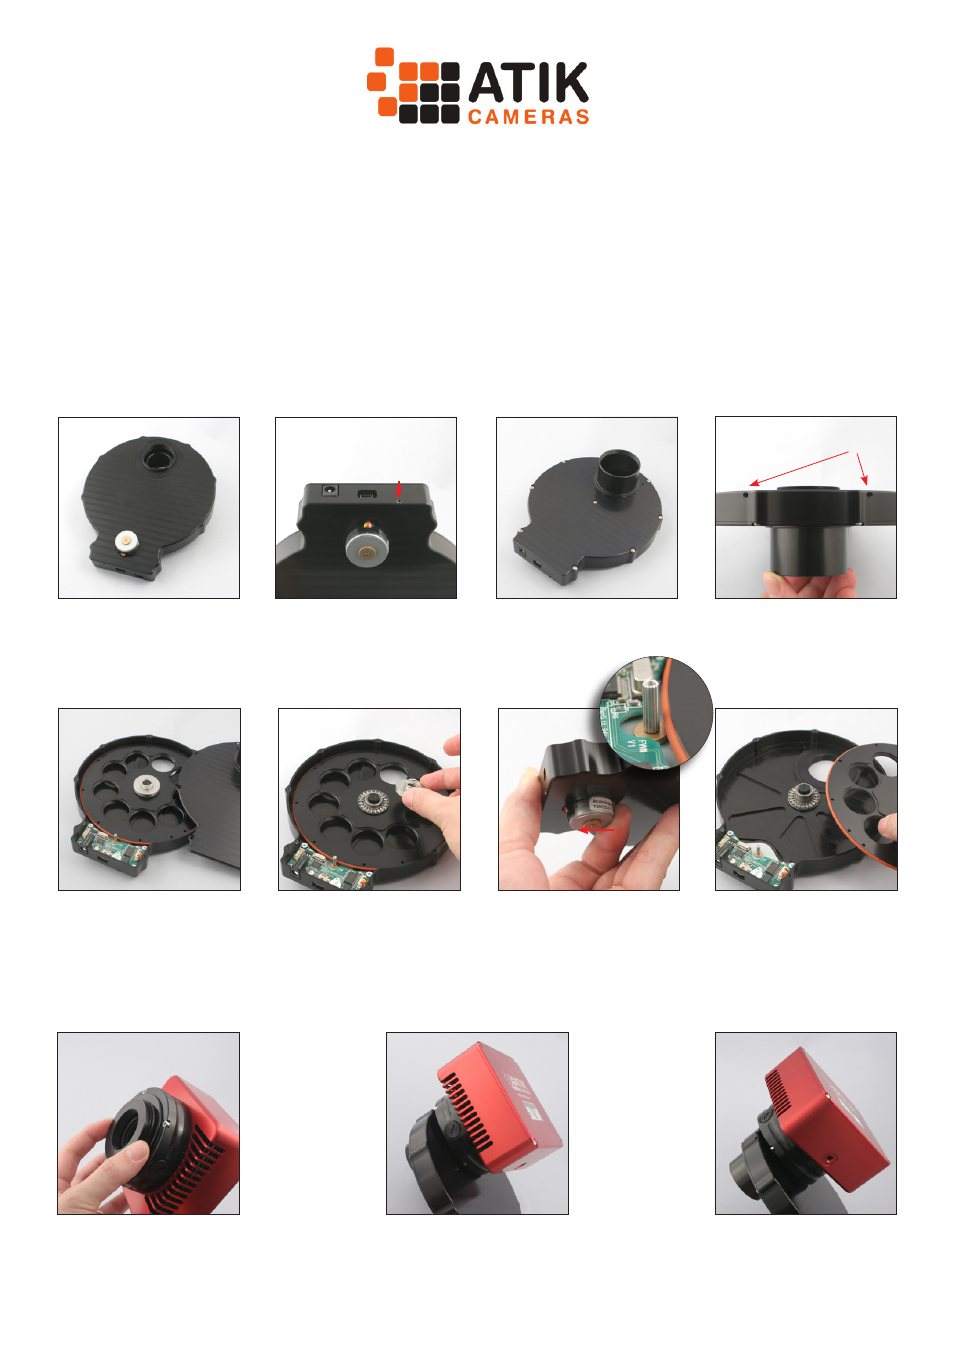
Loading filters and changing disks
Attaching your camera to the EFW2
1
2
3
4 5
6
7
Unscrew the screws and
take the cover off. Install fil-
ters in the numbered slots.
To remove the disk, take the
spring, metal bushing and
bearing off.
Push the motor in the direc-
tion of the USB socket. Note
that the shaft will detach
from the rubber.
Take the disk off while push-
ing the motor. To install the
new disk, repeat the process
in reverse.
Make sure the cover is
put back in place in an up-down motion,
to avoid bending the central spring.
Take the camera adapter off
the EFW2 and attach it to
your camera.
Insert the camera with the
adapter into the EFW2 and
screw in the two retaining
grub screws.
If camera rotation is needed,
slightly unscrew the two re-
taining screws, rotate and
tighten again.
1- Camera adapter; 2- Motor
3- Power input; 4- USB socket;
5- Motor tension adjustment
6- 2” adapter
7- Camera adapter locking
screws.