For non-3dr transmitters, 8 mount to x8, y6, or quad, Operating the gimbal – 3D Robotics GoPro HERO3 stabilization system User Manual
Page 4: 9 attach camera
4
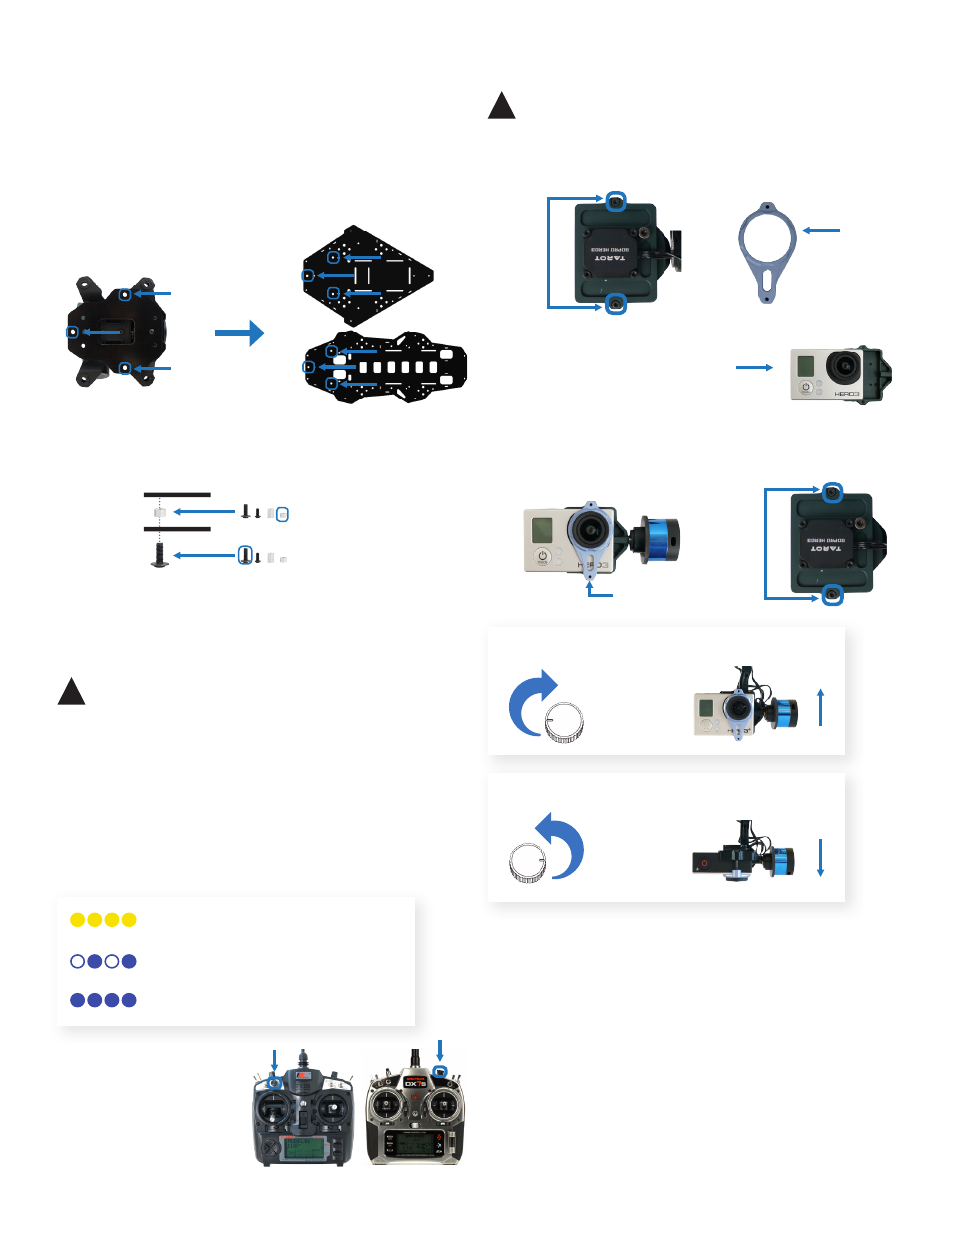
Rotate clockwise to level the camera.
Rotate counterclockwise to tilt the camera down.
For Non-3DR Transmitters
To calibrate a non-3DR transmitter to control the gimbal, you will
need to enable channel six for a knob on your transmitter during RC
calibration in Mission Planner or APM Planner. Once channel six is
enabled, the preconfigured Pixhawk settings will automatically
assign gimbal control to the selected control knob on the
transmitter.
If you are using a PPM encoder to connect to Pixhawk, you will need
to connect channel six from your RC receiver to the encoder before
calibration.
gimbal
interface plate
copter base plate
8 mm screw
3 mm spacer
Y6 base plate
connect to
Quad/X8 base plate
To mount the gimbal to your copter, add an 8 mm screw to each
of the three holes in the interface plate from below so that the
threads protrude from the top of the interface plate. Add a 3 mm
spacer to each screw above the interface plate, and attach the
screws to the three holes in the base plate of the copter indicated
below. The spacers should be between the gimbal interface plate
and the base plate.
8 Mount to X8, Y6, or QUAD
interface plate
Operating the Gimbal
Upon powering the copter, the gimbal will display a solid yellow
light while it is starting and calibrating. Do not touch the gimbal
while it is starting up. When the gimbal displays a blinking blue
light, it is ready to fly.
If the gimbal is not connected to the autopilot, it will perform
automatic stabilization without remote control, indicated by a
solid blue light.
Calibrating, do not touch gimbal
Ready, connected to autopilot
Ready, not connected to autopilot
For 3DR controllers, use the
channel 6 knob to adjust
the angle of the camera.
!
Important note: Flying with a gimbal will reduce your flight
time by as much as five minutes. Please plan your flights
accordingly.
Spektrum
FlySky
Remove the two screws securing the blue face plate,
and remove the plate.
1
face plate
remove
Slide camera into housing with
the lens nearest the top-right
corner.
2
!
Important note: Make sure that the WiFi on your GoPro
is turned OFF at all times when in use with a copter.
remove
9 Attach Camera
Place the blue face plate over the camera, and secure from the
back with the two original screws.
3
Add face plate.
tighten
Tarot Gimbal User Manual vA | ©3D Robotics, Inc. | 2 September 2014