Acuum, Aintenance, 0523-101q-sg588dx – Wood’s Powr-Grip MT89AC User Manual
Page 22: Disassembly/reassembly procedure
Rev 14.0/6-14
20
MT89AC: #35088
V
ACUUM
P
UMP
M
AINTENANCE
−
G
AST 0523-101Q-SG588DX
WARNING: Before proceeding with any maintenance, disconnect power source.
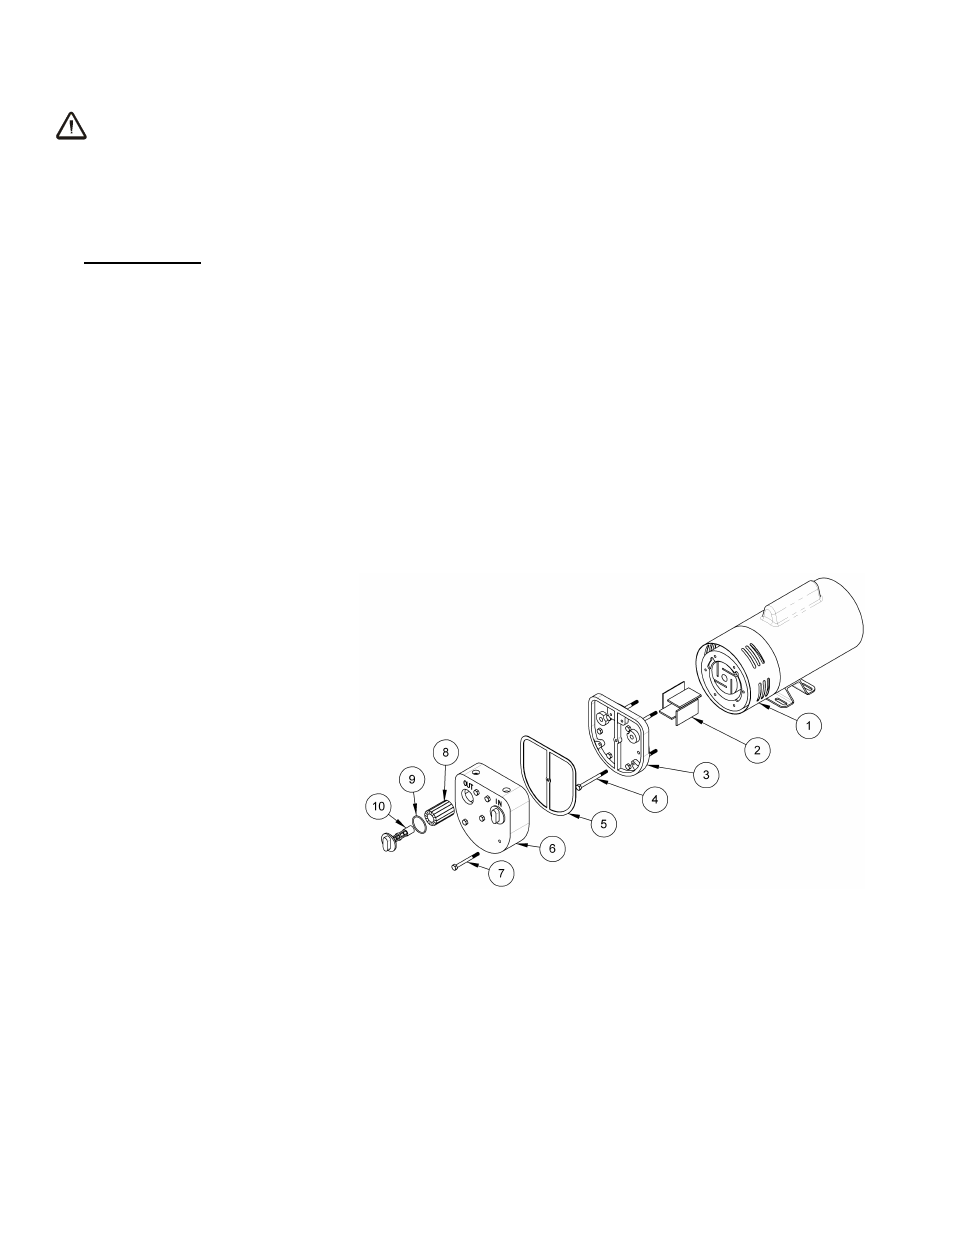
Disassembly/Reassembly Procedure
(includes replacing the air filters, vanes and gasket–see REPLACEMENT PARTS LIST)
1) Remove the end caps (10), O-rings (9) and air filters (8) from the sound chamber (6) of the
vacuum pump.
2) Remove the five bolts (7) and remove the sound chamber (6).
Note: If any liquid is discovered in the sound chamber, thoroughly dry all interior surfaces of
the pump prior to reassembly.
3) Remove the six bolts (4) from the endplate (3), and separate the endplate from the rotor
housing. The shroud (1) surrounding the rotor housing will loosen as well.
4) Note the orientation of the bevel on the vanes (2) for step 5. Then remove the vanes by
sliding them out the end of the rotor. If needed, rotate the rotor by hand to position the
vanes for easier access.
5) Make sure that the rotor and housing are clean and free of debris. Orient the new vanes (2)
like the old ones by matching the bevel. Then insert the new vanes by sliding them into the
empty slots in the rotor.
6) Reinstall the endplate (3) and secure it with the six bolts (4) previously removed.
7) Remove the gasket (5), and
make sure that the contact
surfaces between the endplate
and sound chamber are clean.
Install a new gasket and
reinstall the sound chamber
(6). Then secure the sound
chamber with the five bolts (7)
previously removed.
8) Replace the air filters (8).
Then reinstall the O-rings (9)
and end caps (10).
1 SHROUD
6 SOUND CHAMBER
2 VANES (4x)
7 BOLTS FOR SOUND CHAMBER (5x)
3 ENDPLATE
8 AIR FILTER (2x)
4 BOLTS FOR ENDPLATE (6x)
9 O-RING (2x)
5 GASKET
10 END CAP (2x)