Wolo 7950-A Lookout Plus User Manual
Page 2
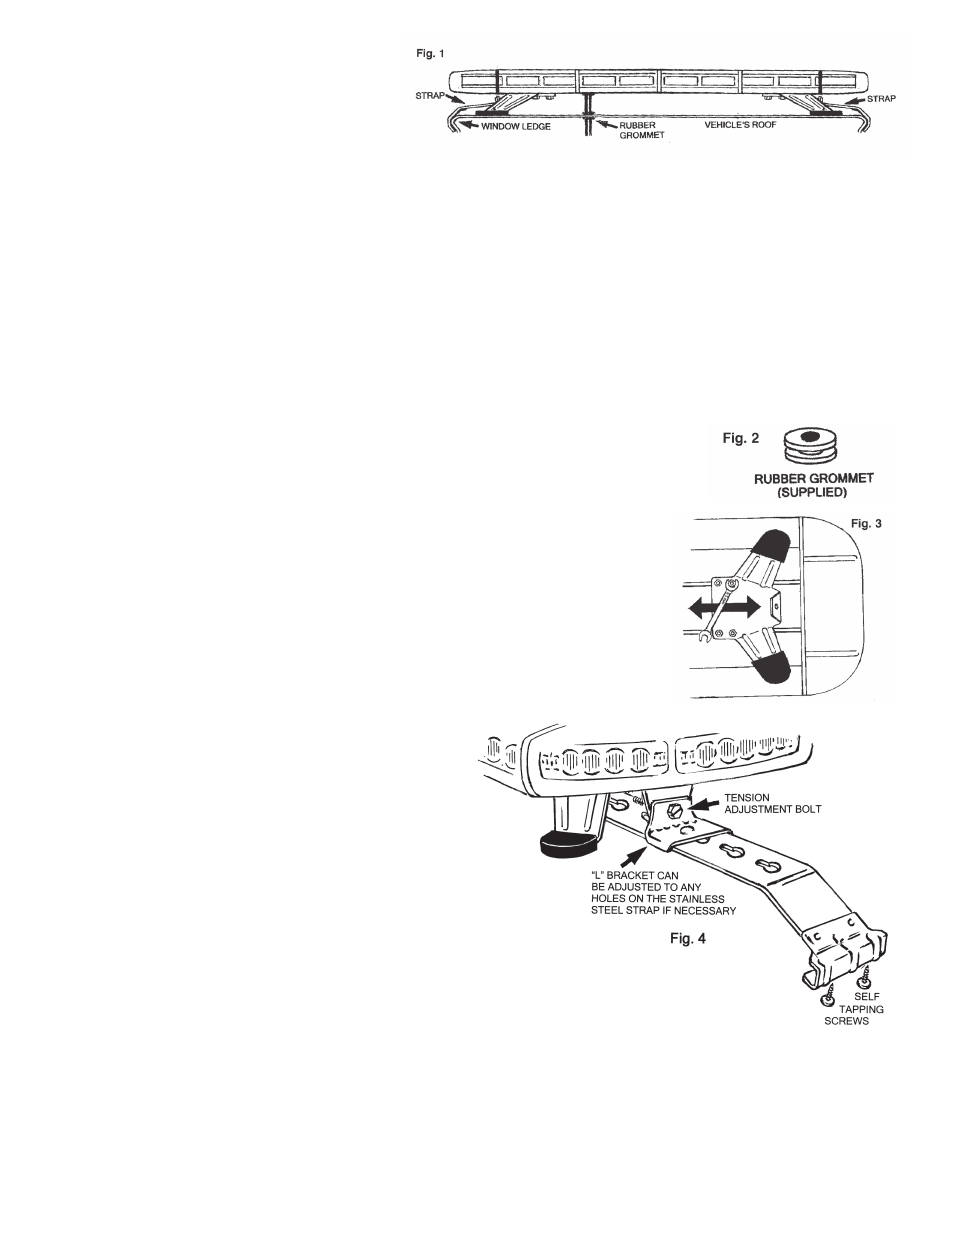
2. Make sure the selected location of the
light bar will allow the stainless steel
straps to attach to the vehicle window
ledge on both the driver’s and passenger
sides. See fig 1.
3. A 1/2’’ hole is needed to be drilled in the roof to route both cables into the interior of the vehicle. Mark the
desired hole location; remove the light bar from the roof and drill the hole. The installer must lower the
headliner to carefully inspect selected location to ensure that there are no components, wires and or any
other vehicle part that could be damaged before drilling. WARNING: The roof has support members that
span across from the driver’s and passenger side of the vehicle. NEVER drill into a support member! It will
be necessary to relocate cable’s access hole to avoid coming into contact with the support member.
4.
IMPORTANT: Protect the vehicle’s interior headliner from damage that could be caused when drilling the
access hole for the light bar’s power cable. Always allow a minimum distance of 6“ to 8” between the roof
and headliner by lowering the headliner before drilling the access hole.
5.
IMPORTANT: Always de-burr the access hole by using a round file to ensure there are no sharp edges.
6. Supplied with the light bar is a rubber grommet; insert the grommet into the
access hole. See figs. 1 and 2.
7. Position the light bar back onto the roof of the vehicle. There are two
adjustable brackets located on the bottom of the light bar. The installer will
need to adjust the location of the two brackets, each having two-(2) rubber
pads, to be close to the edge of the roof.
IMPORTANT: Always make sure
that each of the protective rubber pads are in full contact with the roof. To
adjust each bracket, loosen the four 9.5mm bolts, slide the bracket into
position, and tighten the bolts securely. Repeat the same procedure for the
bracket on the other end of the light bar. See fig. 3.
8. Remove the tension adjustment bolts from brackets located on the bottom of
the light bar. See fig. 4.
9. Open the vehicle’s door and determine the location
that the stainless steel strap will clamp to the
windows ledge. You may need to move the rubber
weather-strip away from the vehicle. Only remove
enough weather-strip so that the area where the
stainless steel strap will be secured to the vehicle
is exposed. Repeat the procedure for other side of
vehicle.
10. Remove the blue protective film covering the
stainless steel straps. Place one of the stainless
steel straps into position on the window ledge
so the installer can determine which hole in the
stainless steel strap is best to attach the “L” bracket.
Insert the tension adjustment bolt through the
strap’s stainless steel “L” bracket and thread bolt
into the light bar’s bracket, hand tighten.
IMPORTANT: The stainless steel strap can be repositioned with
the “L” bracket for proper installation by simply removing the stainless steel strap. Reposition and secure the
“L” bracket in preferred location, repeat the same procedure for other side of vehicle.
WARNING: The two-
(2) stainless steel straps included with the light bar are universal and should securely hold onto the window
ledge of most vehicles. Some vehicles may require a custom designed strap to properly secure the light bar
to the vehicle’s window ledge. Always make sure that both straps have a full hold on the vehicles window
ledge.