Connecting lp gas line, Operating instructions, X x x – Blue Rhino RV2301CLB User Manual
Page 7: Operating instructions (continued)
Contact 1.800.762.1142 for assistance. Do not return to place of purchase.
For great recipes and tips, visit recipes.uniflame.com.
PAGE NO
First Use
-AKE SURE ALL LABELS PACKAGING AND PROTECTIVE
FILMS HAVE BEEN REMOVED FROM THE GRILL
2EMOVE MANUFACTURING OILS BEFORE COOKING ON THIS
grill for the first time by operating the grill for at
LEAST MINUTES ON ()'( WITH THE LID CLOSED
4HIS WILL hHEAT CLEANv THE INTERNAL PARTS AND
DISSIPATE ODORS
Lighting
CAUTION: Keep outdoor gas cooking
appliance area clear and free from
combustible materials, gasoline and
other flammable vapors and liquids.
CAUTION: Do not obstruct the flow of
combustion and ventilation air.
CAUTION: Check and clean burner/
venturi tubes for insects and insect
nests. A clogged tube can lead to a
fire beneath the grill.
CAUTION: Attempting to light the
burner with the lid closed may cause
an explosion.
/PEN LID
-AKE SURE THERE ARE NO OBSTRUCTIONS OF AIRFLOW TO
THE BURNERS 3PIDERS AND INSECTS CAN NEST WITHIN
AND CLOG THE BURNER VENTURI TUBE AT THE ORIFICE !
clogged burner tube can lead to a fire beneath the
APPLIANCE
!LL CONTROL KNOBS MUST BE IN THE /&& POSITION
&IGURE
#ONNECT ,0 GAS TANK PER h#ONNECT ,0 'AS ,INEv
SECTION
4URN ,0 GAS TANK VALVE TO h/0%.v
4URN THE CONTROL KNOB TO ()'(
0RESS THE )GNITER BUTTON REPEATEDLY TO LIGHT BURNER
)F IGNITION DOES NOT OCCUR IN SECONDS TURN CONTROL KNOB TO /&& WAIT MINUTES AND
REPEAT LIGHTING PROCEDURE
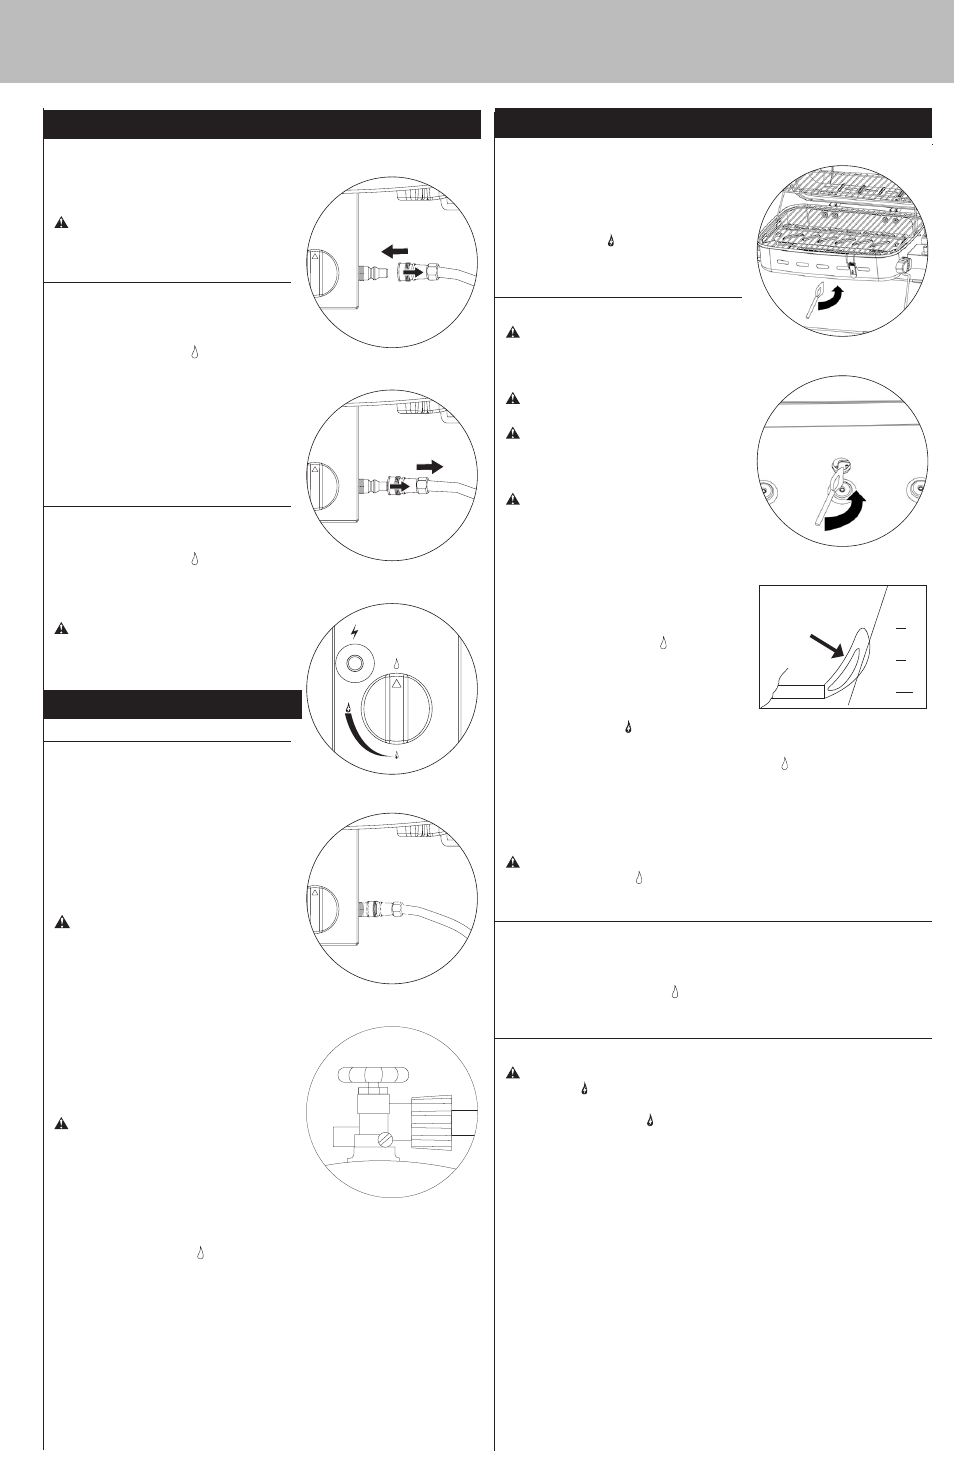
)F IGNITER DOES NOT LIGHT BURNER USE A LONG LIT MATCH TO LIGHT BURNER MANUALLY !CCESS THE
BURNER THROUGH THE HOLE IN BOTTOM BOWL AS INDICATED &IGURE A AND B
!FTER LIGHTING OBSERVE THE BURNER FLAME -AKE SURE ALL BURNER PORTS ARE LIT AND FLAME HEIGHT
MATCHES ILLUSTRATION &IGURE
Caution: If burner flame goes out during operation, immediately turn
the control knob(s) (OFF) and open lid to let the gas clear for about 5
minutes before re-lighting.
Turning Off
4URN ,0 GAS TANK VALVE TO h#,/3%$v
Note: ! hPOOFv SOUND IS NORMAL AS THE LAST OF THE ,0 GAS IS BURNED
4URN CONTROL KNOB CLOCKWISE TO THE /&& POSITION &IGURE
$ISCONNECT ,0 GAS LINE PER h$ISCONNECT ,0 'AS ,INEv INSTRUCTIONS
Cooking
CAUTION: Do not leave grill unattended while preheating or burning off food
residue on (HIGH). If grill has not been cleaned, a grease fire can occur.
/PEN LID AND IGNITE BURNER PER h,IGHTING )NSTRUCTIONSv
#LOSE LID AND PREHEAT GRILL ON ()'(
7EAR PROTECTIVE GLOVES AND USE LONG HANDLE TONGS TO PLACE FOOD ONTO COOKING GRIDS ABOVE THE
LIT BURNERS
!DJUST CONTROLS TO DESIRED FLAME HEIGHT
7ITH LID OPEN OR CLOSED COOK UNTIL DESIRED INTERNAL FOOD TEMPERATURES ARE ACHIEVED
4URN GRILL /&& PER h4URNING /FFv INSTRUCTIONS
&OR MORE TIPS ON DIRECT COOKING PLEASE SEE h4IPS FOR "ETTER #OOKOUTS AND ,ONGER 'RILL ,IFEv
Connecting LP Gas Line
4O OPERATE YOU WILL NEED PRECISION
FILLED ,0 GAS
TANK LB LB OR LB WITH EXTERNAL VALVE
threads and securely fastened to the recreational
VEHICLE 26
CAUTION: LP gas tank must be
properly disconnected and removed
prior to moving this grill.
Connect LP Gas Line
Only cylinders marked “propane” may be used.
,0 GAS TANK MUST BE IN THE h#,/3%$v POSITION
#ONTROL KNOB MUST BE IN THE /&& POSITION
&IGURE
Important: Before connecting, be sure that there
is no debris caught in the head of the main LP
gas line, head of the grill LP gas line or in the
head of the burner and burner ports.
#ONNECT #3! APPROVED QUICK CONNECT ,0 GAS LINE
TO GRILL &IGURE
4EST FOR LEAKS SEE h#HECKING FOR ,EAKSv SECTION
Disconnect LP Gas Line
,0 GAS TANK MUST BE IN THE h#,/3%$v POSITION
#ONTROL KNOB MUST BE IN THE /&& POSITION
&IGURE
$ISCONNECT GRILL ,0 GAS LINE FROM GRILL &IGURE
3TORE THE ,0 GAS TANK IN A PROPER LOCATION
CAUTION: LP gas tank must be
properly disconnected and removed
prior to moving this grill.
Operating Instructions
Checking for Leaks
Burner Connections
-AKE SURE THE REGULATOR VALVE AND HOSE
connections are securely fastened to the burner
AND THE TANK
)F YOUR UNIT WAS ASSEMBLED FOR YOU VISUALLY CHECK
THE CONNECTION BETWEEN THE BURNER VENTURI PIPE
AND ORIFICE -AKE SURE THE BURNER VENTURI PIPE FITS
OVER THE ORIFICE
WARNING: Failure to inspect
this connection or follow these
instructions could cause a fire or an
explosion which can cause death,
serious bodily injury, or damage to
property.
0LEASE REFER TO DIAGRAM FOR PROPER INSTALLATION
&IGURES AND
)F THE BURNER PIPE DOES NOT REST FLUSH TO THE ORIFICE
PLEASE CONTACT FOR ASSISTANCE
Tank/Gas Line Connection
WARNING: Failure to inspect
this connection or follow these
instructions could cause a fire or an
explosion which can cause death,
serious bodily injury or damage to
property.
-AKE OZ OF LEAK SOLUTION BY MIXING ONE PART
LIQUID DISHWASHING SOAP WITH THREE PARTS WATER
-AKE SURE CONTROL KNOB IS IN
/&& POSITION &IGURE
#ONNECT ,0 GAS TANK PER h#ONNECT ,0 'AS ,INEv SECTION
4URN ,0 GAS TANK VALVE TO h/0%.v
3POON LEAK CHECK SOLUTION AT ALL h8v LOCATIONS &IGURES AND
A )F ./ BUBBLES APPEAR after one minute THE CONNECTIONS ARE SECURE 7IPE AWAY SOLUTION
AND PROCEED
B )F BUBBLES APPEAR YOU HAVE A LEAK
2EMOVE THE ,0 GAS TANK AND RECONNECT MAKING SURE THE CONNECTION IS SECURE
2ETEST WITH SOLUTION
)F YOU CONTINUE TO SEE BUBBLES AFTER SEVERAL ATTEMPTS DISCONNECT ,0 GAS TANK AND
CONTACT FOR ASSISTANCE
Figure 1
1
2
Figure 2
1
2
Figure 3
Figure 4
X X X
X X X
Figure 5
X
X
X
X
X
&IGURE A
Match
&IGURE B
Match
&IGURE
1/2"
12,7 mm
6,4 mm
0 mm
1/4"
0"
Flame
Operating Instructions (continued)