Swiss+Tech BodyGard Survivor 12-in-1 Platinum Series Self Powered Emergency Companion User Manual
In-1, Use & care instructions
ACTIVATE FIRST!
Press and hold the Emergency
Flasher Button for 5 seconds until
LEDs flash and you hear a beep.
CHARGE BEFORE USE
In order to operate your
BODYGARD SURVIVOR
®
, the unit
must be charged. Before charging,
make sure that the three-position
slide switch on the side of the unit
is in the middle, or OFF position.
To charge unit, turn the hand crank
on the back of the unit in either
direction, or use an optional A/C Adaptor. For more detailed
instructions, please refer to the
A/C Input (#7) and
Self-Charging Hand Crank (#11) sections below.
ATTACH LANYARD BEFORE USE
To attach the lanyard to the BODYGARD SURVIVOR
®
, insert
the small loop of the lanyard through the lanyard post
on the bottom center of the unit. Next, insert the lanyard
strap through the small loop. Tighten the loop to secure
the lanyard to the unit. Use the pushbutton collar to adjust
lanyard size to your wrist, doorknob, backpack, etc.
RATTLE SOUND
One of the internal components of the Security Alarm
Motion Sensor has a moving part. The sound is normal.
1
. PANIC BUTTON
• Locate the recessed button on the side with the word
“PANIC” above it.
• Press once to activate the alarm.
• Press AND HOLD for 2 Seconds to turn off the alarm.
CAUTION:
Device emits loud noise to aid in warding
off attackers. DO NOT place near ears.
NOTES:
(1) The Emergency Flasher is also activated
when the PANIC button is pressed, ( 2 ) The Flashlight
remains functional while the Panic Button is sounding,
( 3 ) Be sure the speaker on the front is not obstructed
when sounding the panic alarm.
2
. LED FLASHLIGHT
• Locate the protruding button on the side with the lamp
symbol ( ) and the word “FLASHLIGHT” above it.
• Press 1 time to turn on all three LEDs.
• Press 2nd time to turn on the center LED only.
• Press again to turn off.
3
. DIGITAL FM RADIO
• Locate the three-position slide switch on the side with
the words “RADIO ON” above it.
• Move the switch to the RADIO ON position to turn
on the radio.
• To ensure best reception, fully extend antenna.
• Locate the “SCAN >” button on the front panel.
Press the SCAN > button to move to the next highest
frequency signal.
• Locate the “RESET” button on the front panel. Press the
RESET button to move back to the lowest frequency.
• Locate the Volume Down ( ) and Volume Up ( )
buttons on the front panel. Press the appropriate button
to adjust the volume.
USE & CARE INSTRUCTIONS
12-in-1
Self-Powered Emergency Companion
• The Radio LCD display has a backlight feature that will
automatically activate when the radio is turned on. The
backlight feature will automatically turn off after 10
seconds if no radio buttons are pressed.
• To turn off the RADIO, move the three-position slide
switch to the middle, or “OFF” position.
NOTES:
(1) All of the other features remain functional
while the radio is on. ( 2 ) Be sure the speaker on the front
is not obstructed when using the radio. ( 3 ) For best sound,
stand device upright.
FCC COMPLIANCE:
This device complies with
Part 15 of the FCC Rules. Operation is subject to the
following two conditions: (1) This device may not cause
harmful interference, and ( 2 ) this device must accept any
interference that may cause undesired operation.
The frequency ranges are as follows: FM 87.5 – 108.5.
4
. MOTION ALARM
• Using the attached lanyard, hang device on door knob
with the speaker facing outward.
• Locate the three-position slide switch on the side with
the words “MOTION ALARM ON” below it.
• Move the switch to the “MOTION ALARM ON” position
to activate motion sensor.
• Motion will cause the device to trigger the audio alarm
and red emergency flashers.
• To turn off the MOTION ALARM, move the three position
slide switch to the middle, or OFF position.
NOTES:
(1) The Motion Alarm is programmed with a ten
second delay to allow time to stop movement of the device
and prohibit inadvertent activation of the alarm.
( 2 ) The alarm and emergency flashers will be activated for
a minimum of 5 minutes before resetting.
( 3 ) All other features are deactivated when the Motion
Alarm is activated.
5
. RED EMERGENCY FLASHER
• Locate the recessed button on the side with the
recessed triangle symbol ( ) and words
“EMERGENCY FLASHER” below it.
• Press to activate the red Emergency Flasher.
• Press again to turn off.
NOTES:
(1) The two red LEDs will flash 3 times per
second. ( 2 ) All other features will remain active while
emergency flashers are on.
6
. CELL/MP3 CHARGER
(Cable not included)
• Locate the Output Jack on the side with the words
“CELL/MP3 CHARGER” below it.
• To charge a cell phone, MP3 Player, or other device, plug
one end of the cable (not included) into the CELL/MP3
CHARGER Output Jack and the other end into the device
to be charged (Cell Phone, MP3 Player, etc.).
• To charge, wind the Handle in either direction.
7
. A/C INPUT
(A/C Charger not included)
• Locate the Input Jack on the side with the words
“A/C INPUT” below it.
• To use an A/C Adaptor, plug one end into the A/C INPUT
Jack and the other end to a domestic power source.
• The device can be used while charging.
NOTES:
The BODYGARD SURVIVOR
®
comes equipped
with a 300mAh internal Lithium Ion battery. Charging times
will vary depending on the output current of the optional
A/C Adapter charger. For example, a 300mA charger
will fully charge in approximately 1 hour. Higher output
currents (e.g.450mA) will charge faster.
CAUTION:
To avoid damage to the device, the A/C
Adapter Charger should not exceed the following
specifications: Voltage Output — 5.0V (DC output)
Current Output — less than 1,000mA.
8
. ADJUSTABLE LANYARD
• Attach the lanyard to the BODYGARD SURVIVOR
®
by
inserting the small loop of the lanyard through the
post on the bottom corner of the unit.
• Next, insert the lanyard strap through the small loop.
Tighten the loop to secure the lanyard to the unit.
• Use the push-button collar to adjust lanyard size to
secure the unit to your wrist, doorknob, backpack
or other object.
9
. COMPASS
• Locate the COMPASS on the back Hand Crank.
• For best results, move Hand Crank at a 90°angle from
the body of the BODYGARD SURVIVOR
®
before reading
the COMPASS.
• Hold your BODYGARD SURVIVOR
®
absolutely level,
or place on a flat, level surface.
• Locate a distant visual target in the direction you
want to go.
• Check your compass regularly to confirm that you are
continuing in the right direction.
CAUTION:
Avoid using near large metal objects or
electronic devices. These may cause interference with the
compass readings.
10
. THERMOMETER
• Locate the easy-to-read thermometer on the back of
your BODYGARD SURVIVOR
®
.
• The red arrow points directly to the correct temperature
on the scale.
NOTE:
The temperature is measured in degrees
Fahrenheit, each marking equals 5 degrees.
11
. SELF-CHARGING HAND CRANK
• Lift the Hand Crank Handle on the back of your
BODYGARD SURVIVOR
®
.
• To charge, wind the Handle in either direction.
• For optimal charge, wind the Hand Crank up to
120-150 RPM (2 to 2.5 turns per second).
• 3 minutes of Hand Cranking delivers approximately:
- 60 minutes of Flashlight use
- 50 minutes of Emergency Flasher use
- 10 minutes of FM Radio use
- 20 minutes of Security Alarm siren
- 5 minutes of Cell Phone talk time
• A fully charged battery will deliver up to:
- 45 hours of Flashlight use
- 24 hours of Emergency Flasher use
- 2 hours of FM Radio use
- 2.5 hours of Security Alarm siren
NOTES:
(1) Rated battery life should be used as a guide
and never be taken literally. ( 2 ) Actual battery life may
vary based on usage patterns, environmental conditions
and winding speed. ( 3 ) If the Panic Alarm, Flashlight or
Emergency Flasher goes on when generating power, these
buttons should be pressed to the off position.
12
. SIGNALING MIRROR
• Lift the Hand Crank Handle on the back to access the
SIGNALING MIRROR.
• Hold the mirror at eye level (with mirror facing out) and
look over the top of the mirror.
• Outstretch your other arm and form a V with two fingers.
• Sight over the top of the mirror with the mirror reflection
visible on the V.
• Carefully turn and tilt the mirror to move the V and the
reflection to the target.
• Lower the V so that the reflection touches only the tip of
the fingers for maximum signaling performance.
CAUTION:
The bright light reflecting from the signaling
mirror can be blinding and could cause an accident
if flashed inappropriately. Practice by aiming only at
inanimate objects.
NOTES:
(1) It is better to practice with the Signaling
Mirror before you need to use it. This is more important
when you might have to use it in an emergency. ( 2 ) For
daylight use only. If there is no sun, the Signaling Mirror
does not work. It signals by reflecting sunlight.
Limited One Year Warranty
This product is covered by a limited one year warranty to the original
purchaser in that this product is free from defects in workmanship
and materials. During the warranty period, this product will either be
repaired or replaced with a product of equal or greater value.
Damage through normal wear and tear (including battery expiration
and surface coatings), repair or alteration, misuse, abuse, neglect,
accident, improper storage and handling, fire, negligence, improper
cleaning, circumstances not directly attributable to manufacturing
defects, or act of God is not included.
THIS WARRANTY IS IN LIEU OF ALL OTHER WARRANTIES, EXPRESS
OR IMPLIED, INCLUDING BUT NOT LIMITED TO, IMPLIED WARRANTY
OF MERCHANTABILITY OR FITNESS FOR A PARTICULAR ISSUE.
This warranty gives you specific legal rights, and you may also
have other rights which vary from state to state. Simply return your
SWISS+TECH
®
brand product postpaid and insured to:
SWISS+TECH PRODUCTS
701 Beta Drive, Unit 5
Cleveland, OH 44143
www.swisstechtools.com
Made in China. Patents Pending. BODYGARD SURVIVOR
®
and
SWISS+TECH
®
are registered trademarks of Crestwood Partners,
LLC. Specifications are subject to change without notice.
©2009 Crestwood Partners, LLC, Cleveland, OH 44143
1-800-414-8799
#74024 Rev. C
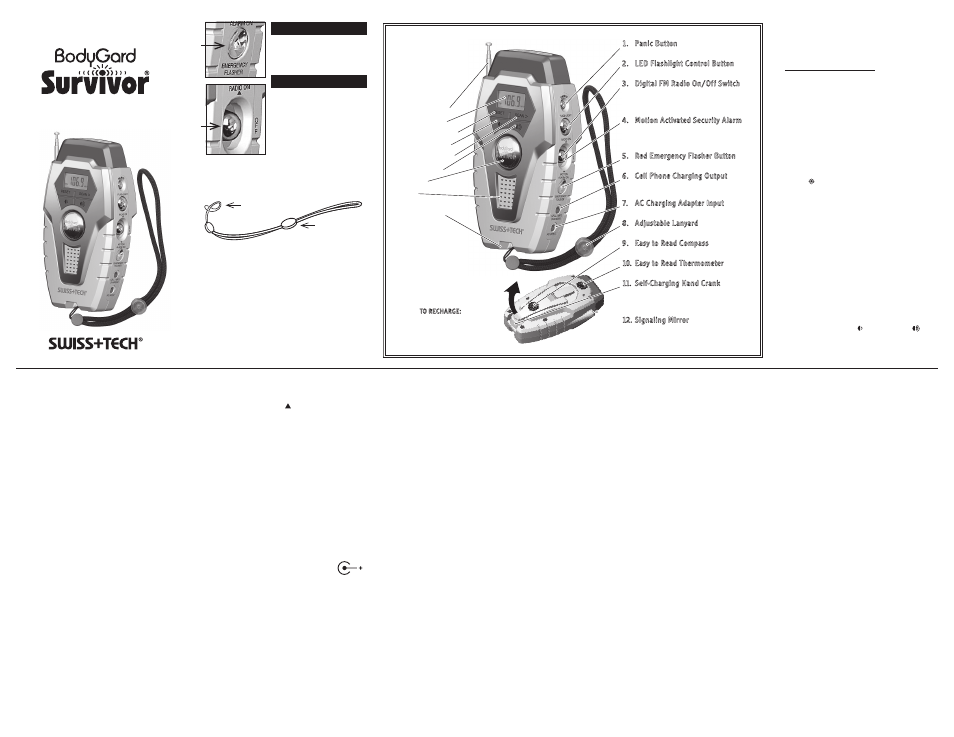
TO RECHARGE: Lift handle
and crank in either direction!
1. Panic Button
• Piercing Sonic Alarm, Flashing Red Light
2. LED Flashlight Control Button
• Bright High and Low Beam modes
3. Digital FM Radio On/Off Switch
• Easy-to-Read LCD Display with Backlight
• Built-in Speaker
• Recessed, Telescoping Antenna
4. Motion Activated Security Alarm
• Motion Sensor activates Sonic Alarm
and Emergency Flashers
• Hang on door knob using Lanyard
5. Red Emergency Flasher Button
• Signals distress or alerts oncoming traffic
6. Cell Phone Charging Output
• Low voltage output for charging
cell phones, MP3 players, etc.
7. AC Charging Adapter Input
• Charge unit using Optional AC Adapter
8. Adjustable Lanyard
• Convenient for wrist, doorknob, backpack
9. Easy to Read Compass
(on hand crank)
• Large, 14mm diameter, oil-filled
10. Easy to Read Thermometer
(on back)
• 0° to 120° Fahrenheit
11. Self-Charging Hand Crank
(on back)
• Easy Hand Crank to generate power
• State-of-the-art internal Lithium-Ion Battery
• Technology used in Cell Phones & Laptops
12. Signaling Mirror
(under hand crank)
• Large mirrored surface to signal for help
Telescoping Antenna
Backlit LCD Display
Automatic Reset Button
Volume Down Button
Automatic Scan Button
Volume Up Button
Sonic Alarm
Speaker
Convenient
Self-Standing Base
Back View
Adjustable
Pushbutton
Collar
Small Loop