SPYPOINT HSC User Manual
P int spy int p spy, Heated seat cushion, Siège chauffant
Heated Seat Cushion
v1.3
Before using the SPYPOINT
®
heated seat cushion (HSC) for
the first time, carefully read the following instructions. This will
allow you to use it at its full potential. This user guide refers to the
following model:
• HSC-B (Black)
• HSC-C (Camouflage)
BATTERY INSTRUCTIONS
This product is powered by HSC-LT 1.8 Ah 14.4V rechargeable
lithium batteries. Before the first use, the rechargeable battery
should be charged with the special charger (included). Use of
unauthorized batteries or chargers may lead to fire, explosion,
leakage or others dangers.
Battery type
Amperage
Battery life
HSC Li-ion
(included)
1.8Ah
Up to 3 hours (High)
Up to 4 hours (Low)
SPYPOINT
®
BATT-12V*
7Ah
Up to 6 hours (High)
Up to 8 hours (Low)
SPYPOINT
®
KIT-12V
7Ah
Up to 6 hours (High)
Up to 8 hours (Low)
*SPYPOINT
®
CB-12FT required (cable with alligator clips), plug
the clips to the terminals of the battery by following the exact
polarity (red = +, black = - ).
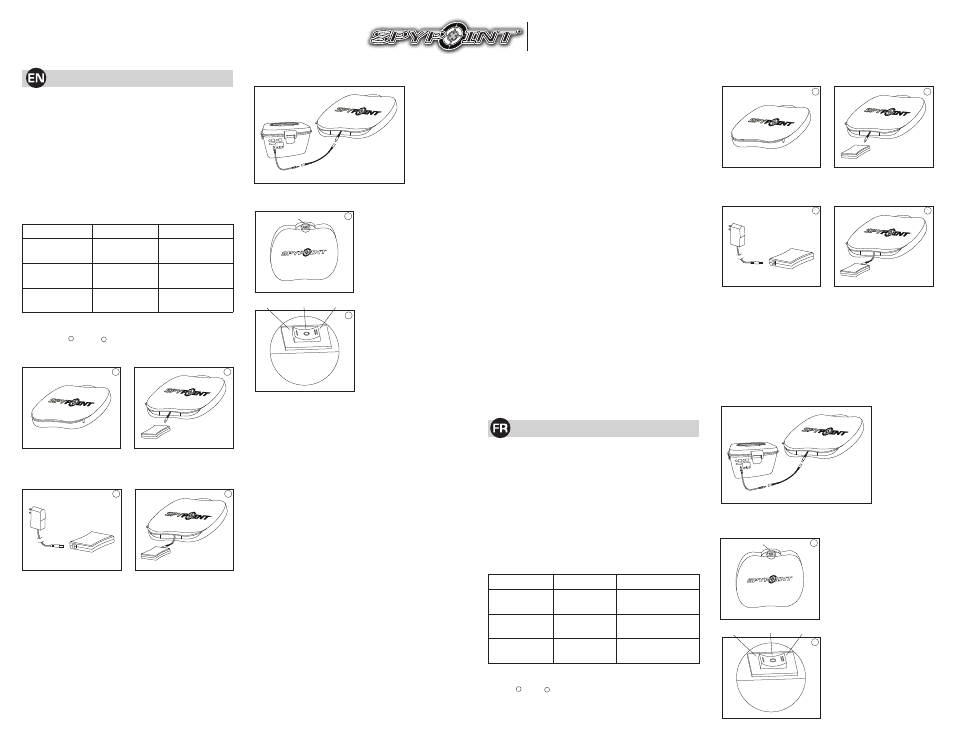
INITIAL CHARGING / BATTERY CHARGING
4. Brancher la prise
d’alimentation, remettre la
pile à l’intérieur du siège
et refermer la fermeture à
glissière.
INTERRUPTEUR D’ALIMENTATION
1. The power switch is under
the handle on the top of the
cushion.
Connect the 12V
adaptor to the
power plug of
the cushion and
to a SPYPOINT
®
power cable
#PW-12FT (in
this case, the
power cable is
included with the
KIT-12V).
1
2
3
4
1
3
4
P INT
SPY
TM
INT
P
SPY
2
Power Switch
Siège chauffant
Avant d’utiliser pour la première fois le siège chauffant SPYPOINT
MD
HSC, lire attentivement les directives qui suivent afin de profiter au
maximum du système. Ce guide de l’utilisateur réfère aux modèles
suivants :
• HSC-B (Noir)
• HSC-C (Camouflage)
DESCRIPTION DE LA PILE
Le siège chauffant est alimenté par une pile lithium rechargeable
HSC-LT 1.8Ah 14.4V. Avant la première utilisation, la pile doit être
rechargée à l’aide du chargeur (inclus). L’utilisation d’un autre type
de pile ou de chargeur non autorisé, peut entrainer des risques de
feux, d’explosion, de fuite ou d’autre type accident.
Type de batterie
Ampérage
Autonomie
HSC Li-ion
(incluse)
1.8Ah
Jusqu'à 3 heures (High)
Jusqu'à 4 heures (Low)
BATT-12V*
SPYPOINT
MD
7Ah
Jusqu'à 6 heures (High)
Jusqu'à 8 heures (Low)
KIT-12V
SPYPOINT
MD
7Ah
Jusqu'à 6 heures (High)
Jusqu'à 8 heures (Low)
* CB-12FT SPYPOINT
MD
requis (câble avec pinces crocodile),
connecter les pinces aux bornes de la pile en respectant la polarité
(rouge = +, noir = - ).
CHARGE INITIALE / RECHARGE DE LA PILE
1. Ouvrir la fermeture à
glissière du siège.
2. Sortir la pile du siège et
la déconnecter de la prise
d’alimentation.
3. Connecter le chargeur dans
la prise électrique, puis
connecter le fil du chargeur
dans la pile. Charger pour
une période 4 à 5 heures.
Une DEL rouge allume
lorsque la pile est en charge
et devient verte lorsque la
pile est entièrement chargée.
1
2
3
4
1
3
4
P INT
SPY
TM
INT
P
SPY
2
1. Open up the zipper.
2. Take out the battery box
and disconnect it from the
power plug.
3. Connect the charger to
power supply and then
connect the battery.
Charging period: 4-5 hours.
Ared LED will light when
charging and turn to green
when the battery is fully
charged.
4. Connect the power interface,
put the battery box in
cushion and close the zipper.
1
2
3
4
1
3
4
P INT
SPY
TM
INT
P
SPY
2
UTILISATION DE L'ADAPTATEUR 12V
(INCLUS)
Connecter
l'adaptateur
12V à la prise
d'alimentation du
siège et à un câble
d'alimentation
SPYPOINT
®
#PW-12FT (dans
ce cas, le câble
d'alimentation
est inclus avec le
KIT-12V).
1
2
3
4
1
3
4
P INT
SPY
TM
INT
P
SPY
2
OFF
LOW
HIGH
POWER SWITCH
USING THE 12V ADAPTOR (INCLUDED)
2. When the switch is set to;
- "O", the power is OFF.
- "I", the power is set to low
level mode (1.4A).
- "II", the power is set to high
level mode (2.4A).
Note: The current varies depending on the battery voltage, so these
currents refer to a fully charged battery.
WORKING PRINCIPLE
A special temperature controlled component is embedded to switch
to OFF when the temperature reaches 50
o
C, thus saving energy.
As well; the internal controller will able or disable the power to
maintain a constant temperature of 50°C.
Note: For optimal heat comfort as soon as you are comfortable on
the cushion, switch the cushion to OFF and use the residual heat
made from the cushion and the user. Switch the cushion to ON when
necessary.
WARNING
• Do not use in damp or wet conditions.
• Unplug when not in use.
• Do not leave unattended.
• Not recommended for children.
WARRANTY AND REPAIR
This SPYPOINT
®
product designed by GG Telecom, is covered
by a one (1) year warranty on material and workmanship starting
from the original date of purchase. The sales receipt is your proof of
purchase and must be presented if warranty service is needed. This
warranty will be honored in the country of purchase only.
This warranty does not cover any GG Telecom product which
has been subjected to misuse, neglect and accidents or has been
improperly used or maintained. In addition, this warranty is not
applicable for all products purchased online from an unauthorized
dealer. Any modification or tampering of the product will affect its
operation, performance, durability and void this warranty.
Instructions for repair service
GG Telecom will repair the product without charge or replace it at
its discretion with an equivalent product, if it has a manufacturing
defect covered by the warranty described previously. We will pay
the shipping costs only for the return of the products covered by the
warranty. The shipping costs for an item sent to us will be assumed
by the customer.
Repairs for damages not covered by the warranty will be subject to a
reasonable charge. The customer will pay all shipping costs.
1. BEFORE sending a product for repair, please contact our
technical support team at 1-888-779-7646 or [email protected].
Clearly describe the problem and give a phone number where
we can reach you. It happens regularly that some problems can be
solved over the phone.
2. If a product needs to be sent, an RMA number will be given to the
customer (Return Merchandise Authorization).
3. Prepare a package for GG Telecom and include the original
receipt or a copy.
4. Write the RMA number on the outside of the package and send it to:
Canada
United States
GG Telecom
GG Telecom
120 J.Aurèle-Roux
555 VT route 78
Victoriaville, QC
Swanton, Vermont
G6T 0N5
05488
IMPORTANT: Under no circumstances will GG Telecom accept
returned products without a Return Material Authorization number
(RMA). It is essential to contact us before making a return.
The customer is liable for loss or damage to the product that may
occur during the transport to GG Telecom. We recommend you to
use a traceable method of shipping to ensure your protection
Note: For the latest update of the user’s manual, refer to our website.
WWW.SPYPOINT.COM
1
2
3
4
1
3
4
P INT
SPY
TM
INT
P
SPY
2
1
2
3
4
1
3
4
P INT
SPY
TM
INT
P
SPY
2
1
2
3
4
1
3
4
P INT
SPY
TM
INT
P
SPY
2
Interrupteur
1
2
3
4
1
3
4
P INT
SPY
TM
INT
P
SPY
2
OFF
LOW
HIGH
1. L’interrupteur est positionné
sous la poigné dans le haut
du siège.
2. Lorsque l’interrupteur est en
position ;
- « O », le siège est en
position arrêt.
- « I », l’alimentation est en
mode « LOW » (1.4A).
- « II », l’alimentation est en
mode « HIGH » (2.4A).
HSC
P INT
SPY
INT
P
SPY
1
2
3
4
1
3
4
P INT
SPY
TM
INT
P
SPY
2
P INT
SPY
TM
INT
P
SPY
TO CAMERA
12V
CHARGER OR
SOLAR PANEL
-
+
Power
cable
12V adaptor
Red/12V
1
2
3
4
1
3
4
P INT
SPY
TM
INT
P
SPY
2
P INT
SPY
TM
INT
P
SPY
TO CAMERA
12V
CHARGER OR
SOLAR PANEL
-
+
Câble
d'alimentation
Adaptateur 12V
Rouge/12V