Maintenance – Multiquip WBH16EAWD User Manual
Page 26
page 26 — WBH16eaWD epa poWer Buggy • operation anD parts manual — rev. #0 (09/09/13)
pump Control lever aDjustment
If the power buggy tends to creep in the forward or reverse
direction after you release the speed control lever, the pump
control lever requires adjustment.
3. Place the machines drive wheels on jacks or blocks
free from ground contact.
4. Locate the pump control lever adjusting bolt.
5. Loosen the jam nut.
6. Start the engine and place the buggy's directional
control lever in the forward then reverse directions
while observing for wheel movement.
7. The pump lever has a very sensitive neutral position
of about 1/32" to 1/16". If the wheels are creeping,
turn the adjusting bolt in very slight increments. If
wheels are creeping in reverse, turn the adjusting bolt
counterclockwise. If wheels are creeping forward, turn
the adjusting bolt clockwise.
tires/WHeels/lug nuts
Tires and wheels are very important and critical components
of the buggy. When specifying or replacing the wheels, it
is important that the wheels, tires, and axle are properly
matched.
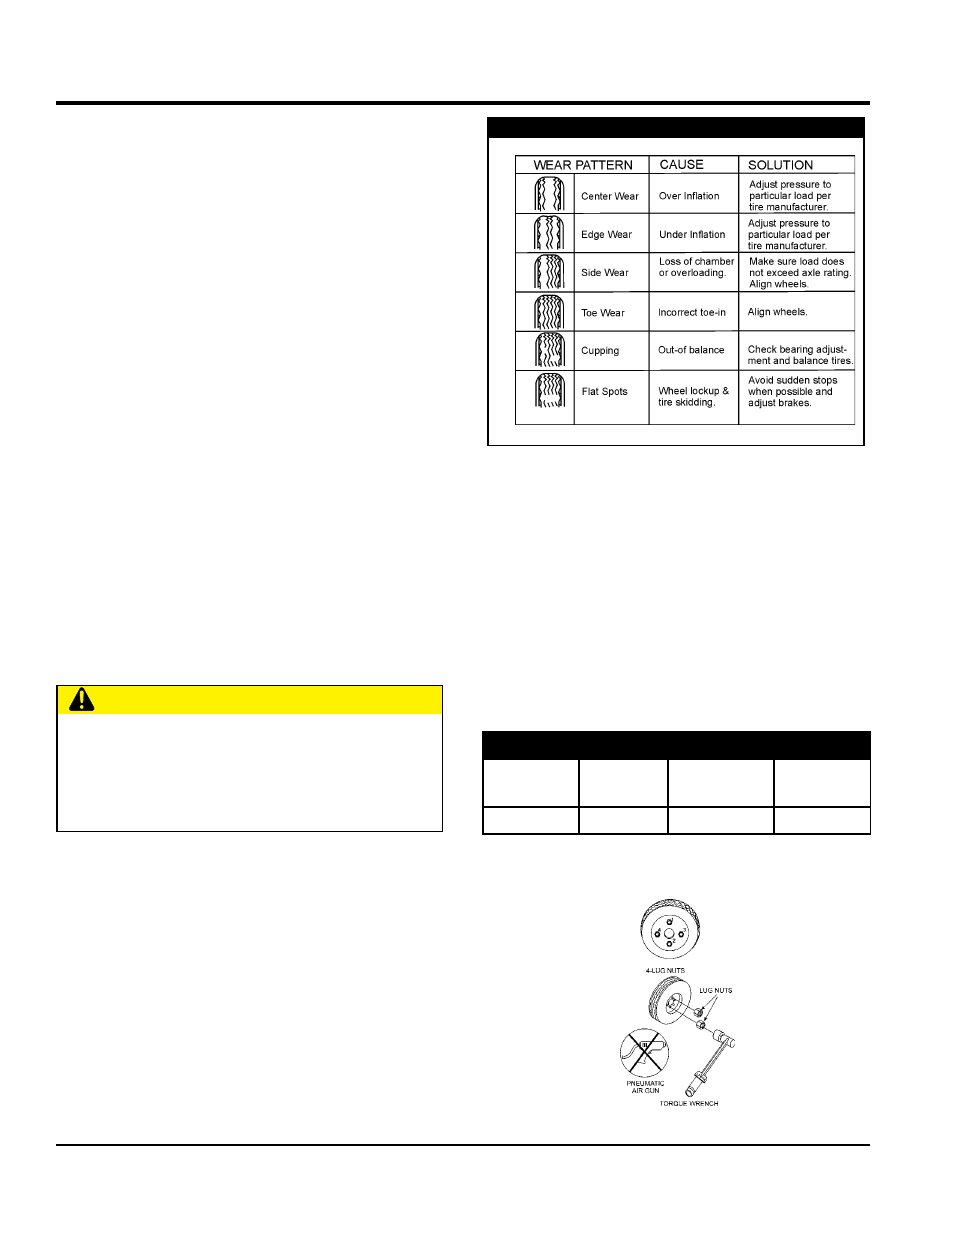
tires Wear/inFlation
Tire inflation pressure is the most important factor in tire life.
1. Check tire pressure when the tires are cold before
operation.
2. Do not bleed air from tires when they are hot.
3. Check inflation pressure weekly during use to ensure
the maximum tire life and tread wear.
4. Refer to Table 4 (Tire Wear Troubleshooting) to pinpoint
the causes and solutions of tire wear problems.
Caution
Do not attempt to repair or modify a wheel. Do not
install an inner tube to correct a leak through the rim.
If the rim is cracked, the air pressure in the inner tube
may cause pieces of the rim to explode (break-off) with
great force and can cause serious eye or bodily injury.
MAINTENANCE
lug nut torque requirements
It is extremely important to apply and maintain proper wheel
mounting torque on the trailer. Be sure to use only the
fasteners matched to the cone angle of the wheel. Proper
procedure for attachment of the wheels is as follows:
1. Start all wheel lug nuts by hand.
2. Torque all lug nuts in sequence. See Figure 25. DO
NOT torque the wheel lug nuts all the way down.
Tighten each lug nut in 3 separate passes as defined
by Table 5.
3. After first road use, retorque all lug nuts in sequence
(Figure 25). Check all wheel lug nuts periodically.
Figure 25. Lug Nut Torque Sequence
table 4. tire Wear troubleshooting
table 5. tire torque requirements
Wheel Size First Pass
FT-LBS
Second Pass
FT-LBS
Third Pass
FT-LBS
480 x 8 in.
20-25
35-40
50-65