Commissioning, Testing & adjustments, Pressure settings (all models except fryers) – Garland MASTER SERIES HEAVY DUTY RANGES, FRYERS & BROILERS User Manual
Page 15: Pressure settings - fryers, Burner adjustments, Thermostat bypass adjustment - oven
Part # 4519069 Rev 01(7 Feb 14)
Page 15
COMMISSIONING
Testing & Adjustments
Fittings and pipe connections: Check all pipe fi ttings and
connections to the appliance for leaks. Use only approved
gas leak detectors or soap solutions to check fi tting and pipe
connections. DO NOT USE A FLAME.
1. Turn all valves and thermostats to the OFF position.
2. Turn on the main gas supply valve and light the top
section pilots.
3. Leak test the valves and fi ttings as described above, seal
any leaks found and re-check to make sure the leak is
sealed.
4. Light the oven pilot.
5. If the range is provided with an oven shut-off valve
separate from the thermostat, turn this valve ON and set
the thermostat at 250°C. Gas will now fl ow to the oven
burner.
6. Leak test all valves and fi ttings, seal leaks and re-test.
7. Shut OFF all range valves and set the thermostat dials to
the OFF position.
Pressure Settings (All Models Except Fryers)
1. Make sure all gas taps are in the OFF position and turn on
the main gas supply.
2. Light all pilots in accordance with the User’s Instructions.
3. Connect a U-gauge manometer to the pressure test point
on the main manifold and turn all gas controls to the ON
or position.
4. Confi rm that the pressure is the same as stated on the
rating plate.
Pressure Settings - Fryers
1. Connect a U-Gauge manometer to the pressure test point
at the end of the burner manifold and check that the
pressure setting is the same as stated on the rating plate.
2. If necessary, adjust the pressure using a screw driver to
turn the adjusting screw on the gas control. Turn the
control clockwise to increase pressure and counter-
clockwise to decrease.
Burner Adjustments
•
Check that the air shutter is set to the required opening.
Refer to Table H
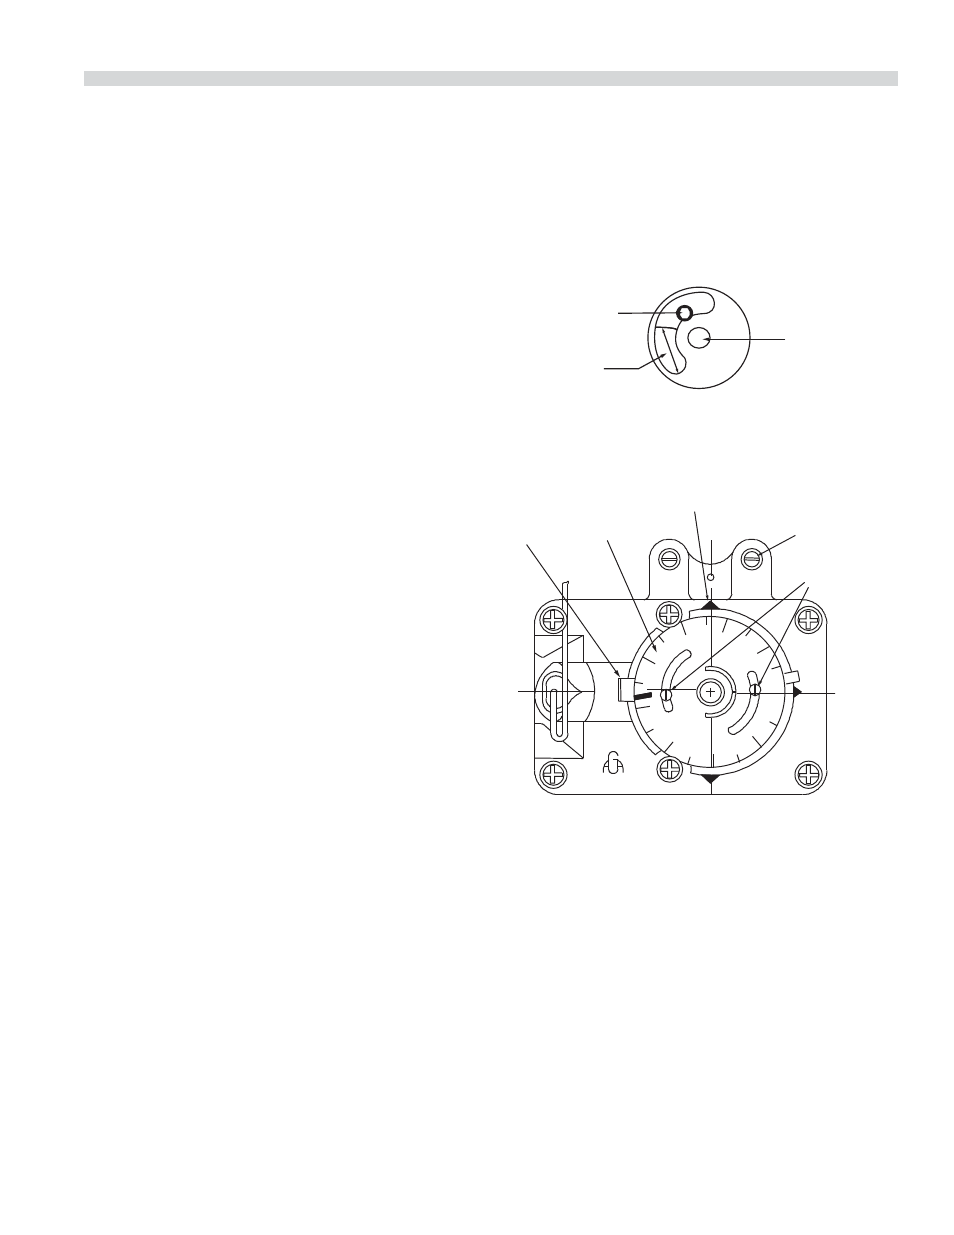
Figure 1 – Air Shutter
Injector Location
Fixing Screw
Required Length
of Opening
Thermostat Bypass Adjustment - Oven
Figure 2 – Oven Thermostat
450 50
0
5
5
0
1
5
0
3
00
2
50
30
0
3
5
0
4
00
Calibration
Lock Screws
By-pass Flame
Adjuster
Indicator Mark
Calibration
Plate
Dial
Stop
With reference to Figure 2, the Robertshaw FDO snap-
throttle thermostat requires a bypass adjustment. To adjust
the bypass, follow this procedure.
1. Turn the oven temperature control dial to 200°F (93°C)
then allow the oven to heat for 3 minutes.
2. Turn the oven control dial to the OFF position, then
slowly turn the oven temperature control dial counter-
clockwise until an audible click is heard.
3. Making sure not to disturb the oven temperature control
dial, turn the bypass fl ame adjusting screw and adjust the
bypass fl ame to the LOWEST POSSIBLE STABLE FLAME
COVERING THE ENTIRE PORTED AREA OF THE BURNER.
Turn the adjusting screw counter-clockwise to increase or
clockwise to decrease the size of the bypass fl ame.