Cam adjustments, Initial bow setup – Bear Archery Compound Bow 2008 User Manual
Page 9
17
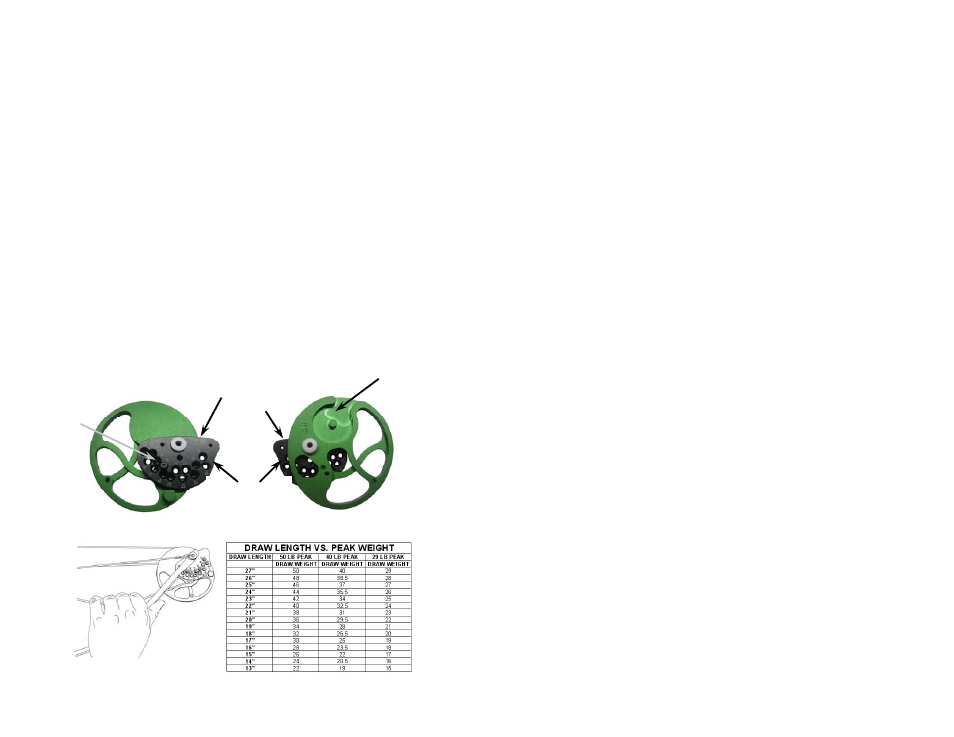
CAM ADJUSTMENTS
Adjusting Draw Length – Rotating Modular
Cam System with MultiDraw
The adjustable multidraw cam equipped bow can
be configured to provide a draw length from 13”
to 27” in 1” intervals. No bow press is required
to adjust the multidraw cam system. To adjust
the draw length, first remove the socket head cap
screw located in the rotating module. Next rotate
the module to the desired draw length and
reinstall the screw in the corresponding hole. It
may be necessary to pull the cable away from the
module to provide clearance for the module to
rotate, see the picture below. Next perform the
same operation on the opposite cam. Be sure that
both the top and bottom cams are set to the
same draw length position. The adjustable cam
operates on a sliding poundage scale where an
increase in draw length also provides an increase
in peak draw weight. This allows the bow to
grow with the archer. The chart below shows the
peak draw weight at each draw length for the 29,
40 and 50 pound peak bows.
Back View
Front View
Draw Length
printed on
module
Right or
left hand
designation
Module
Mounting
Screw
Cam
18
INITIAL BOW SETUP
Before you can safely and effectively shoot your
bow, a number of specific initial bow setup steps
must be taken. These steps can be performed on
your own, if your level of expertise is adequate.
Or, your local Bear Archery dealer can help you.
Arrow Rest Installation & Setup
Arrow rests should be installed according to the
manufacturer’s specifications. The first
adjustment you need to perform is setting the
vertical height of your arrow rest. When properly
adjusted, your arrow rest should align the
centerline of the arrow with the center of the two
holes used to mount the rest to the riser. To
check this, place an arrow in the rest and nocked
on the string. Visually confirm the center of the
arrow passes directly through the center of the
arrow rest mounting holes when viewed from the
side. If not, adjust your rest up or down to
correct.
Next, the rest should be adjusted for proper
“Centershot”. With an arrow in the rest and
nocked on the string, firmly hold another arrow
against the inside of the riser near the arrow rest
mounting holes as illustrated. Look down the
arrows and verify that the arrows are parallel to
each other. In other words, the spacing between
the two arrows should be the same along the
entire length of the arrows. If not, adjust your
rest side to side to correct. This is only your
“initial” centershot and additional fine tuning
may be required depending on your shooting
style and equipment.