Aligning the arrow keys, Mounting into the face plate, Grounding a metal plate – Allen&Heath PL-4 User Manual
Page 2: Wiring standards, Pl-anet connection – early version, Pl-anet connection – later version, End of chain termination, Connection to the idr, Testing the wiring, Powering up the pl system
2
PL-4 User Guide AP5082 issue 4
IN
B
B
B
C
C
C
A
OUT
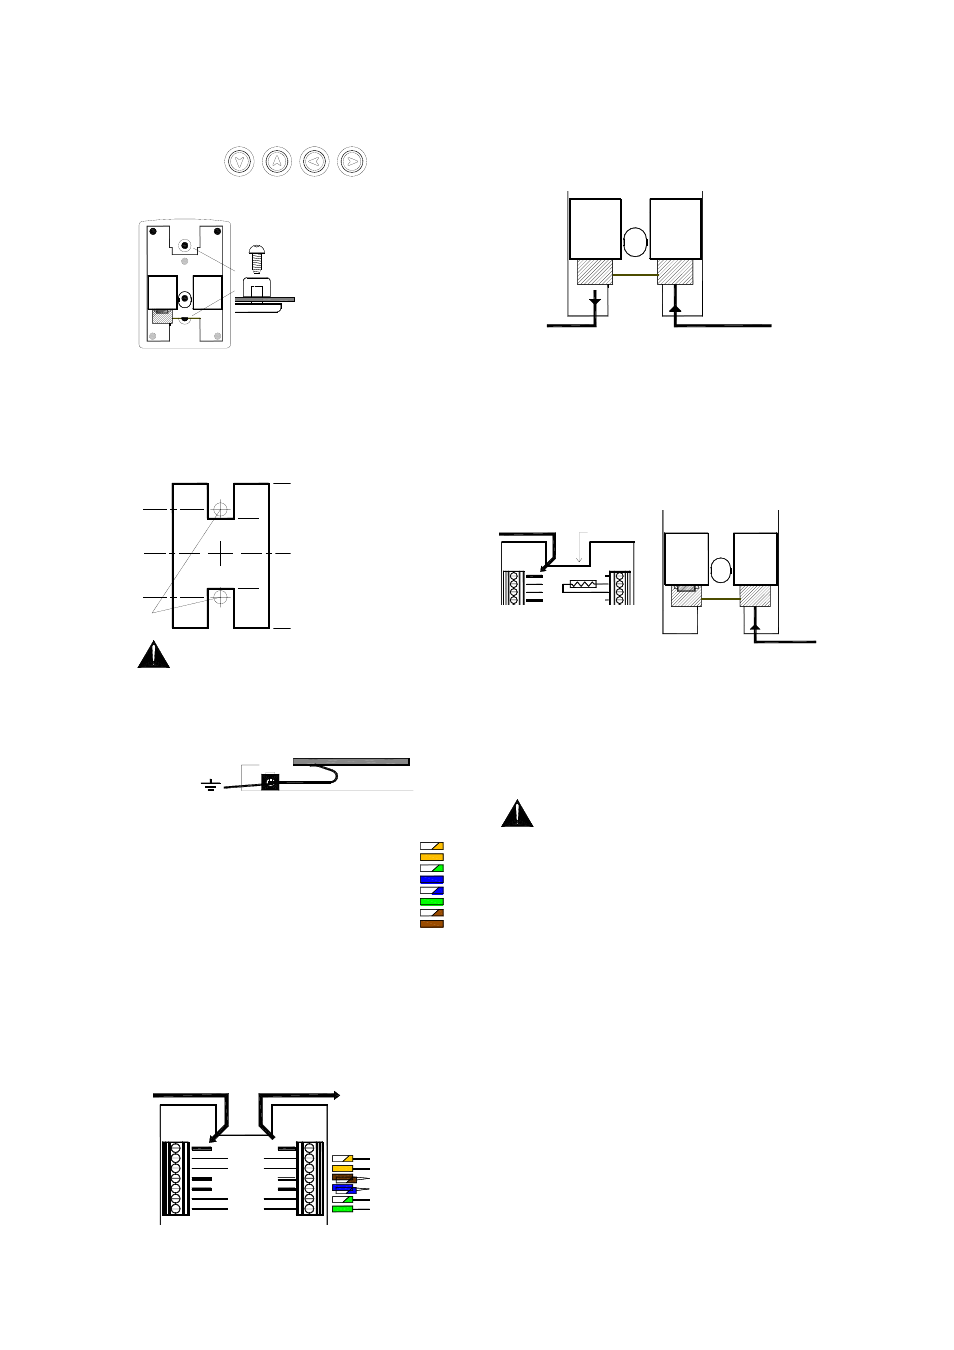
Aligning the arrow keys
The two switch
caps can be rotated so that the arrow faces up, down,
left or right. Decide which way you want them to face
according to function, for example volume or source
select.
To change them, first
remove the three screws
(B) and unplug the top
PCB. Remove the three
screws (C) and lift the
lower PCB away. Rotate
the switch caps into the
required position.
Reassemble the module
taking care to correctly
align the inter-PCB
connector.
Mounting into the face plate
A pre-cut
brushed aluminium UK (part number AA5029), EU
(AA5250) or US (AA5030) plate is supplied. A backing
box for the UK plate can be ordered (AA5220).
The assembled module
fits into an ‘H’ shaped
cutout in the centre of the
mounting plate. The
module is held using the
two screws with plastic
clamps provided (A).
Unscrew these from the
module first. Dimensions
are in millimetres below.
Grounding a metal plate
If the face
plate is metal ensure that it is correctly grounded to
ensure operator safety. The plate should be connected
to a local safety ground, not the PL-Anet screen
connection. Use a ground wire or physical contact with
a grounded back box.
Wiring standards
Use flame
retardent CAT5 STP (shielded twisted
pair) cable. The connection follows
the EIA/TIA 568B wiring colour
scheme. Ensure all ports and cables
in the system are wired to this
scheme. The RJ45 connector wiring
is shown here.
PL-Anet connection – early version
Screw terminal blocks are provided for the serial port
IN and OUT connections on early version PL-4
modules. Use a small flat bladed screwdriver. Ensure
the wires are correctly stripped and formed to allow
sufficient service loop in the backing box. Note that
some wires are twisted together in the same terminal.
PL-Anet connection – later version
RJ45 sockets are provided for the serial port IN and
OUT connections on more recent PL-4 modules. Use
unbooted plugs to ensure the cables can fit into the
backing box. Use a small bladed screwdriver to lever
up the plug retaining clips when unplugging the cables
if the clips are against the circuit card.
End of chain termination
As with any
RS485 system, the last PL device needs to have a
terminating resistor fitted to its output port. Early
version PL-4 modules are shipped with a 100 ohm
resistor already fitted. Leave this fitted only if the unit is
the last in the chain. Later version PL-4 modules are
supplied with a terminating RJ45 plug (Allen & Heath
part number 003-082).
Connection to the iDR
The PL-Anet network
plugs into the iDR unit using an RJ45 connector. This
is wired to the 568B scheme. The PL-Anet port
provides the RS485 serial communication and +20V
DC power to the chain of PL modules. The device
addresses are automatically allocated per type in the
order they appear in the PL-Anet chain.
Testing the wiring
Before powering
up the system make sure all the wiring is inspected and
continuity tested. This is important as wiring errors
may result in damage to the equipment.
Powering up the PL system
Ensure that
the iDR PL-Anet port is active. Its green ‘active’ LED
should be lit. If not, use the iDR System Manager
software Communications Option menu to activate the
port. Plug in the PL-Anet cable. The iDR System
Manager screen should display icons on the right hand
toolbar for each PL device it recognises. The rotary
control on the powered PL-4 should work immediately
with the LED level bar. Refer to the Help file for details
on programming the PL functions.
Diagnostics
If a fault is suspected check the two
diagnostics LEDs on the PL-4 connector PCB. Both
the red and green LEDs should be lit once
communication with the iDR is established. Also
measure the PL-Anet +20V supply feed between the
blue wires (+20V) and the brown wires (0V). For
reliable operation this voltage should not drop below
+11V with all PL LED displays turned on. If a fault is
found, first check for correct wiring. If further
assistance is required contact Allen & Heath technical
support.
12
16
32
16
34
20
20
DIA 6
c
TOP
16
16
INPUT
OUTPUT
TERMINATION
100 ohms
CABLE SCREEN
WH/OR
OR
BN + WH/BN
BL + WH/BL
WH/GN
GN
INPUT
OUTPUT
0V
+20V DC
1 WH/OR
2 OR
3 WH/GN
4 BL
5 WH/BL
6 GN
7 WH/BN
8 BN
OUT
FROM PREVIOUS PL DEVICE
100 ohms TERMINATOR
IN
PL-Anet
OUT
FROM PREVIOUS PL DEVICE
TO NEXT PL DEVICE
IN
OR TERMINATOR