Product overview, Remote control, Installation – IOGear GHDSSW4 User Manual
Page 2: 2d to 3d, Configuration, Image enhancement
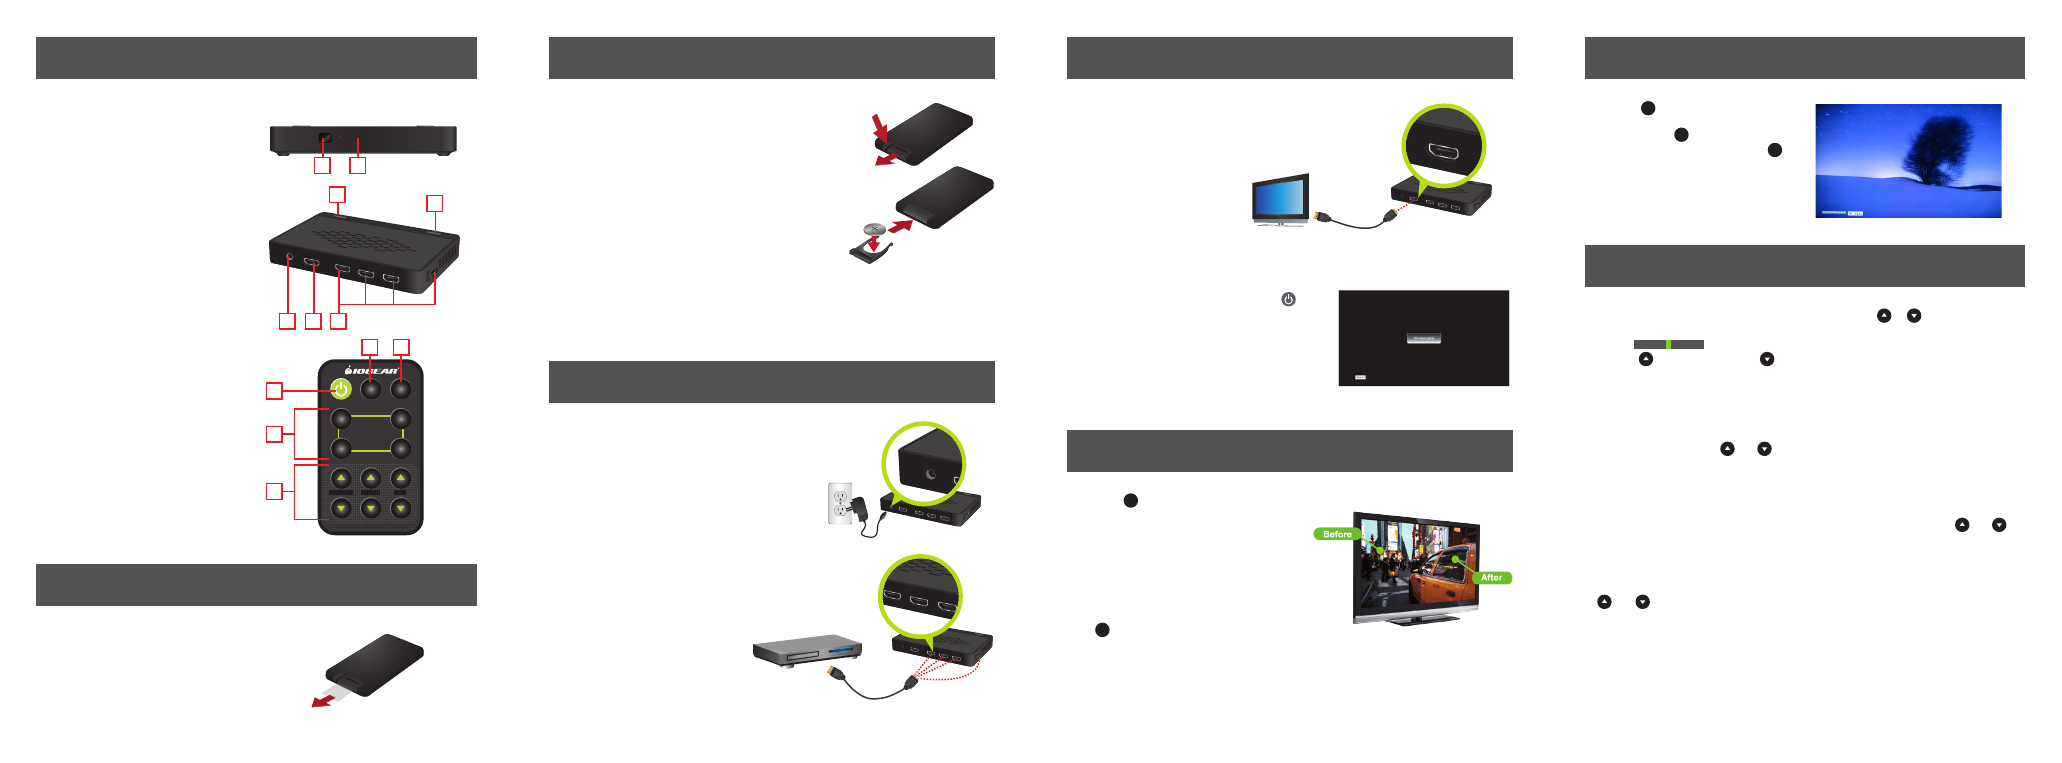
Product Overview
3D Complete +
1. Remote sensor: Receives the
remote control signals.
2. Source indicators: Lights up
when source is inputted.
3. Source button: Switches between
different input sources.
4. Power button: Turn the power to
on or off.
5. DC IN: Plugs the supplied power
adapter.
6. HDMI output: Outputs the image
source to a HDMI display device.
7. HDMI inputs: Inputs image
sources.
Remote Control
1. Power button: Press to turn the
power to on or off.
2. 2D Button: To enable 2D mode
and enable/disable video
enhancement function
3. 3D button: Enable the 3D function.
4. 1/2/3/4 Source buttons: Select the
desired input source by pressing
the number button.
5. Adjust buttons: Press to adjust the
level of 3D LEVEL, DEPTH or POP.
Remote Control
Replacing the battery inside of the remote control
Replace the battery when the battery is low power.
1. Push and hold the release tab to the right, and then
pull our the battery holder.
2. Replace the battery with CR2025 (3V lithium
battery) by following the orientation which printed
on the battery holder.
3. Push the holder back to the remote control.
Caution
• Be careful or your fingernails when pushing the battery release tab.
• Dispose the old battery in accordance with local regulations.
• Make sure the battery's orientation is correct. Improper or incorrect replacement of battery may cause fire,
personal injury or damage to property.
• Keep the cell battery (CR2025) away from children. Consult a medical advice immediately if a child swallows
the battery.
Installation
Connect the power adapter
Plug the DC connector plug of
power adapter into the 3D
Complete+ unit, and the other
end of adapter into a wall
outlet.
Connect the 3D Complete+ unit to a TV
Plug one end of HDMI
cable into HDMI output
connector of the 3D
Complete+ unit, and the
other end of HDMI cable
into a HDMI input
connector of a 3D-Ready
TV or projector.
Input a source to the 3D Complete+ unit
The source shown below is an
example only. The source must be
a device which supported HDMI
output, such as a BD player, DVD
player, Set-Top box, camcorder
and so on. Plug one end of HDMI
cable into HDMI input connector of
the 3D Complete+ unit, and the
other end of HDMI cable into the
HDMI output of source. Four HDMI
inputs are supported by this 3D
Complete+ unit.
2D to 3D
1. Press button to enable the 3D
function.
2. Pressing the will enable the 3D
function but not disable it. The
disables the 3D function.
Note: The 3D function is available on the
display device which supports 3D display
and the refresh rate is 120MHz at least.
Configuration
1. To configure the
3D LEVEL, DEPTH or POP, press or button
corresponding to the item of the remote control.
2. The (adjustment bar) will appear on the lower left of the screen.
Press to increase or press to decrease the level.
Note: The adjustments of
3D LEVEL
,
DEPTH
and
POP
are available only in the 3D mode.
3D Level
3D Level allows you to fine tune the optimal balance of presets between 3D Pop and Depth
effects. Using the 3D Level and button on the remote control, adjust the bar level to the
right to increase the amount of preset 3D Depth and reduce the amount of preset 3D Pop.
Adjust the bar level to the left to decrease the amount of preset 3D Depth and increase the
amount of preset 3D Pop.
3D Depth
3D Depth adjusts the amount of depth going into your 3D TV. Using the 3D Depth
and
keys on the remote control, adjust the bar level to the right to increase the amount of depth
effect and adjust the bar level to the left to decrease.
3D Pop
3D Pop controls the amount of the video images popping out of your 3D TV. Using the 3D Pop
and
button on the remote control, adjust the bar level to the right to increase the
amount that images pop out at you and adjust the bar level to the left to decrease.
Operation
1. Follow the Connection section to connect the
3D Complete+ unit , and then press
button on the remote control to turn on the
3D Complete+ unit. Alternatively, press
Power button on the top panel of 3D
Complete+ unit to turn the power to on.
2. Press the Source button on the top panel to
select an available or desired input source if
the screen shows No input signal.
3D
3D
2D
Remote Control
Using remote control for the first time
Pull out the insulating film from the remote
control if the remote control is being used
for the first time.
Image Enhancement
1. Press button to enhance the images of
source. Verify at the lower right of the
screen that Video Enhancement On is
displayed
2. To see the difference between the original
source and enhanced image, press the
Depth Up Arrow or Down Arrow keys to
split the screen.
3. To turn off the image enhancement, press
button again.
Note: Sometimes the TV's screen may display a black screen when inputting source from a
computer. This indicates the resolution set on the computer is not supported by the TV. Specify a
resolution and refresh rate that the TV can recognize or select the display mode to "Extended"
on the computer. For more supported resolutions, refer to the TV's instruction manual.
2D
2D
DC IN
HDMI OUT
HDMI 1
HDMI 2
HDMI 3
HDMI
4
DC IN
HDMI OUT
HDMI 1
HDMI 2
HDMI 3
HDMI
4
DC IN
HDMI OUT
HDMI 1
HDMI 2
HDMI 3
HDMI
4
DC IN
HDMI OUT
HDMI 1
HDMI 2
HDMI 3
HDM
I 4
5 6 7
1
2
4
3
To a wall
outlet
HDMI Cable
HDMI Cable
Display
Source
INPUT
2D
3D
2
4
1
3
3D LEVEL
DEPTH
POP
1
4
2
3
5
DC IN
HDMI OUT
HDMI 1
HDMI 2
HDMI 3
HDMI 4
DC IN
HDMI OUT
HDMI 1
HDMI 2
HDMI 3
HDMI 4
DC IN
HDMI OUT
HDMI 1
HDMI 2
HDMI 3
HDMI 4
2
3
4
5