Applications, 1 recording studio – Behringer Eurorack Pro RX1202FX User Manual
Page 10
10
EURORACK PRO RX1202FX User Manual
3. Applications
3.1 Recording studio
MIDI sound module
B-2 Pro
V-Amp 3
Electric Guitar
HPS3000
HPS3000
TRUTH B200A
Keyboard
F-Control FCA202
Laptop
MD Recorder
Mini Amp Amp 800
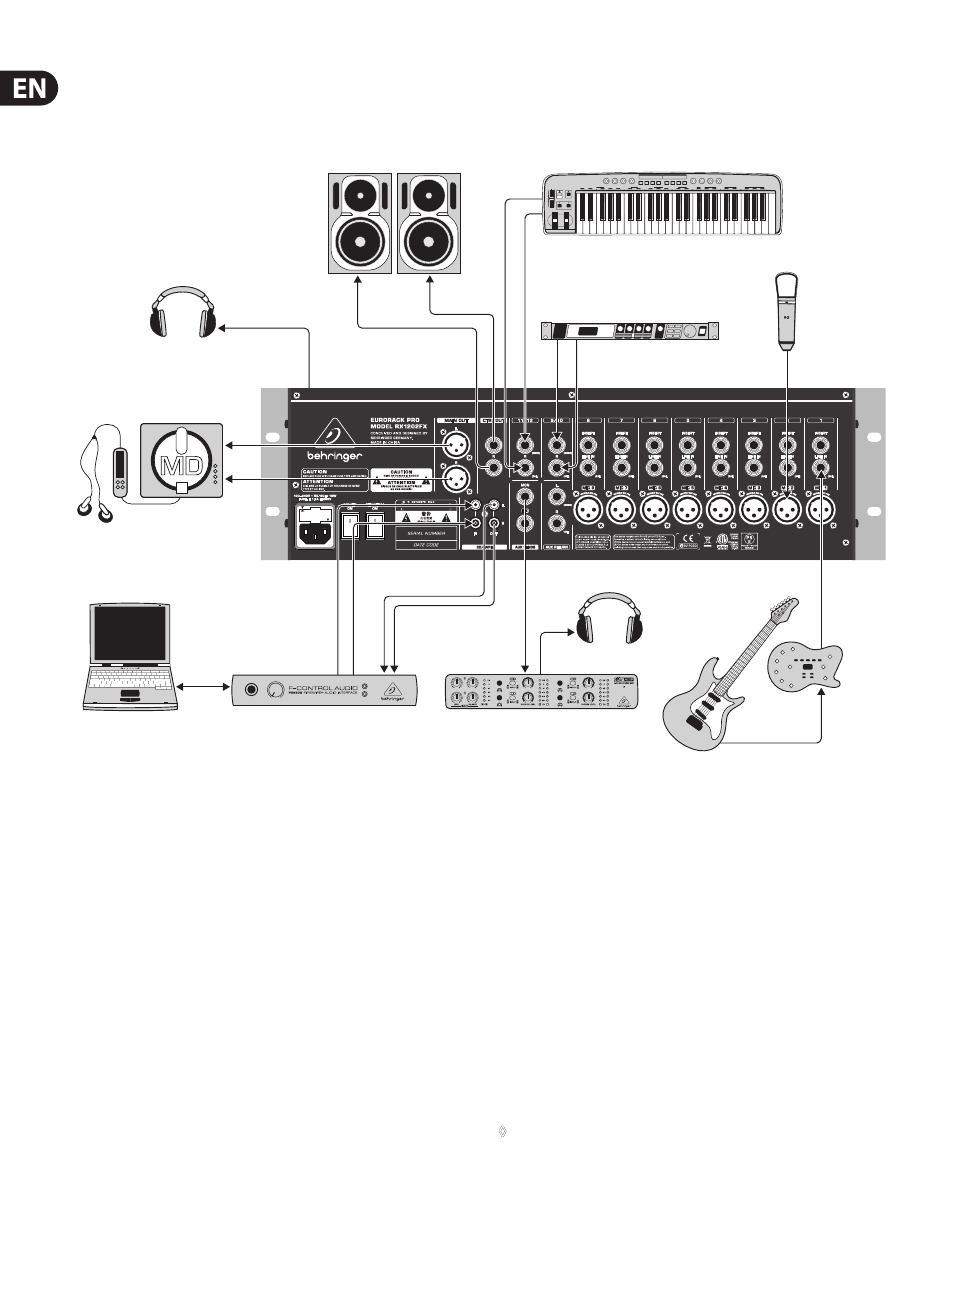
Fig. 3.1: The RX1202FX in a recording studio
Even though most of the tasks in a studio can nowadays be accomplished using
a computer, a mixing console remains an unavoidable piece of equipment that
lets you effectively manage audio inputs and outputs: microphone signals
need to be pre-amplified prior to being recorded, and the quality of microphone
sound is often worked on; recording and playback signals must be routed to the
appropriate connectors or integrated into the mix; the volume of headphones
and studio monitors needs to be adjusted, and so on. The well-equipped main
section of the RX1202FX is extremely useful in this case.
Cabling:
Connect your sound sources to the mic or line inputs of the mixer. Join your
master machine (DAT/MD recorder) to the main outputs. Your monitor speaker
is connected to the CTRL OUT connector, the headphones to the PHONES
output. Now attach the CD/TAPE outputs with the inputs of the sound
card of your Digital Audio Workstation (DAW). Hook up the outputs of the
computer’s soundcard to the CD/TAPE inputs. Connect a headphone amplifier
to the MON connector to be able to provide performing musicians with a
monitoring signal.
Record and playback:
The recording signal is preamplified in a mixer’s channel, processed with the
EQ and routed back to the main bus. Determine the recording level with the
LEVEL fader. The entire level to the computer is adjusted with the MAIN MIX
fader. To ensure that the signal is really being recorded, you should not listen
in to the main mix signal (i.e. the output signal of the console, prior to recording)
of the phones or control room bus. Instead, listen in to the returned signal
of the soundcard that is connected to the CD/TAPE inputs, in which case you
have a kind of read-after-write control. In this case, press the CD/TAPE TO CTRL
switch and adjust the volume level with the PHONES/CONTROL ROOM controller.
This way you can record further tracks to an existing playback (so-called
overdubs). In the process, use the Direct Monitoring function of your DAW
(Digital Audio Workstation).
Determine the amount of the input signals (keyboard, guitar, sound module
and microphone) in the mono and stereo channels that are to be sent to the
MON output by using the MON controller of the corresponding channel.
◊
With this application, the CD/TAPE TO MIX switch should not be pressed;
otherwise, the playback signal from the sound card output would be
routed back to the computer and would be added to the recording.
This would not only be undesirable, it would also create a feedback loop.