Maintenance – Steele Products SP-PB306 User Manual
Page 7
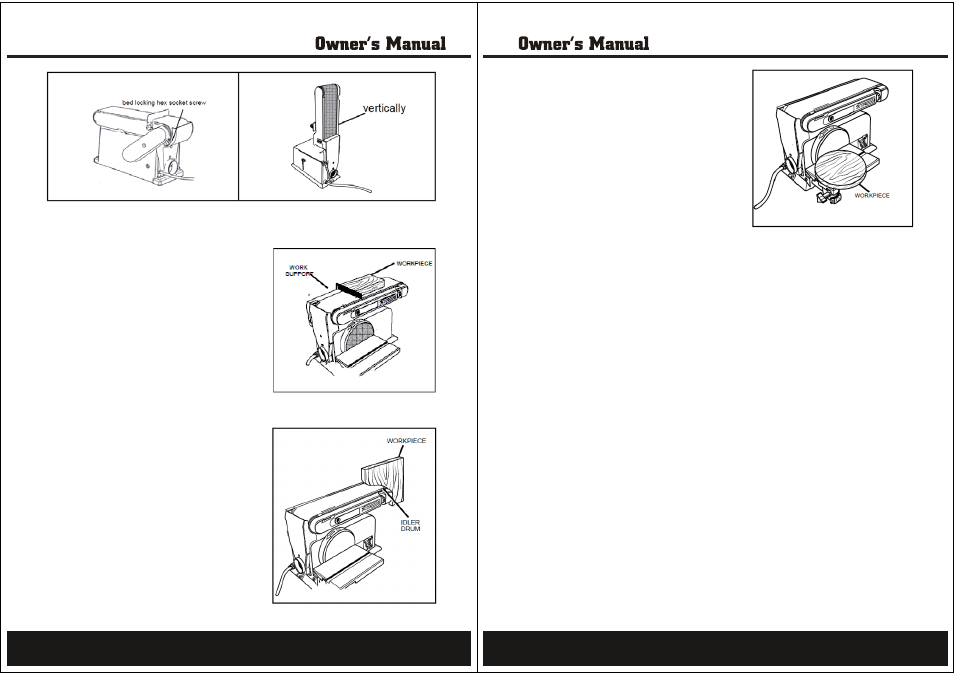
Surface Sanding on the Sanding Belt
4DAJO=J@EJCŃ=P
>NK=@OQNB=?AOKJPDA>AHPO=J@AN
DKH@PDASKNGLEA?AłNIHU>QPHECDPHUKJPKPDAOQNB=?A
KBPDA>AHP=J@=C=EJOPPDASKNGOQLLKNPĠSKNGNAOP
GAALEJCłJCANO=S=UBNKIPDAO=J@EJC>AHP KJOE@AN
QOEJC=LQODKNDKH@@KSJOPE?G
+KPAġ2OAATPN=?=QPEKJSDAJO=J@EJCRANUPDEJLEA?AO
=J@SDAJO=J@EJCATPN=HKJCLEA?AO
NAIKRAPDASKNG
OQLLKNP
LLHUKJHUAJKQCDLNAOOQNAPK=HHKSPDAO=J@EJC>AHP
PKNAIKRAI=PANE=H
Sanding Curved Pieces
4DAJO=J@EJCEJOE@A?QNRAOKJPDA>AHPO=J@AN
=HS=UOO=J@KJPDAE@HAN@NQIAJ@KBPDASKNG
OQLLKNPOP=PEKJĠNECDPOE@AKBPDAI=?DEJA=O
ODKSJEJ@E=CN=I
%KH@PDASKNGLEA?AłNIHU
GAALEJCłJCANO=S=U
BNKIPDAO=J@EJC>AHP(AALPDA?QNRALNAOOA@
łNIHU=C=EJOPPDAE@HAN@NQI
IKREJCPDASKNG
ARAJHU>=?G=J@BKNPD=?NKOOPDA@NQI
+KPAġ2OAATPN=?=QPEKJSDAJO=J@EJCRANUPDEJ
LEA?AO
=J@=LLHUKJHUAJKQCDLNAOOQNAPK=HHKS
PDAO=J@EJC>AHPPKNAIKRAPDAI=PANE=H
13
Sanding Disc Station - Sanding Outside Curves
Always sand outside curves using the sanding disc
and moving the workpiece from the left side of centre,
=OODKSJ(AALPDA?QNRALNAOOA@łNIHU=C=EJOPPDA
sanding disc, moving the work evenly from the left
side of the sanding disc. Be sure to hold the workpiece
łNIHUKJPKPDAOQNB=?AKBPDAO=J@EJC@EO?P=>HA
Mitre Gauge – Disc Sander
IEPNAC=QCAEOOQLLHEA@SEPDUKQNO=J@AN
=J@?=J>AQOA@KJPDA@EO?P=>HA
=OODKSJ1DAIEPNA
C=QCADA=@?=J>AOAP=JUSDANAQLPKgĠNECDPKNHABP>UHKKOAJEJCPDAHK?GGJK>
OAPPEJCPDAIEPNA
C=QCADA=@PKPDA@AOENA@=JCHA
=J@NAPECDPAJEJCPDAHK?GGJK>
Sanding Small End Grain and other small surfaces using the Mitre Gauge
Use of the mitre gauge is recommended for sanding small end surfaces on the sanding disc. Note:
HS=UOIKRAPDASKNGLEA?A=?NKOOPDAO=J@EJC@EO?BNKIPDAHABPOE@APKS=N@OPDANECDPOE@A
=J@>A
OQNAPKDKH@PDASKNGLEA?A@KSJPECDPHUKJPKPDAP=>HAOQNB=?A
Maintenance
WARNING!
Turn the power switch “OFF” and disconnect the plug from the outlet prior
to adjusting or maintaining the sander. DO NOT attempt to repair or maintain the electrical
?KILKJAJPOKBPDAIKPKN1=GAPDAO=J@ANPK=MQ=HEłA@OANRE?APA?DJE?E=JBKNPDEOPULAKB
maintenance.
Maintenance Required
#NAMQAJ?U
1.
Check power cord
Before each use.
2.
DA?GO=J@EJC>AHPO=J@@EO?OBKN@=I=CA
Before each use.
3.
DA?GIKREJCL=NPOBKN=HECJIAJP=J@>EJ@EJCEOOQAO
Before each use.
4.
Dress sanding surfaces
As needed
5.
/ALH=?AO=J@EJC>AHPOKN@EO?OĠOAAI=JQ=HOA?PEKJBKNOLA?Eł?O
As needed.
Clean and vacuum dust from the motor housing and other sander parts
As needed.
7.
=HHA=NEJCOEJPDEOPKKH=NAHQ>NE?=PA@=J@OA=HA@1DAUNAMQENAJKBQNPDANHQ>NE?=PEKJ
0ANRE?A>AUKJ@NA?KIIAJ@A@I=EJPAJ=J?AKJPDAOAPKKHOODKQH@KJHU>ALANBKNIA@>U=J
=QPDKNEVA@
MQ=HEłA@PA?DJE?E=J
14