JBA 40-1502 User Manual
Installation instructions, Installation recommendation, Part
INSTALLATION INSTRUCTIONS
**Installation recommendation:
**Installation recommendation:
**Installation recommendation:
**Installation recommendation:
JBA recommends in most cases that the vehicle be taken to a reputable exhaust shop.
G
G
G
G
40-1502
1991-95 Jeep Wrangler
1991-95 Jeep Wrangler
1991-95 Jeep Wrangler
1991-95 Jeep Wrangler
A
A
A
A
4.0L
4.0L
4.0L
4.0L L6
L6
L6
L6
T
T
T
T OOLS RECOMMENDED:
OOLS RECOMMENDED:
OOLS RECOMMENDED:
OOLS RECOMMENDED:
9/16''deep socket
9/16''deep socket
9/16''deep socket
9/16''deep socket
3/8î ratchet
3/8î ratchet
3/8î ratchet
3/8î ratchet
3/8'' Extension
3/8'' Extension
3/8'' Extension
3/8'' Extension
5/16''allen wrench
5/16''allen wrench
5/16''allen wrench
5/16''allen wrench
13mm socket
13mm socket
13mm socket
13mm socket
D
D
D
D
21mm socket
21mm socket
21mm socket
21mm socket
21mm combination wrench
21mm combination wrench
21mm combination wrench
21mm combination wrench
channel lock pliers
channel lock pliers
channel lock pliers
channel lock pliers
rubber mallet
rubber mallet
rubber mallet
rubber mallet
anti-seize
anti-seize
anti-seize
anti-seize
B
E
C
F
B
E
C
F
B
E
C
F
B
E
C
F
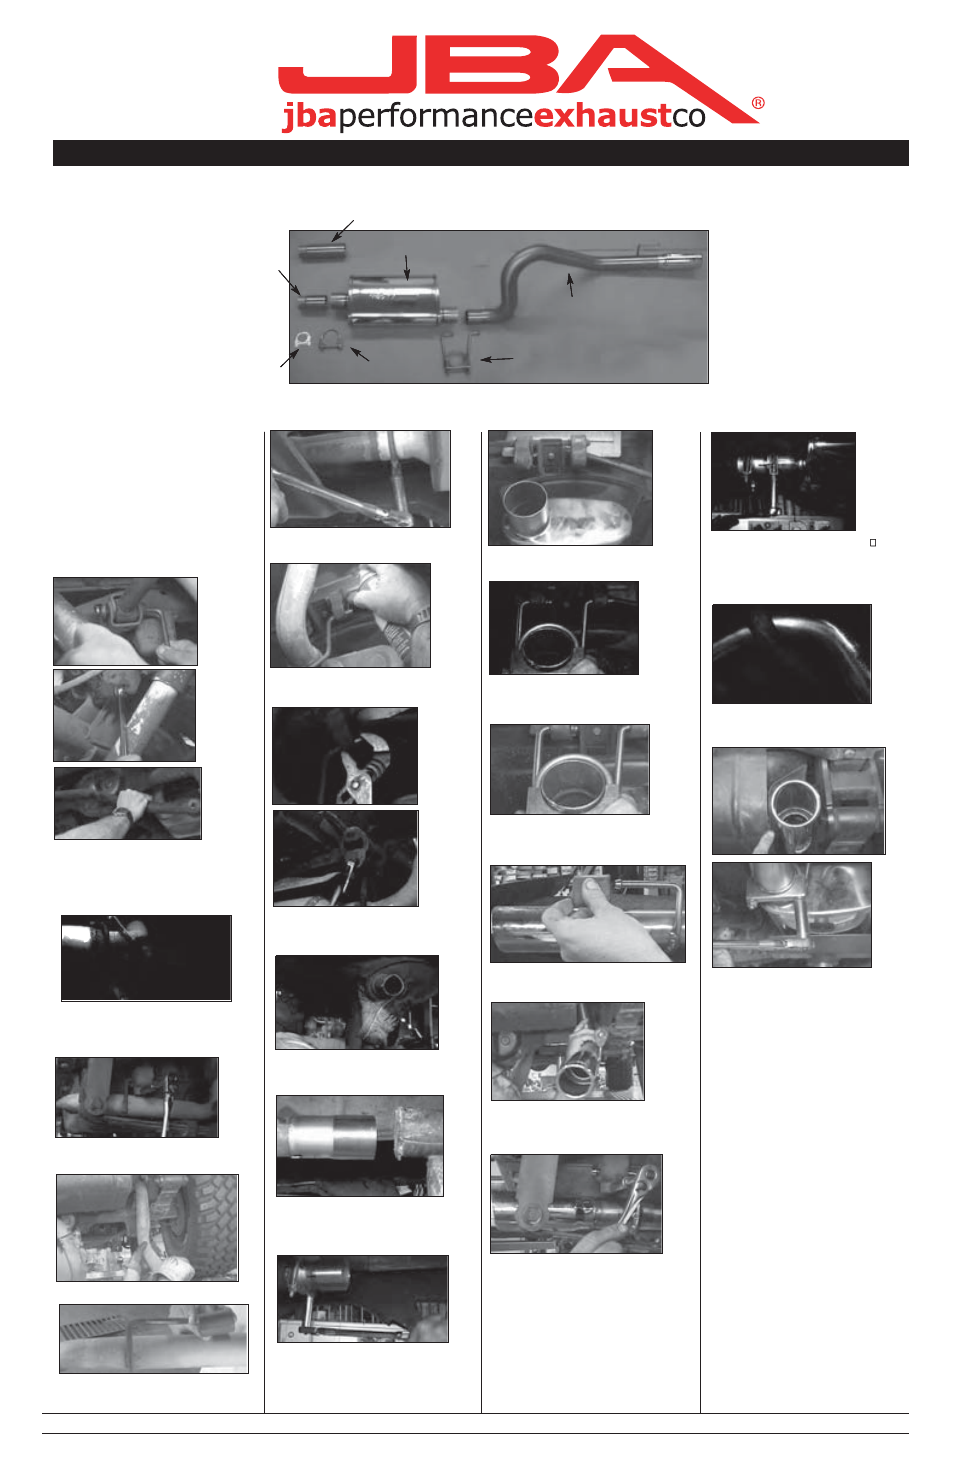
Part
Part
Part
Part s List
s List
s List
s List
A.
A.
A.
A. Head pipe
Head pipe
Head pipe
Head pipe
1
1
1
1
B.
B.
B.
B. Muf
Muf
Muf
Muffler
fler
fler
fler
1
1
1
1
C.
C.
C.
C. T
T
T
Tail pipe w/tip
ail pipe w/tip
ail pipe w/tip
ail pipe w/tip
1
1
1
1
D.
D.
D.
D. 2-1/4î clamp
2-1/4î clamp
2-1/4î clamp
2-1/4î clamp
1
1
1
1
E.
E.
E.
E. 2-1/2î clamp
2-1/2î clamp
2-1/2î clamp
2-1/2î clamp
1
1
1
1
F
.F
...F
F 2-1/2î clamp/hanger
2-1/2î clamp/hanger
2-1/2î clamp/hanger
2-1/2î clamp/hanger
1
G
G
G
G
.... Extra head pipe
Extra head pipe
Extra head pipe
Extra head pipe
1
T
T
T
T O
O
O
O ST
ST
ST
ST ART
ART
ART
ART ::::
spray lubricant or penetrating oil
spray lubricant or penetrating oil
spray lubricant or penetrating oil
spray lubricant or penetrating oil
reciprocating saw or hack saw
reciprocating saw or hack saw
reciprocating saw or hack saw
reciprocating saw or hack saw
p
p
p
pair of channel lock pliers 10î
air of channel lock pliers 10î
air of channel lock pliers 10î
air of channel lock pliers 10î
2. Disconnect negative battery cable and
2. Disconnect negative battery cable and
2. Disconnect negative battery cable and
2. Disconnect negative battery cable and
allow vehicle exhaust to cool.
allow vehicle exhaust to cool.
allow vehicle exhaust to cool.
allow vehicle exhaust to cool.
1. Remove and inventory new Evol™
1. Remove and inventory new Evol™
1. Remove and inventory new Evol™
1. Remove and inventory new Evol™
exhaust.
exhaust.
exhaust.
exhaust.
8.
8.
8.
8. Remove front muf
Remove front muf
Remove front muf
Remove front muffler clamp using a
fler clamp using a
fler clamp using a
fler clamp using a
15mm socket.
15mm socket.
15mm socket.
15mm socket.
14.
14.
14.
14.Inst
Inst
Inst
Install muf
all muf
all muf
all muffler (B) with of
fler (B) with of
fler (B) with of
fler (B) with offset toward
fset toward
fset toward
fset toward
rear and inward.
rear and inward.
rear and inward.
rear and inward.
20.
20.
20.
20. Position muf
Position muf
Position muf
Position muffler and inst
fler and inst
fler and inst
fler and install 2
all 2
all 2
all 2 ''clamp
''clamp
''clamp
''clamp
(E) over front muf
(E) over front muf
(E) over front muf
(E) over front muffler slip joint.T
fler slip joint.T
fler slip joint.T
fler slip joint.Tighten
ighten
ighten
ighten
completely using a 9/16'' deep wall sock-
completely using a 9/16'' deep wall sock-
completely using a 9/16'' deep wall sock-
completely using a 9/16'' deep wall sock
et.
et.
et.
et.
NOTE:
NOTE:
NOTE:
NOTE:
USE
USE
USE
USE ANTI SEIZE ON
ANTI SEIZE ON
ANTI SEIZE ON
ANTI SEIZE ON
THREADS OF CLAMP
THREADS OF CLAMP
THREADS OF CLAMP
THREADS OF CLAMP
. See notes #3
. See notes #3
. See notes #3
. See notes #3
9. S
9. S
9. S
9. Spray lube on two rear muf
pray lube on two rear muf
pray lube on two rear muf
pray lube on two rear muffler hanger
fler hanger
fler hanger
fler hanger
rod rubber grommet
rod rubber grommet
rod rubber grommet
rod rubber grommets.
s.
s.
s.
15. Inst
15. Inst
15. Inst
15. Install rear muf
all rear muf
all rear muf
all rear muffler clamp/hanger (F)
fler clamp/hanger (F)
fler clamp/hanger (F)
fler clamp/hanger (F)
into lower holes in rubber grommet
into lower holes in rubber grommet
into lower holes in rubber grommet
into lower holes in rubber grommets, with
s, with
s, with
s, with
rods pointing toward p
rods pointing toward p
rods pointing toward p
rods pointing toward passenger side.
assenger side.
assenger side.
assenger side.
21. Reinst
21. Reinst
21. Reinst
21. Reinstall p
all p
all p
all pan bar over rear axle.
an bar over rear axle.
an bar over rear axle.
an bar over rear axle.
Check for proper clearance on t
Check for proper clearance on t
Check for proper clearance on t
Check for proper clearance on tail pipe.
ail pipe.
ail pipe.
ail pipe.
3. With vehicle raised and properly sup-
3. With vehicle raised and properly sup-
3. With vehicle raised and properly sup-
3. With vehicle raised and properly sup
ported, remove p
ported, remove p
ported, remove p
ported, remove pan bar over rear axle by
an bar over rear axle by
an bar over rear axle by
an bar over rear axle by
removing two bolt
removing two bolt
removing two bolt
removing two bolts using a 21mm socket
s using a 21mm socket
s using a 21mm socket
s using a 21mm socket
or combination wrench and 5/16'' allen-
or combination wrench and 5/16'' allen-
or combination wrench and 5/16'' allen-
or combination wrench and 5/16'' allen
wrench.
wrench.
wrench.
wrench.
4.
4.
4.
4. Using a reciprocating saw
Using a reciprocating saw
Using a reciprocating saw
Using a reciprocating saw, cut t
, cut t
, cut t
, cut tail pipe
ail pipe
ail pipe
ail pipe
of
of
of
off 4''behind rear muf
f 4''behind rear muf
f 4''behind rear muf
f 4''behind rear muffler hanger
fler hanger
fler hanger
fler hanger....
See notes #1
See notes #1
See notes #1
See notes #1
1
1
1
11.
1.
1.
1. Using some form of heat and force
Using some form of heat and force
Using some form of heat and force
Using some form of heat and force
remove muf
remove muf
remove muf
remove muffler assembly without damag-
fler assembly without damag-
fler assembly without damag-
fler assembly without damag
ing stock cat
ing stock cat
ing stock cat
ing stock catalytic converter pipe.
alytic converter pipe.
alytic converter pipe.
alytic converter pipe.
10.
10.
10.
10. Support muf
Support muf
Support muf
Support muffler and remove two rear
fler and remove two rear
fler and remove two rear
fler and remove two rear
muf
muf
muf
muffler hangers from rubber grommet
fler hangers from rubber grommet
fler hangers from rubber grommet
fler hangers from rubber grommets
s
s
s
using channel lock pliers.
using channel lock pliers.
using channel lock pliers.
using channel lock pliers.
16. Position rear muf
16. Position rear muf
16. Position rear muf
16. Position rear muffler clamp/hanger
fler clamp/hanger
fler clamp/hanger
fler clamp/hanger
(F),over rear muf
(F),over rear muf
(F),over rear muf
(F),over rear muf
fler slip joint and hand
fler slip joint and hand
fler slip joint and hand
fler slip joint and hand
tighten only at this time.
tighten only at this time.
tighten only at this time.
tighten only at this time.
17.
17.
17.
17. Inst
Inst
Inst
Install factory rear t
all factory rear t
all factory rear t
all factory rear tail pipe rubber
ail pipe rubber
ail pipe rubber
ail pipe rubber
grommet on rear t
grommet on rear t
grommet on rear t
grommet on rear tail pipe hanger rod.
ail pipe hanger rod.
ail pipe hanger rod.
ail pipe hanger rod.
23. Check exhaust kit for proper clear-
23. Check exhaust kit for proper clear-
23. Check exhaust kit for proper clear-
23. Check exhaust kit for proper clear
ances, and t
ances, and t
ances, and t
ances, and tack weld all slip joint
ack weld all slip joint
ack weld all slip joint
ack weld all slip joints in
s in
s in
s in
three spot
three spot
three spot
three spots.
s.
s.
s.
22. Position t
22. Position t
22. Position t
22. Position tail pipe, checking chrome tip
ail pipe, checking chrome tip
ail pipe, checking chrome tip
ail pipe, checking chrome tip
for clearance, and tighten clamp/hanger
for clearance, and tighten clamp/hanger
for clearance, and tighten clamp/hanger
for clearance, and tighten clamp/hanger
(F) completely using a 9/16'' deep wall
(F) completely using a 9/16'' deep wall
(F) completely using a 9/16'' deep wall
(F) completely using a 9/16'' deep wall
socket.
socket.
socket.
socket.
NOTE:
NOTE:
NOTE:
NOTE:
USE
USE
USE
USE ANTI SEIZE ON
ANTI SEIZE ON
ANTI SEIZE ON
ANTI SEIZE ON
THREADS OF CLAMP
THREADS OF CLAMP
THREADS OF CLAMP
THREADS OF CLAMP
. See notes #3
. See notes #3
. See notes #3
. See notes #3
5.
5.
5.
5. Remove rear t
Remove rear t
Remove rear t
Remove rear tail pipe hanger using a
ail pipe hanger using a
ail pipe hanger using a
ail pipe hanger using a
13mm socket and extension.
13mm socket and extension.
13mm socket and extension.
13mm socket and extension.
12. Inst
12. Inst
12. Inst
12. Install Evol™ head pipe (A), aligning
all Evol™ head pipe (A), aligning
all Evol™ head pipe (A), aligning
all Evol™ head pipe (A), aligning
notch with locating pin. Note: you may
notch with locating pin. Note: you may
notch with locating pin. Note: you may
notch with locating pin. Note: you may
have to t
have to t
have to t
have to tap on with rubber mallet.
ap on with rubber mallet.
ap on with rubber mallet.
ap on with rubber mallet.
See
See
See
See notes #2
notes #2
notes #2
notes #2
18.
18.
18.
18.Inst
Inst
Inst
Install t
all t
all t
all tail pipe from rear of vehicle.
ail pipe from rear of vehicle.
ail pipe from rear of vehicle.
ail pipe from rear of vehicle.
Place rubber grommet in holder and slip
Place rubber grommet in holder and slip
Place rubber grommet in holder and slip
Place rubber grommet in holder and slip
ttttail pipe into rear muf
ail pipe into rear muf
ail pipe into rear muf
ail pipe into rear muffler slip joint 2''.
fler slip joint 2''.
fler slip joint 2''.
fler slip joint 2''.
24. Using a sof
24. Using a sof
24. Using a sof
24. Using a soft cloth, remove all print
t cloth, remove all print
t cloth, remove all print
t cloth, remove all prints
s
s
s
from turnout tip.
from turnout tip.
from turnout tip.
from turnout tip.
25. Lower vehicle and reatt
25. Lower vehicle and reatt
25. Lower vehicle and reatt
25. Lower vehicle and reattach the
ach the
ach the
ach the
negative battery cable.
negative battery cable.
negative battery cable.
negative battery cable.
NOTES:
NOTES:
NOTES:
NOTES:
1.
1.
1.
1. If vehicle is lif
If vehicle is lif
If vehicle is lif
If vehicle is lifted with proper vehicle
ted with proper vehicle
ted with proper vehicle
ted with proper vehicle
lif
lif
lif
lift, step #4 can be eliminated.
t, step #4 can be eliminated.
t, step #4 can be eliminated.
t, step #4 can be eliminated. The muf-
The muf-
The muf-
The muf
fler assembly can be removed in one
fler assembly can be removed in one
fler assembly can be removed in one
fler assembly can be removed in one
piece by removing right rear shock, and
piece by removing right rear shock, and
piece by removing right rear shock, and
piece by removing right rear shock, and
raising right rear frame rail.
raising right rear frame rail.
raising right rear frame rail.
raising right rear frame rail.
2.
2.
2.
2. Due to the possibility of stock cat
Due to the possibility of stock cat
Due to the possibility of stock cat
Due to the possibility of stock catalytic
alytic
alytic
alytic
converter being changed or altered from
converter being changed or altered from
converter being changed or altered from
converter being changed or altered from
6.
6.
6.
6. Remove t
Remove t
Remove t
Remove tail pipe from rear of vehicle.
ail pipe from rear of vehicle.
ail pipe from rear of vehicle.
ail pipe from rear of vehicle.
7.
7.
7.
7. Remove rubber grommet from t
Remove rubber grommet from t
Remove rubber grommet from t
Remove rubber grommet from tail pipe
ail pipe
ail pipe
ail pipe
hanger rod and save, as it will be reused.
hanger rod and save, as it will be reused.
hanger rod and save, as it will be reused.
hanger rod and save, as it will be reused.
13.
13.
13.
13.Inst
Inst
Inst
Install and position 2 º''clamp (D),
all and position 2 º''clamp (D),
all and position 2 º''clamp (D),
all and position 2 º''clamp (D),
over head pipe (A) slip joint and tighten
over head pipe (A) slip joint and tighten
over head pipe (A) slip joint and tighten
over head pipe (A) slip joint and tighten
completely using a 9/16'' deep wall sock-
completely using a 9/16'' deep wall sock-
completely using a 9/16'' deep wall sock-
completely using a 9/16'' deep wall sock
et.
et.
et.
et.
NOTE:
NOTE:
NOTE:
NOTE:
USE
USE
USE
USE ANTI SEIZE ON
ANTI SEIZE ON
ANTI SEIZE ON
ANTI SEIZE ON
THREADS OF CLAMP
THREADS OF CLAMP
THREADS OF CLAMP
THREADS OF CLAMP
. See notes #3
. See notes #3
. See notes #3
. See notes #3
19.
19.
19.
19. Reassemble rear t
Reassemble rear t
Reassemble rear t
Reassemble rear tail pipe hanger
ail pipe hanger
ail pipe hanger
ail pipe hanger
assembly
assembly
assembly
assembly, and tighten using a 13mm
, and tighten using a 13mm
, and tighten using a 13mm
, and tighten using a 13mm
socket.
socket.
socket.
socket.
stock, JBA has supplied an extra head
stock, JBA has supplied an extra head
stock, JBA has supplied an extra head
stock, JBA has supplied an extra head
pipe with a longer length for customer to
pipe with a longer length for customer to
pipe with a longer length for customer to
pipe with a longer length for customer to
cut at his discretion for a custom fit. First
cut at his discretion for a custom fit. First
cut at his discretion for a custom fit. First
cut at his discretion for a custom fit. First
you must inst
you must inst
you must inst
you must install Evol™
all Evol™
all Evol™
all Evol™ tail pipe (C), rear
tail pipe (C), rear
tail pipe (C), rear
tail pipe (C), rear
muf
muf
muf
muffler clamp/hanger (F), and muf
fler clamp/hanger (F), and muf
fler clamp/hanger (F), and muf
fler clamp/hanger (F), and muffler (B)
fler (B)
fler (B)
fler (B)
and position for proper clearance, to
and position for proper clearance, to
and position for proper clearance, to
and position for proper clearance, to
determine where to cut extra head pipe
determine where to cut extra head pipe
determine where to cut extra head pipe
determine where to cut extra head pipe
supplied.
supplied.
supplied.
supplied.
3.
3.
3.
3. If anti seize is not used on threads of
If anti seize is not used on threads of
If anti seize is not used on threads of
If anti seize is not used on threads of
clamp
clamp
clamp
clamps before tightening, the nut's will
s before tightening, the nut's will
s before tightening, the nut's will
s before tightening, the nut's will
gall, and clamp rod will break.
gall, and clamp rod will break.
gall, and clamp rod will break.
gall, and clamp rod will break.
aking the truck to a muffler shop and having all slip connections t
aking the truck to a muffler shop and having all slip connections t
aking the truck to a muffler shop and having all slip connections t
aking the truck to a muffler shop and having all slip connections t
ack welded.
ack welded.
ack welded.
ack welded.
17227
17227
17227
17227