Installation cassette, Radio/maintenance troubleshooting, Mains – Philips PORTABLE RADIO CASS REC SINGLE User Manual
Page 2: Ab c d
Installation
Cassette
SUPPLY
Battery supply (See
2)
• Open the battery compartment and insert as
indicated 4 batteries, type R20, UM1 or D-cells.
• Remove the batteries if exhausted or if they
will not be used again for a long period.
• The battery supply is switched off when the
set is connected to the mains. To change over
to battery supply, pull out the plug from the
MAINS socket.
Mains supply (See 3)
• Check if the mains voltage as shown on the
model number plate (on the base of the set)
corresponds to your local mains voltage. If it
does not, consult your dealer or service
organisation.
• Connect the mains lead to the MAINS socket
and the wall socket. The mains supply is
switched on. To disconnect the set from the
mains completely, withdraw the mains plug
from the wall socket.
The model number and production number are
located on the base of the set.
This product complies with the radio interference
requirements of the European Community.
CASSETTE RECORDER
Copyright
Recording is permissible insofar as copyright or
other rights of third parties are not infringed.
Fast winding and rewinding
Press fast forward wind F.FWD 5 or
REWIND 6 button. To stop, press STOP 9.
Safeguarding a cassette against erasure
Keep the cassette side to be
safeguarded in front of you and
break out the left tab.
Now, recording on this side is no
longer possible.
CASSETTE PLAYBACK
• Set the TAPE/RADIO selector to TAPE.
• Press EJECT 9 and insert a cassette.
– For playback, any cassette type can be
inserted.
• To start playback, press PLAY (.
• Adjust the sound with the controls VOLUME
and DBB.
– You may connect stereo headphones with 3.5
mm plug to socket p. The loudspeaker is then
muted.
• To stop, press STOP 9. The set is then
switched off. On pressing again, the cassette
holder will open (EJECT).
When the end of the tape is reached, the
recorder buttons are released.
RECORDING
• Press EJECT 9 to open the cassette holder.
• Insert the cassette.
• For recording you must use a
NORMAL cassette (IEC I) on
which the tabs are not removed.
– At the very beginning of the
tape, no recording will take place during the
first 7 seconds when the leader tape passes
the recorder heads.
• When monitoring during recording, adjust the
sound with the controls VOLUME and DBB.
These controls do not affect the recording.
Recording from the radio
• Set the TAPE/RADIO selector to RADIO.
Starting and stopping the recording
• To start recording, press RECORD 0; in doing
so, PLAY ( is pressed too.
• For brief interruptions, press PAUSE ;. Press
again to restart recording.
• To stop, press STOP 9. On pressing again, the
cassette holder will open (EJECT).
– When the end of the tape is reached, the
recorder buttons are released.
• The set is switched off if TAPE/RADIO selector
is in position TAPE and the recorder buttons
are released.
1
Radio/Maintenance
Troubleshooting
RADIO RECEPTION
• Set the TAPE/RADIO selector to RADIO.
• Adjust the sound with the controls VOLUME
and DBB.
– You may connect stereo headphones with 3.5
mm plug to socket p. The loudspeaker is then
muted.
• Select the wave band using BAND selector.
• Tune to a radio station using TUNING knob.
(LW not on all versions).
– For FM, pull out the telescopic aerial. To
improve FM-reception, incline and turn the
aerial. Reduce its length if the FM-signal is too
strong (very close to a transmitter).
– For AM/MW and LW (Medium and Long
Wave), the set is provided with a built-in aerial,
so there is no need to use the telescopic
aerial. The aerial can be directed by turning the
whole set.
• The set is switched off if the TAPE/RADIO
selector is in position TAPE and the recorder
buttons are released.
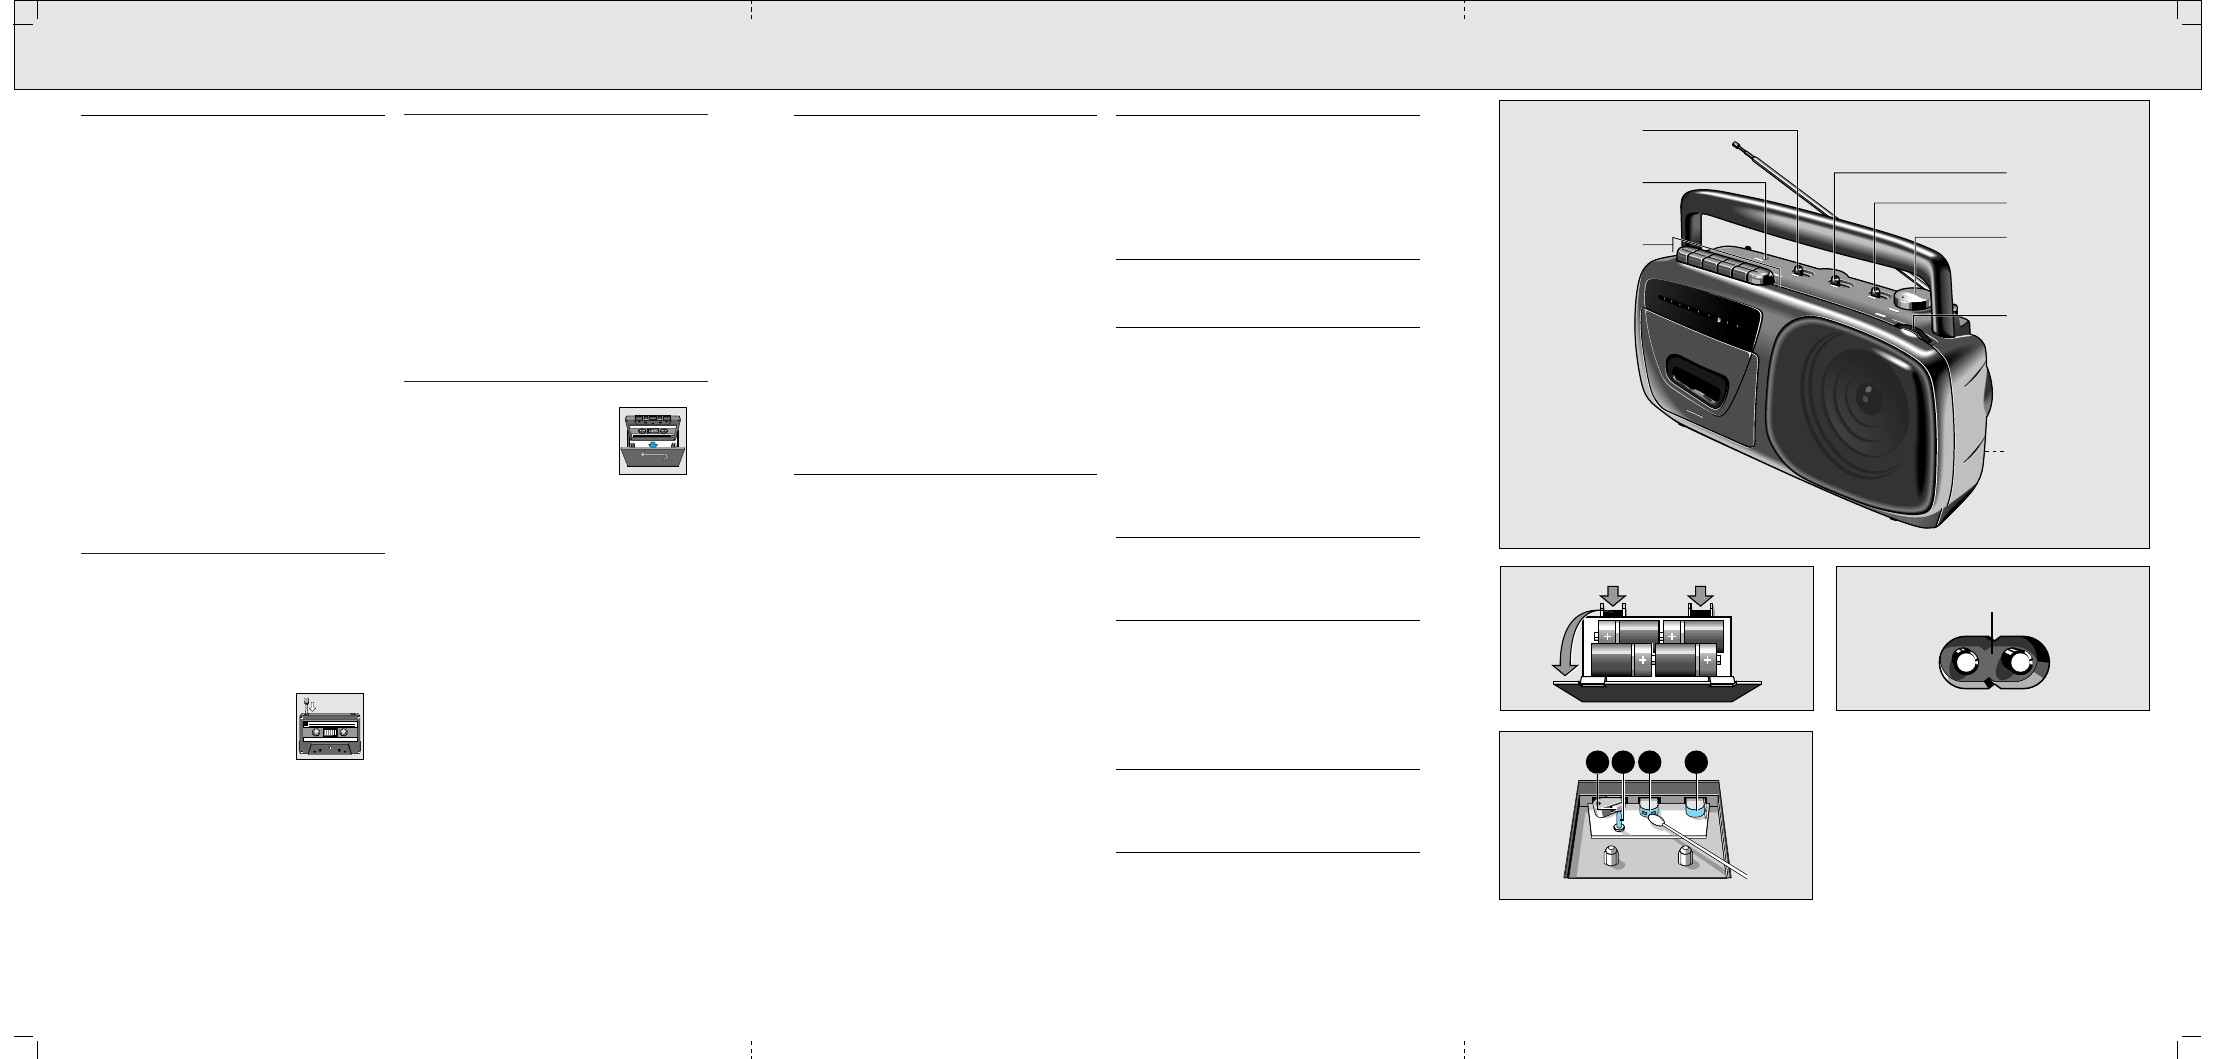
MAINTENANCE (see 4)
Clean the parts indicated after every 50 hours of
operation or, on average, once a month.
• Open the cassette holder by pressing EJECT 9.
• Use a cotton bud slightly moistened with
alcohol or a special head cleaning fluid.
• Press PLAY ( and clean the rubber pressure
roller D.
• Then press PAUSE ; and clean the capstan C,
recording/playback head B and erase head A.
• After cleaning, press STOP 9.
Cleaning of the heads A and B can also be done
by playing a cleaning cassette through once.
Do not expose the set, batteries and cassettes to
rain, moisture, sand, or to excessive heat e.g.
from heating equipment or in motor cars parked
in the sun.
If a fault occurs, first check the points listed
below before taking the set for repair. If you are
unable to remedy a problem by following these
hints, consult your dealer or service centre.
Warning: Under no circumstances should you try
to repair the set yourself, as this would invalidate
the guarantee
PROBLEM
– POSSIBLE CAUSE
• REMEDY
No sound
– VOLUME is not adjusted
• Adjust the VOLUME
– Headphones connected
• Disconnect the headphones
– Batteries are exhausted
• Insert fresh batteries
– Batteries are incorrectly inserted
• Insert the batteries correctly
– Mains lead is not securely connected
• Connect the mains lead properly
Broadcast cannot be received
– Insufficient antenna input
• Rotate telescopic antenna (FM) or set (AM) for
best reception
poor radio reception
– Weak radio aerial signal
• Aim the aerial for best reception:
– FM: incline and rotate telescopic aerial
– AM (MW/LW): rotate the entire set
– Interference caused by the vicinity of electrical
equipment
• Keep the set away from electrical equipment
Poor cassette sound quality
– Dust and dirt on the heads, capstan or
pressure roller
• Clean the heads etc. See maintenance
Recording does not work
– Cassette tab(s) may be removed
• Apply a piece of adhesive tape over the
missing tab space
IOIOIO
IOIOIO
IOIOIO
IOIOIO
IOIOIO
IOO
IOO
Radio Cassette Recorder
IOOO
IOIIOI
IOIIOI
IOII OI
IOIIOI
IOII OI
IOIIOIO
IOIIOI
IOII OI
IOII OI
IOO
IOO
Radio Cassette Recorder
IOOO
IOIIOI
IOIIOI
IOII OI
IOIIOI
IOII OI
IOIIOIO
IOIIOI
IOII OI
IOII OI
IOIOIO
IOIOIOI
FM 88 I
92
I 94 I 96
I 100
I 104
I
108 MHz
AM 522 530
650 800
1000
1300
1607 kHz
FM 88 I
92
I 94 I 96
I 100
I 104
I
108 MHz
AM 522 530
650 800
1000
1300
1607 kHz
DYNAMIC
BASS BOOST
• ONE
TOUCH
RECORDING
REC PLAY
DYNAMIC
BASS BOOST
• ONE
TOUCH
RECORDING
REC PLAY
TAPE/RADIO
HEADPHONES p
CASSETTE KEYS
BAND
DBB
TUNING
BATTERY
COMPARTMENT
VOLUME
4 x R20 - UM1 - D-cells
MAINS
1
2
3
A
B
C
D
4