A/v 1 j, Dvanced, Elevision – Philips 27DV60S User Manual
Page 5: Onnections, A/v 2 j, Acks, Ideo
75
Ω
L/Mono
Monitor
out
VIDEO
S-VIDEO
SURROUND SOUND
+ R – – L +
8
Ω
8
Ω
AV1
in
AV2
in
AUDIO
R
DIGITAL AUDIOOUT
PCM/MPEG2/DOLBYD/DTS
OPTICAL
COAXIAL
AV1
1
3
2
AUDIO OUT
R L
S-VIDEO
OUT
ANT/CABLE
OUT
VIDEO
OUT
5
SLEE
P
SOUR
CE
STATU
S
CC
CLOC
K
REPE
AT
SOUN
D
PICTU
RE
MENU
CH
REPE
AT
NGLE
POW
ER
SHUF
FLE
OK
TV
DVD
SCAN
MENU
A-B
4
T
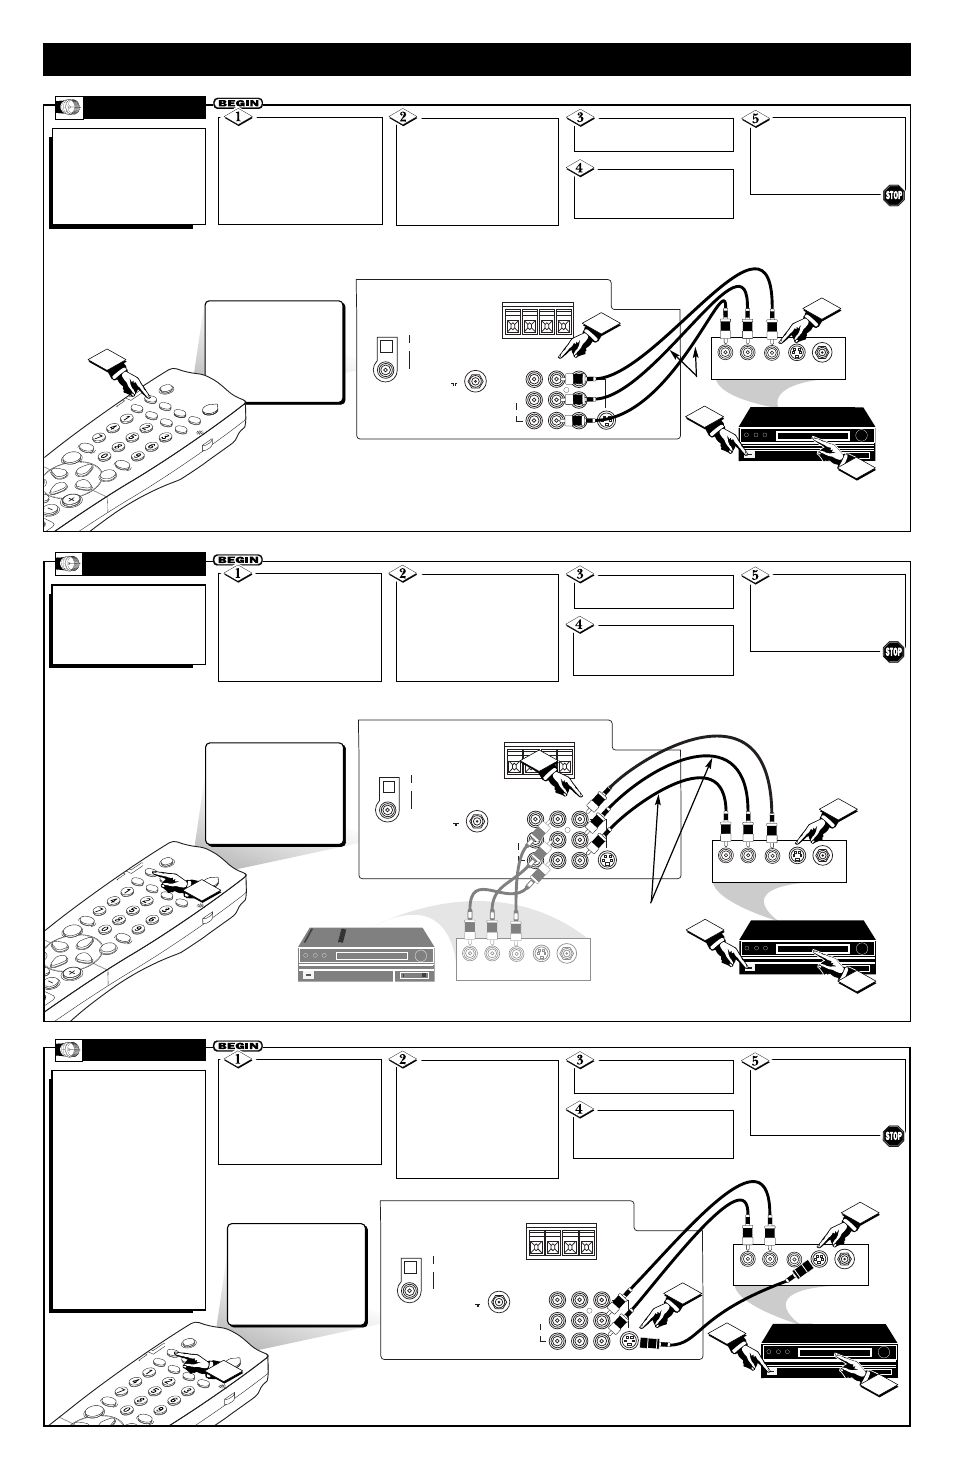
he TVÕs Audio/Video Input
Jacks are for direct pic-
ture and sound connections
between the TV and a VCR
(or similar device) that has
audio/video output jacks.
A/V 1 J
ACKS
Connect the VIDEO
(yellow) cable to the VIDEO
AV1 in jack on the back of the
TV. Then connect the AUDIO
(red and white) cables to the
AUDIO (left and right) AV1 in
jacks on the rear of the TV.
Connect the VIDEO (yel-
low) cable to the VIDEO OUT
jack on the back of the VCR.
Then connect the AUDIO (red
and white) cables to the
AUDIO (left and right) OUT
jacks on the rear of the VCR.
VCR (or Accessory Device
with A/V Outputs)
A
DVANCED
T
ELEVISION
C
ONNECTIONS
Turn the VCR and the
TV ON.
With the VCR ON and a
prerecorded tape inserted,
press the PLAY button to
view the tape on the televi-
sion.
Press the SOURCE but-
ton on the remote control to
select the AV1 channel.
VCR Jack Panel
Video (yellow) Cable
Audio Cables
(red & white)
Jack Panel on the
back of the TV
Tune the TV to the AV1 Channel
SLEE
P
SOUR
CE
STATU
S
CC
CLOC
K
REPE
AT
SOUN
D
PICTU
RE
MENU
CH
REPE
AT
ANGL
E
POW
ER
SHUF
FLE
OK
TV
DVD
SCAN
MENU
A-B
AV2
4
75
Ω
L/Mono
Monitor
out
VIDEO
S-VIDEO
SURROUND SOUND
+ R – – L +
8
Ω
8
Ω
AV1
in
AV2
in
AUDIO
R
DIGITAL AUDIOOUT
PCM/MPEG2/DOLBYD/DTS
OPTICAL
COAXIAL
1
3
2
AUDIO OUT
R L
S-VIDEO
OUT
ANT/CABLE
OUT
VIDEO
OUT
5
AUDIO OUT
R L
S-VIDEO
OUT
ANT/CABLE
OUT
VIDEO
OUT
A
second VCR or accessory
device with audio/video
output jacks can be added by
using the AV2 Inputs on the
back of the television.
A/V 2 J
ACKS
Connect the VIDEO
(yellow) cable to the VIDEO
AV2 in jack on the back of the
TV. Then connect the AUDIO
(red and white) cables to the
AUDIO (left and right) AV2 in
jacks on the rear of the TV.
Connect the VIDEO (yel-
low) cable to the VIDEO OUT
jack on the back of the 2nd VCR.
Then connect the AUDIO (red
and white) cables to the AUDIO
(left and right) OUT jacks on the
rear of the 2nd VCR.
VCR
(or Accessory Device with A/V Outputs)
Turn the 2nd VCR and
the TV ON.
With the 2nd VCR ON
and a prerecorded tape insert-
ed, press the PLAY button to
view the tape on the televi-
sion.
Press the SOURCE but-
ton on the remote control to
select the AV2 channel.
VCR Jack Panel
Video (yellow) Cable
Audio Cables
(red & white)
Jack Panel on the
back of the TV
Tune the TV to
the AV2 Channel
Possible First VCR or Accessory Device
Connected to the AV1 Input Jacks
5
SLEE
P
SOUR
CE
STATU
S
CC
CLOC
K
REPE
AT
SOUN
D
PICTU
RE
MENU
REPE
AT
POW
ER
SHUF
FLE
TV
DVD
SCAN
MENU
A-B
AV2
4
75
Ω
L/Mono
Monitor
out
VIDEO
S-VIDEO
SURROUND SOUND
+ R – – L +
8
Ω
8
Ω
AV1
in
AV2
in
AUDIO
R
DIGITAL AUDIOOUT
PCM/MPEG2/DOLBYD/DTS
OPTICAL
COAXIAL
1
3
2
AUDIO OUT
R L
S-VIDEO
OUT
ANT/CABLE
OUT
VIDEO
OUT
5
T
he S(uper)-Video connec-
tion on the rear of the TV
can provide you with better
picture detail and clarity for
the playback of accessory
sources such as DBS (digital
broadcast satellite), DVD
(digital video discs), video
games, and S-VHS VCR
(video cassette recorder)
tapes than the normal anten-
na picture connections.
NOTE: The accessory device
must have an S-VIDEO
OUT(put) jack in order for
you to complete the connec-
tion on this page.
S-V
IDEO
Connect one end of the
S-Video (SVHS) cable to the S-
Video jack on the back of the TV.
Then connect one end of the
AUDIO (red and white) cables
to the AUDIO (left and right) AV2
in jacks on the rear of the TV.
Connect the other end of
the S-Video (SVHS) cable to
the SVHS jack on the back of
the VCR. Then connect the
other end of the AUDIO (red
and white) cables to the
AUDIO (left and right) OUT
jacks on the rear of the VCR.
VCR
(or Accessory Device with S-VIDEO Jack
Turn the VCR and the
TV ON.
With the VCR ON and a
prerecorded tape inserted,
press the PLAY button to
view the tape on the televi-
sion.
Press the SOURCE but-
ton on the remote control to
select the AV2 (SVHS) channel.
VCR Jack Panel
S-Video Cable
Audio Cables
(red & white)
Jack Panel on the
back of the TV
Tune the TV to the AV2
Channel for S-Video