Stop, Ow to, Irst – Philips PV6080 User Manual
Page 2: Etup, System feature (if desired)
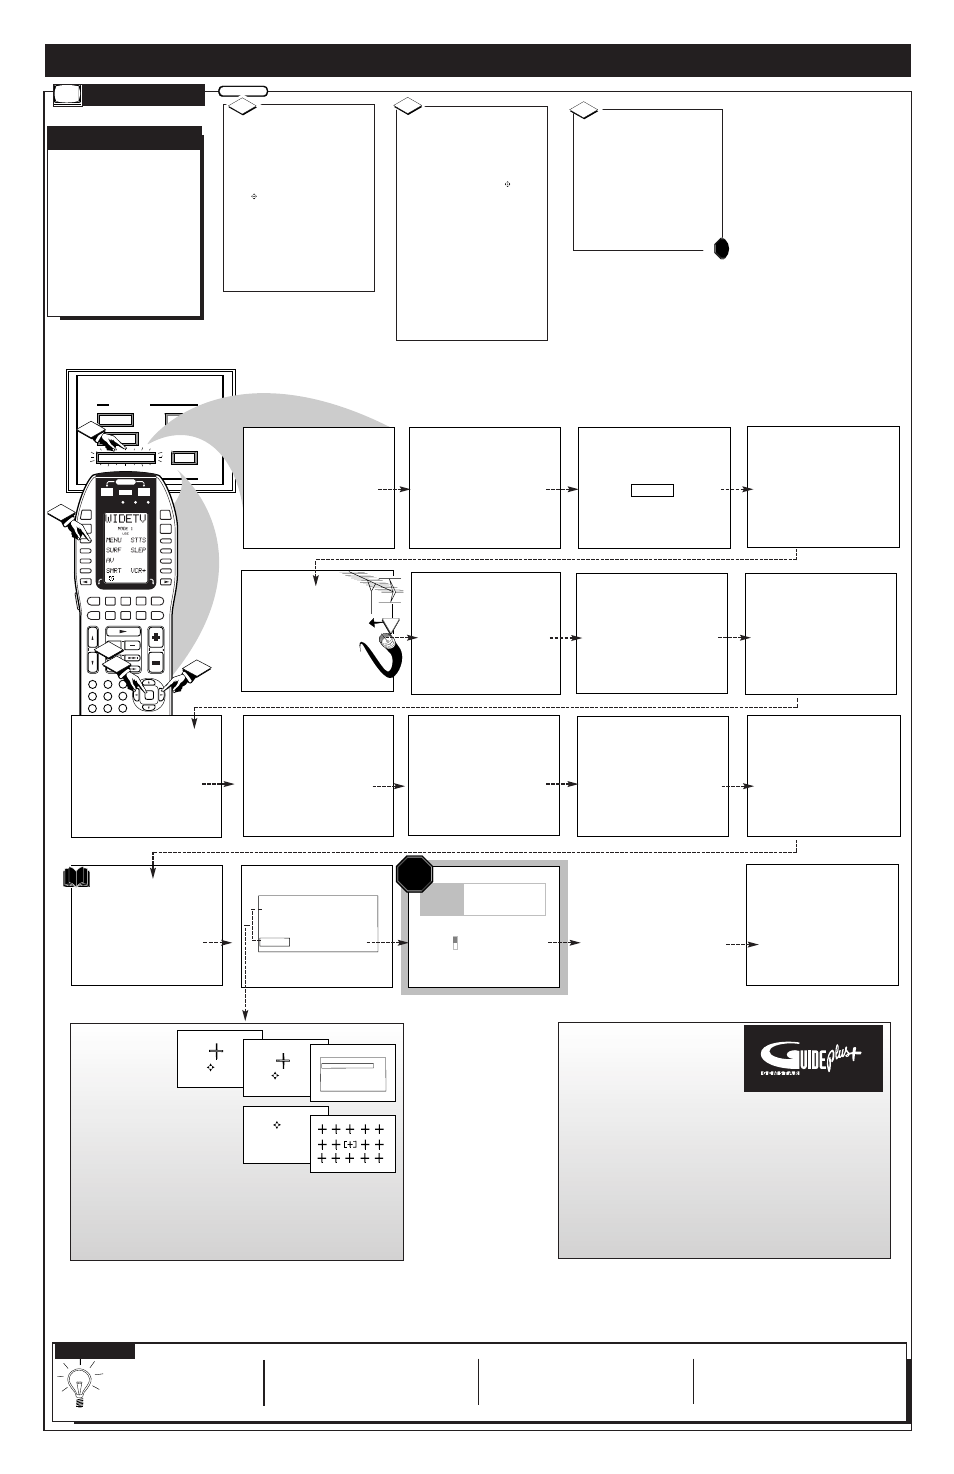
FEATURES
EXIT
MAIN MENU
SOUND
PICTURE
1ST TIME SETUP
D1
D2
D3
D4
D5
D6
D7
D8
POWER
SOURCE
OFF
ON
ON/OFF
CLONE MACRO
MODE
L E A R N I N G R E M OT E C O N T RO L
R C - 1 8 S R
MACRO
MACRO
1
2
3
4
OK
VOL
CH
LD
DVD
AUX
TAPE
CD
TV
TUNER
CD-R
/MD
DSS/
VCR2
VCR1
MUTE
GUIDE
AMP
1
4
7
M
2
5
8
0
3
6
9
C
This completes the
First-Time Setup.
Press "M" to Exit Setup
TV GUIDE PLUS +
Setup
10:17a
Where do you live?
B USA
Y CANADA
Press color key to select
STOP
After ALL connections
and First-Time Setup for
the GUIDE PLUS+ system
are completed, the TV
will have to be turned
OFF overnight to receive
program information.
Many of the current TV
control settings will be
modified by continuing
with First-Time Setup.
Press STATUS to Quit
or
Press "M" to Continue
System is testing for
correct tuning mode
for ANT A.
* Please Wait *
1
The search for active
channels is complete
for ANT A.
17 channels were found
and saved in memory
.
Press "M" to Continue
System is searching for
all active channels
on ANT A.
* Please Wait *
Testing channel 2
in cable mode.
The First-Time Setup
provides a simple method
of adjusting the most
important controls for
this television receiver.
Press "M" To Continue
Press "▲▼" to select the
language you would like
the TV displays to use.
ENGLISH
ESPANOL
FRANCAIS
Press "M" to Continue
Please check that your
other antenna or cable is
connected to the plug
marked ANT B on
the TV rear input panel.
This TV is equipped with
the TV Guide Plus+ feature.
This feature is designed
to operate only on the
main antenna, ANT A.
Press "M" to Continue
OR
Please check that your
main antenna or cable is
connected to the plug
marked ANT A on
the TV rear input panel.
Press STATUS to Quit
or
Press "M" to Continue
System is testing for
correct tuning mode
for ANT B.
* Please Wait *
1
The search for active
channels is complete
for ANT B.
17 channels were found
and saved in memory
.
Press "M" to Continue
System is searching for
all active channels
on ANT B.
* Please Wait *
Testing channel 2
in cable mode.
Press STATUS to Quit
or
Press "M" to Continue
2
2
1
3
This TV is equipped with
a Surround-Sound system.
Surround Sound requires
the use of additional
speakers being placed
around your room.
Press "M" to Continue
Please thoroughly read
the section in your
owners manual which
details the proper setup
and operation of the
Surround-Sound System.
Press "M" to Continue
˜
CONVERGENCE MENU
ALIGN RED
ALIGN BLUE
CONVERGE MULTI POINT
BACK
PLEASE REFER
TO YOUR
GUIDE PLUS+
INSTRUCTION MANUAL
FOR DETAILS ON
1st TIME SETUP.
®
1
H
OW TO
U
SE
F
IRST
T
IME
S
ETUP
F
irst Time Setup automati-
cally takes care of some
basic TV control settings for
you. Follow the steps in this
section to quickly add area
channel numbers into the
TV's memory, and set the TV
for your connected signal
(Antenna or Cable.) You can
also set the GUIDE Plus+
®
system feature (if desired).
AUTOMATIC
S
ETTINGS
S
ETUP
Press the MENU
SELECT button on the TV,
or on the remote’s LCD panel
“D1” control button (Wide
TV - Mode 1 screen active).
Note: You may also use the
OK
button area on the
remote to easily select the
TV’s Menu features.
An on-screen list of TV fea-
tures shows on the "MAIN
MENU".
BEGIN
1
Select "1ST TIME
SETUP" on the TV's Main
Menu. (Selected MENU item
is highlighted in RED.)
Press the remote's OK area
arrow ring buttons to
move UP/DOWN and from
SIDE-TO-SIDE within the
list of on-screen features.
Press CH(annel) ▲ ▼ and
VOL(ume) (+) (-) on the TV
keyboard to also move
UP/DOWN and from SIDE-
TO-SIDE within the list of
on-screen features.
2
Press the OK Menu
ring button on the remote
(or the Menu button on the
TV) to begin SETUP.
Follow the instructions
shown on the TV screen to
guide you through the First
Time Setup and use of your
new TV.
3
STO
OR
2
• Press the STATUS/EXIT but-
ton on the remote or TV to
stop the SETUP at any time.
• Remember, SETUP is a first -use, one-
time operation and will not have to be
repeated (only the clock settings can be
lost).
• Even if there is no Antenna or Cable
signal connected to the ANT(enna) B
input (located on the rear of the TV), 1st
Time Setup will still attempt to add
channels into memory for that source.
In such cases, a channel search in the
Antenna Mode will be completed, and
“0 channels saved in memory” will be
displayed on-screen.
S
MART
H
ELP
Note: The GUIDE Plus+
®
system is
an electronic program service avail-
able with your set to show you cur-
rent and future TV listings; program
content descriptions, and other pro-
gramming information. Your TV may display a GUIDE Plus+ sys-
tem demonstration mode when first turned on for normal opera-
tion and use. Pressing the TV’s control panel or remote control
buttons will enable you to bypass the demonstration and continue
with normal TV program viewing.
Remove the GUIDE Plus+ Demo Mode Pin (tag label attached to
the “G-LINK” connection plug at the rear of TV) when setting up
the GUIDE Plus+ system for use (and to completely disable the
automatic demo). Follow the instructions contained in your sepa-
rate GUIDE Plus+ information manual for feature installation and
other operation details.
®
Note: Convergence
(or lining up of red
and blue light paths
on the TV screen)
has been preset at
the factory for your conve-
nience and should not need
any further adjustments.
However, Convergence con-
trols are provided (in both the
First Time Setup and Picture
Menu areas) in case the picture on your TV shows color fringing.
Color fringing is when colors “bleed” or appear around the edges
of onscreen images and objects. Please refer to the TV’s Picture
Menu Convergence control page section for further details.
PRESS TO ALIGN BLUE
PRESS MENU TO RETURN
PRESS TO ALIGN RED
PRESS MENU TO RETURN
CONVERGENCE MULTI POINT
CONVERGE RED POINTS
CONVERGE BLUE POINTS
RESTORE FACTORY SETTINGS
SAVE ADJUSTMENTS
BACK
CONVERGE RED POINTS
USE TO ADJUST
DIGIT 2, 4, 6, 8 TO MOVE CURSOR
MENU TO RETURN
PRESS MENU NOW TO CONTINUE