Preparation, Connecting to a tv – Philips DVD953AT User Manual
Page 11
11
Preparation
General Notes
¶ Depending on your TV and other equipment you wish to
connect, there are various ways you could connect the
player. Use only one of the connections described below.
¶ Please refer to the manuals of your TV, VCR, Stereo System
or other devices as necessary to make the best
connections.
¶ For better sound reproduction, connect the player’s audio
out jacks to the audio in jacks of your amplifier, receiver,
stereo or audio/video equipment. See ‘Connecting to
optional equipment.’
Caution:
–
Make sure the DVD Player is connected
directly to the TV. Set the TV to the correct video
input channel.
–
Do not connect the DVD Player’s audio out
jack to the phono in jack of your audio system.
–
Do not connect your DVD Player via your
VCR. The DVD image could be distorted by the
copy protection system.
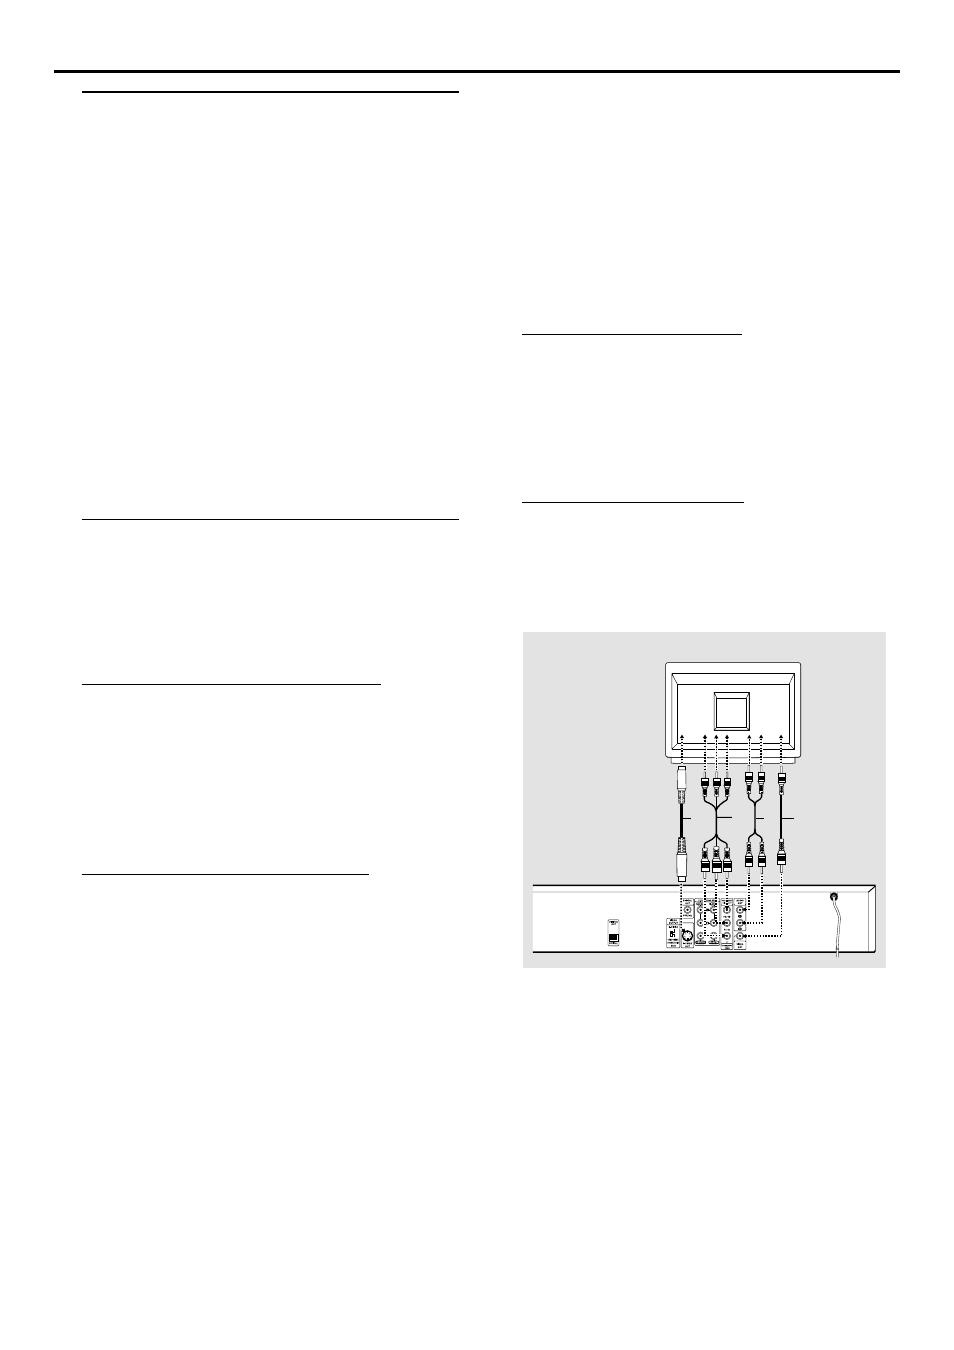
Connecting to a TV
¶ Make one of the following connections, depending on the
capabilities of your existing equipment.
¶ When using the COMPONENT VIDEO OUT jacks, set the
VIDEO OUTPUT switch to COMPONENT. When using
the S-VIDEO OUT jack, set the VIDEO OUTPUT switch to
S-VIDEO.
Component Video ( Y P
R
/C
R
P
B
/C
B
)
connection
1
Connect the P
B
/C
B
P
R
/C
R
Y COMPONENT VIDEO OUT
jacks on the DVD Player to the corresponding in jacks on
the TV using an optional P
R
/C
R
P
B
/C
B
Y cable
(Z).
2
Connect the Left and Right AUDIO OUT jacks of the DVD
Player to the audio left/right in jacks on the TV
(A) using
the supplied audio cables.
Progressive Scan ( Y P
R
/C
R
P
B
/C
B
)
connection
¶ If your television is a high-definition or “digital ready”
television, you may take advantage of the DVD Player’s
progressive scan output for the highest video resolution
possible.
¶ If your TV does not accept the Progressive Scan format, the
picture will appear scrambled if you try Progressive Scan on
the DVD Player.
¶ Make sure the TV’s Sync Mode setting is correct. For
example, on some Philips TVs, set “SYNC MODE” to
“SYNC MODE 2.” An incorrect Sync Mode setting will
cause the picture to shift off-center on the TV screen while
using Progressive Scan. Check your TV owner’s manual for
details on correct Sync Mode settings.
1
Connect the P
R
/C
R
P
B
/C
B
Y COMPONENT VIDEO OUT
jacks on the DVD Player to the corresponding in jacks on
the TV using an optional P
R
/C
R
P
B
/C
B
Y cable
(Z).
2
Connect the Left and Right AUDIO OUT jacks of the DVD
Player to the audio left/right in jacks on the TV
(A) using
the supplied audio cables.
Notes:
– The progressive scan circuitry must be activated by
changing the Personal Preference. See page 14.
– The progressive scan capability is not operational with
standard analog component video connections.
S-Video (Y/C) connection
1
Connect the S-VIDEO OUT jack on the DVD Player to the
S-Video in jack on the TV using an optional S-Video cable
(Y).
2
Connect the Left and Right AUDIO OUT jacks of the DVD
Player to the audio left/right in jacks on the TV
(A) using
the supplied audio cables.
Video (CVBS) connection
1
Connect the VIDEO OUT jack on the DVD Player to the
video in jack on the TV using the video cable supplied
(X).
2
Connect the Left and Right AUDIO OUT jacks of the DVD
Player to the audio left/right in jacks on the TV
(A) using
the supplied audio cables.
TV
Y
X
A
Z
P
REPARATION