Tracking adjustment instructions – BOB OMS05A User Manual
Page 4
Tracking Adjustment
Instructions:
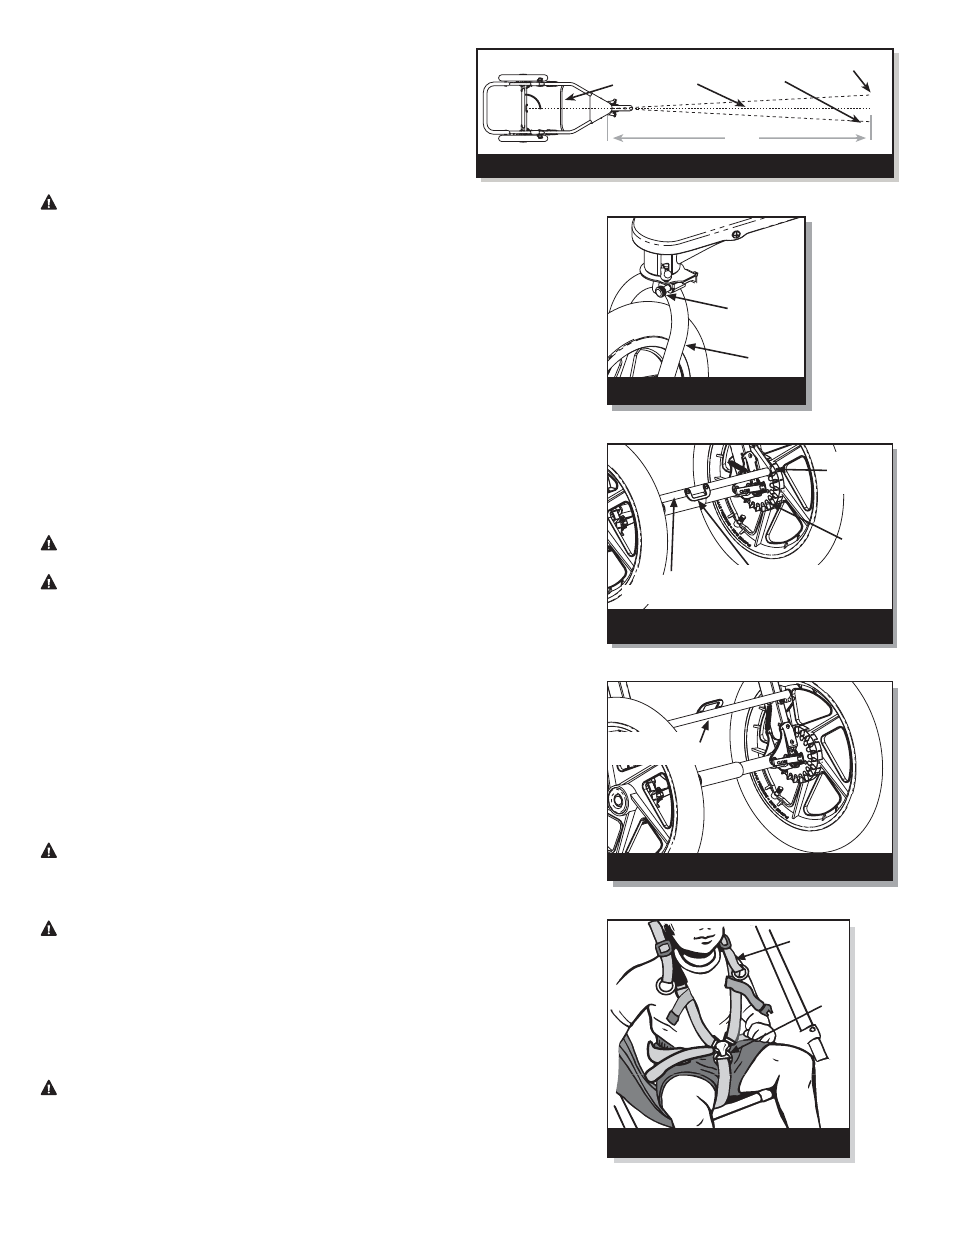
Note: Tracking adjustment can only be performed with the stroller
fork locked out (Jog Mode). Roll test the stroller as described
below. It is recommended you have someone assist with this
task in order to catch and return the stroller. Fig. 12 illustrates
the roll test process.
a. Empty the stroller.
WARNING: Do not roll test with a child or any occupant in the stroller.
b. Find a location on level ground approximately 16 ft. long. It is helpful to use an existing
straight-line as a frame of reference such as the edge of the sidewalk or a painted line
in a playground.
c. Align the stroller so the rear wheel axles are perpendicular to the straight line. Push
and release the stroller, trying carefully not to influence its direction to the left or right,
so it rolls straight down the test path. This step should be performed more than once
to make sure the stroller was not biased left or right by the pushing action.
d. If the stroller consistently pulls to the left or right when pushed straight, proceed with
the steps below until tracking is satisfactory. Fig. 12 illustrates how to interpret the
results.
Reference convention: Left and right are described as viewed from the operators
frame of reference (behind the stroller). Example: The swivel lockout knob is on the left
side of the stroller.
Fine tune tracking of stroller is accomplished by using the tracking adjustment knob
shown in Fig. 13. If your stroller pulls to the left, turn the knob counter-clockwise 1/2
turn. If your stroller pulls to the right, turn the knob clockwise 1/2 turn. Repeat roll test
and adjustment until the stroller rolls straight.
8. PARKING BRAKE:
The brake is a parking brake, it prevents the stroller from moving while loading and
unloading. The parking brake is not designed as a stopping brake.
WARNING: Do not use the brake to slow or stop the stroller because doing so
could cause the stroller to stop abruptly, resulting in loss of control.
WARNING: The brake is intended to park the stroller on flat surfaces, not on
inclines. Never leave your child in the stroller unattended with or without the
parking brake set!
To set the parking brake, press the brake bar down into the locked position (Fig. 14)
with your foot on the red foot pedal making sure the locking pin fully engages the
locking disk. To ensure the brake is set properly, attempt to roll the stroller fore and aft
after setting the brake. If the stroller will not roll, the brake is set properly. To release
the parking brake, lift up on the red foot pedal with your foot until the brake bar springs
up into the fully unlocked position (Fig. 15).
9. SUN CANOPY:
The stroller features a two position canopy. To fully open the canopy, rotate the assembly
forward until the fabric is taut. The rear canopy flap should be freed from the Velcro to
give additional sun protection. To reduce the size of the sun canopy, pull the canopy
toward the handlebar. The additional fabric can be gathered by pulling the canopy
drawstring (Fig. 1) and securing the cord lock.
10. SEAT SAFETY HARNESS:
WARNING: Set parking brake before placing child in stroller.
To secure your child in the seat, put one shoulder strap over each shoulder and snap
the male buckle into the female receiver on the crotch strap (Fig. 16). Adjust shoulder
straps to be snug and secure (Fig. 17). Connect the sternum strap (red), see Fig. 18.
WARNING: Never place passengers in the stroller without securing them in the
harness. Unrestrained passengers can affect the control of the stroller.
Passenger weight limit - 70 lbs (32 kg)
Passenger height limit - 44 in (112 cm)
For heavier and or taller passengers (closer to the maximum limits above), auxiliary
harness anchors may be utilized by unfolding anchor Velcro (Fig. 17), sliding ladder
lock buckles above anchors, and reconnecting Velcro to keep ladder lock buckles in
place.
11. RECLINING SEAT:
WARNING: Set parking brake before making any seat adjustments.
To partially recline the seat, rotate the ladder lock buckles forward thus releasing the
reclining straps. (Fig 19)
To fully recline the seat, unfasten side release buckles at seat back. (Fig. 20)
Shoulder
Strap
Crotch
Strap
Buckle
Fig. 16
Place straps over shoulders
and secure to buckle.
Fig. 13
Tracking Adjustment.
Tracking
Adjustment
Knob
Fork
Fig. 15
Parking Brake - Unlocked position.
Brake Bar
(Unlocked Position)
Fig. 14
Parking Brake - Locked position.
Locking
Disk
Brake Bar
(Locked Position)
Locking
Pin
(Engaged)
Red Foot Pedal
OMS05A
P4
Fig. 12
Stroller roll test.
16
Stroller pulls
to left
90
o
Wheel axles
perpendicular
to straight line
Stroller pulls
to right
Top View Of Stroller