3changing over the door hinge, Putting into operation, 3 changing over the door hinge – Liebherr TX 1021 Comfort User Manual
Page 5
WARNING
Blocked ventilation openings pose a risk of fire and damage!
u
Always keep the ventilation openings clear. Always ensure
that the appliance is properly ventilated!
NOTICE
Risk of damage due to condensate!
u
Do not install the appliance directly alongside a further
refrigerator/freezer.
q
In the event that the appliance is damaged, contact the
supplier immediately before connecting to the mains.
q
The floor at the site must be flat and level.
q
Do not install the appliance in a location where it is exposed
to direct radiation of the sun, next to a cooker, heater and
similar.
q
Always stand the appliance with its back directly to the wall.
q
The appliance may be moved only when it is empty.
q
Do not install the appliance without assistance.
q
The more R 600a refrigerant there is in the appliance, the
larger the room in which the appliance is standing needs to
be. In rooms that are too small, a flammable mix of gas and
air may be created if there is a leak. According to the EN
378 standard, every 11 g of R 600a refrigerant requires at
least 1 m
3
space in the room for the appliance. The amount
of refrigerant in your appliance is on the type plate inside the
appliance.
u
Detach the connecting cable from the rear of the appliance,
removing the cable holder at the same time because other-
wise there will be vibratory noise!
u
Remove the protective film from the decorative trims.
u
Remove all transit supports.
u
Dispose of packaging material (see 4.4) .
u
Align the appliance so that it
stands firmly and on a level by
applying the accompanying
spanner to the adjustable-
height feet (A) and using a
spirit level.
Note
u
Clean the appliance (see 6.2) .
If the appliance is installed in a very damp environment,
condensate may form on the outside of the appliance.
u
Always see to good ventilation at the installation site.
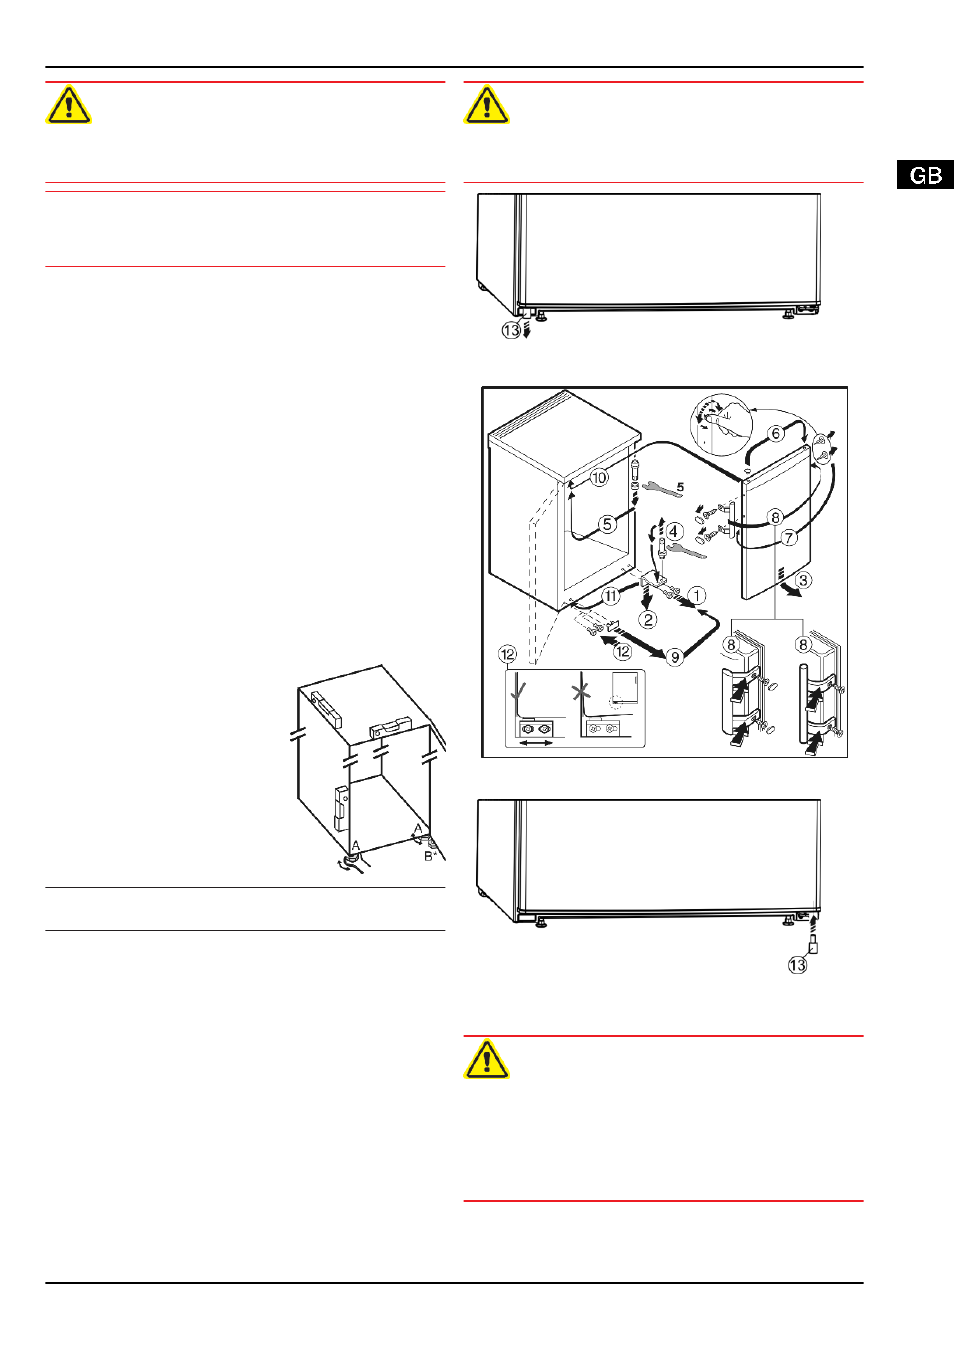
4.3 Changing over the door hinge
You can change over the door hinges if necessary.
Make sure that the following tools are at hand:
q
Torx® 25
q
Torx® 15
q
Supplied open-ended wrench
q
If necessary, a second person to assist with installation
CAUTION
Risk of injury if the door tips!
u
Take good hold of the door.
u
Set down the door carefully.
Fig. 4
u
Remove the spacer
Fig. 4 (13)
from under the left-hand side
of the door.
Fig. 5 On appliances with a door handle
u
Follow the sequence of the item numbers in the diagram.
Fig. 6
u
Insert the spacer
Fig. 6 (13)
back under the right-hand side
of the door, as it is important for the stability of the appli-
ance.
WARNING
Risk of injury due to the door dropping out!
If the bearing parts are not screwed into place firmly enough,
the door may drop out. This may lead to severe injuries. What
is more, the door may not close and therefore the appliance
may fail to cool properly.
u
Screw on the bearing brackets/bearing pins tightly (4 Nm).
u
Check all of the screws and retighten if necessary.
Putting into operation
* Depending on model and options
5