Versa-tether, Ab c – Britax Marathon User Manual
Page 14
Versa-Tether
®
Versa-Tether
®
25
24
Using the Versa-Tether
®
Consult your vehicle’s owner’s manual for
approved tether-anchorage locations .
Locate tether on rear of restraint and remove
tether components from pouch .
Secure the child restraint by a seat-belt or
with the LATCH system .
Lift tether release tab; then pull to fully
extend tether strap into a "V" shape .
Locate the hook on the strap and loosely
attach the tether to an anchor point .
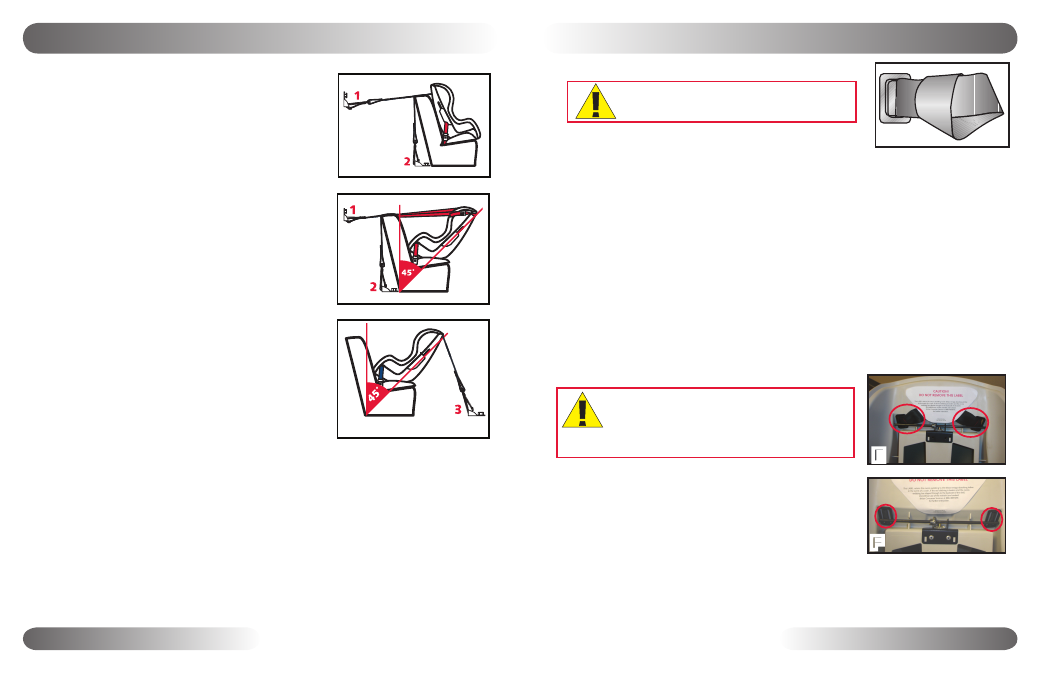
See figure A for forward-facing installation.
See figures B and C for rear-facing
installation.
Rear-facing installation may also require the use
of the Tether Connector Strap, as described on
page 25 .
Pull the adjuster strap to remove all slack .
Verify there is tension in the tether strap and
that child restraint is properly secured . The
restraint is stable when it cannot be moved
front to back or side to side more than 1 inch
(2 .5 cm .) at the belt path .
NOTE
:
The rear-facing recline angle of the child restraint should be 30º-45º from ver-
tical (not to exceed 45º from vertical) when car is parked on a level surface .
The rear-facing recline angle can be adjusted by placing a rolled towel or pool
noodle in the crease of the vehicle seat, and the restraint can be stabilized by
tightening the tether as shown in figure C, using anchor point 3 .
It may be necessary to loosen the tether and vehicle seat belt before adjusting
the recline position .
1�
2�
3�
4�
5�
•
•
6�
7�
•
•
•
A
B
C
Because every vehicle model is different, sometimes you
cannot find a location to properly anchor the tether or the
structural part of the seat is too large for the hook . Use the tether connector strap to
assist in creating an anchor point (fig . D) .
Find a fixed vehicle-seat-belt anchor or vehicle seat leg (that is bolted to the floor)
to which the strap can be wrapped around .
If you cannot find an acceptable location to create an anchor point, contact the
vehicle manufacturer to identify a suitable tether connection point .
Loop the strap around the metal anchor .
Take the metal D-ring and thread it through the webbing loop on the other end
of the strap .
Pull the metal D-ring all the way through until the strap is tight around the metal
anchor .
Use the D-ring as an attachment point for hook on tether strap .
1�
2�
3�
4�
5�
6�
D
WARNING:
Only use the tether connector
strap for rear-facing tether installation .
Rear-Facing Tether Connector Strap
WARNING:
The energy-absorbing tether has
been designed to indicate when child restraint
has been in a severe crash and replacement of
child restraint is necessary .
E
F
Energy-Absorbing Tether
Figure E shows the tether when the child restraint is
acceptable for continued use . The colored stitching
will be intact and the webbing will be held under a
tether label .
Figure F shows the tether when the child restraint
is unacceptable for continued use . The colored
stitching will be broken and the loops will have pulled through the back side of
the shell . The tether label may also be torn . If this condition occurs, discontinue
use of the child restraint and contact Britax Consumer Services for further
instruction .