Please save these instructions, Please read and save these important safeguards – BIONAIRE BW2300 User Manual
Page 2
Step 2: To turn the fan on press the Speed Control Button.
Step 3: Set the speed to high, medium (med) or low by
pressing the Speed Control Button.
Step 4: Set the airflow direction to Exhaust (out), Intake (in)
or exchange (one blade blowing air in and the
second blade blowing air out) by pressing the air
flow button.
Step 5: To turn the fan off press the Speed Control Button
until the fan stops.
AUTOMATIC OPERATING INSTRUCTIONS
Your window fan is equipped with the digital control
thermostat that automatically turns the fan on and off
depending upon the preset comfort level. For example, if
you have set your thermostat to 75 degrees and the room
temperature drops to 74 degrees or lower then the fan will
automatically shut off. The fan will then turn on again when
the room temperature exceeds 75 degrees. In order to
take advantage of this feature, make sure your window fan
is in automatic mode (this will be indicated by a red light on
the left of the control panel).
Step 1: Set the fan to Automatic Mode by pressing the
Mode button located on the Control Panel. The
Auto On light will illuminate when the unit is in
Automatic Mode.
Step 2: Press the Temp Set (+,–) buttons on the front of
the Control Panel or use the remote control to
program the desired temperature or switch to the
manual mode.
Step 3: When you are finished setting the temperature, let
go of the button. The display will blink a few times
and then will return to displaying the current room
temperature.
IMPORTANT: If the unit will not start in automatic mode,
please make sure that the set temperature is below the
current room temperature. If the fan is stopped and you
would like to turn it back on, lower the set temperature or
switch to the manual mode.
REMOTE CONTROL INSTRUCTIONS
Your window fan is equipped with a remote control. This
remote control can be used to adjust the following
functions: Power, Manual/Automatic mode, Air Flow
Direction, Temperature adjustments.
Two “AAA” batteries have been included for your
convenience.
•
Do not mix old and new batteries.
•
Do not mix alkaline, standard (carbon-zinc),or
rechargeable (nickel-cadmium) batteries.
CLEANING/MAINTENANCE INSTRUCTIONS
Follow these instructions to correctly and safely care for
your fan. Please remember:
•
Always unplug the fan before cleaning.
•
Do not allow water to drip on or enter into fan housing.
•
Be sure to use a soft cloth moistened with a mild soap
solution.
•
Do not use gasoline, thinner or benzene as a cleaner.
Step 2: If the fan does not fit snugly to the top and bottom of
the window casing, attach the included extender
panel(s) and pull out the built-in extender screen until
the fan fits safely in your window (See Figure 3).
Step 3: To keep the fan in place, carefully close the
window so that the bottom edge of the window
rests on the flat area on the top of the window fan.
WARNING: Be sure fan is securely installed in your
window at all times. Do not lean or push on fan while it is
in the window.
NOTE: For slider windows, set the fan vertically in your
window opening, with the left side on the bottom.
INSTALLATION GUIDE
The extender panels can be secured to the fan by simply
sliding the extender panels into the grooves located on the
left hand side of the fan.
The extender screen can be adjusted by pulling out the
extender locks located on the top and bottom of the right
side of the fan. Push the locks back into place to secure
the extender screen at the desired length.
For 24 inch to 27 inch (61-69cm): Use up to 3 inch
(7cm) of right side, pull out extender screen.
For 28 inch to 34 inch (71-86cm): Use one 3 inch (7cm)
extender panel on the left side. Adjust the pull out extender
screen on the right side for a tight fit
(from 0.5 inch to 7 inch (1.3-17.8cm) ).
For 35 inch to 37 inch (89-94cm): Use two 3 inch (7cm)
extender panels on the left side. Adjust the pull out
extender screen on the right side for a tight fit
(from 0.5 inch to 7 inch (1.3-17.8cm) ).
Larger than 37 inch (94cm): Additional extender panels
will be required.
MANUAL OPERATING INSTRUCTIONS
NOTE: To operate the fan continuously, make sure that the
auto on light located to the left of the control panel is off.
Step 1: Plug your window fan into any 120V AC electrical
outlet.
NOTE: The temperature display will always be on when
the fan is plugged into the electrical outlet.
FAN SAFETY
PLEASE READ AND SAVE
THESE IMPORTANT
SAFEGUARDS
IMPORTANT INSTRUCTIONS
When using electrical appliances, basic safety precautions
should always be followed to reduce the risk of fire, electric
shock, and injury to persons, including the following:
1. Read all instructions before using the appliance.
2. To avoid fire or shock hazard, plug the appliance
directly into a 120 V AC electrical outlet.
3. Keep the cord out of heavy traffic areas. DO NOT let
the cord hang over the edge of a table or counter. To
avoid fire hazard, NEVER put the cord under rugs,
near heat registers, radiators, stoves, or heaters.
4. To protect against electrical hazards, DO NOT
immerse in water or other liquids. Do not use near
water.
5. Close supervision is necessary when any appliance is
used by or near children or disabled people.
6. Always unplug the fan before moving it, putting on or
taking off parts, cleaning, or whenever the fan is not in
use. Be sure to pull by the plug and not the cord.
7. Avoid contact with moving parts. DO NOT operate
without fan grills properly in place.
8. DO NOT operate any appliance with a damaged cord
or plug, if motor fan fails to rotate, after the appliance
malfunctions, or if it has been dropped or damaged in
any manner. Return appliance to manufacturer for
examination, electrical or mechanical adjustment, or
repair.
9. DO NOT operate in the presence of explosive and/or
flammable fumes.
10.Use appliance only for intended household use as
described in this manual. Any other use not
recommended by the manufacturer may cause fire,
electric shock, or injury to persons. The use of
attachments not recommended or sold by Bionaire
®
may cause hazards.
11.DO NOT use outdoors.
12.Always use on a dry, level surface.
13.Keep unit away from heated surfaces and open flames.
14.DO NOT attempt to repair or adjust any electrical or
mechanical functions on this unit. Doing so will void
your warranty. The inside of the unit contains no user
serviceable parts. All servicing should be performed
by qualified personnel only.
PLEASE SAVE THESE
INSTRUCTIONS
CONSUMER SAFETY INFORMATION
THIS APPLIANCE HAS A POLARIZED
AC PLUG (one blade is wider than the
other). To reduce the risk of electric
shock, this plug is intended to fit in a
polarized outlet only one way. If the plug
does not fit fully in the outlet, reverse the
plug. If it still does not fit, contact a
qualified electrician to install the proper outlet.
DO NOT ATTEMPT TO MODIFY THIS PLUG OR
DEFEAT THIS SAFETY FEATURE IN ANY WAY.
PLEASE READ AND SAVE
THESE IMPORTANT
SAFETY INSTRUCTIONS
WINDOW FAN INSTALLATION
The window fan has been designed to fit double-hung,
slider and casement windows.
Step 1: Set the fan into your window opening.
INSTALLATION INSTRUCTIONS
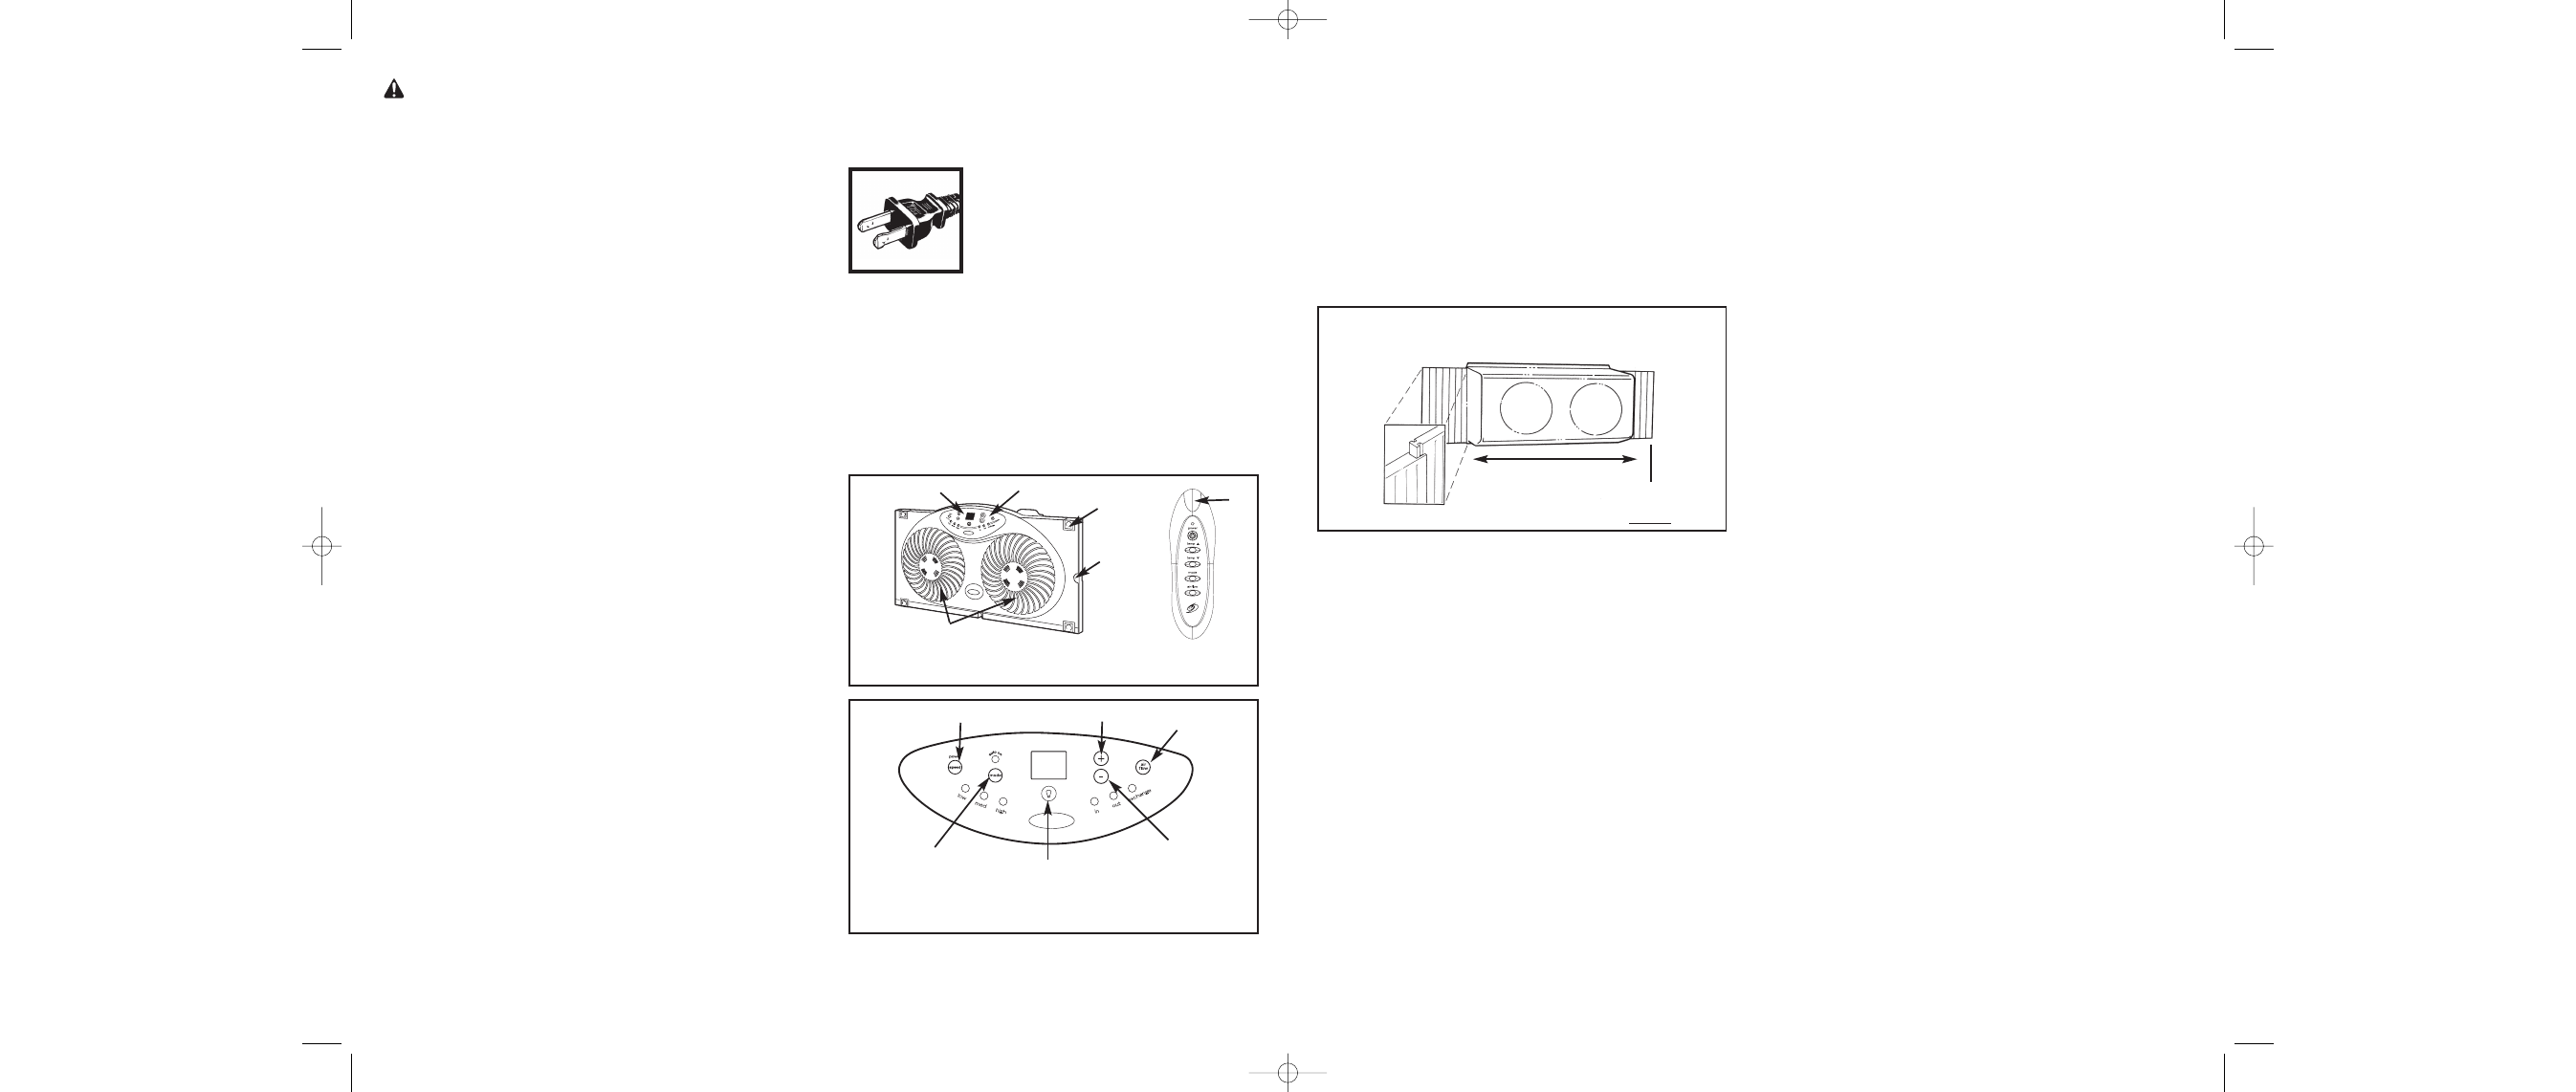
Figure 1
A
B
C
D
E
PULLS OUT UP TO 7.0 inch (17.8cm)
LEFT
Extra Extender Panels
RIGHT
Built-In, Pull Out Extender Screen
24 inch (61cm) long
FRONT VIEW
Two 3.0 inch (7cm) extenders, (Included in your box packed at both ends)
Figure 3
F
G
J
K
L
H
I
Figure 2
G. Speed Control Button
J. Mode Button
H. Temp Up Button
K. Dimmer Button
I. Air Flow Direction Button
L. Temp Down Button
A. Front Grills
B. Extender Screen (not shown)
C. Extender Locks(2)
D. Control Panel
E. LCD Display
F. Remote Control
BW2300_07EM1. qxd:BW230006EM1. qxd 11/17/07 8:38 AM Page 2