Operating instructions, Lcd display, Setting the clock – Bosch PB10-CD User Manual
Page 8: Audio portion
8
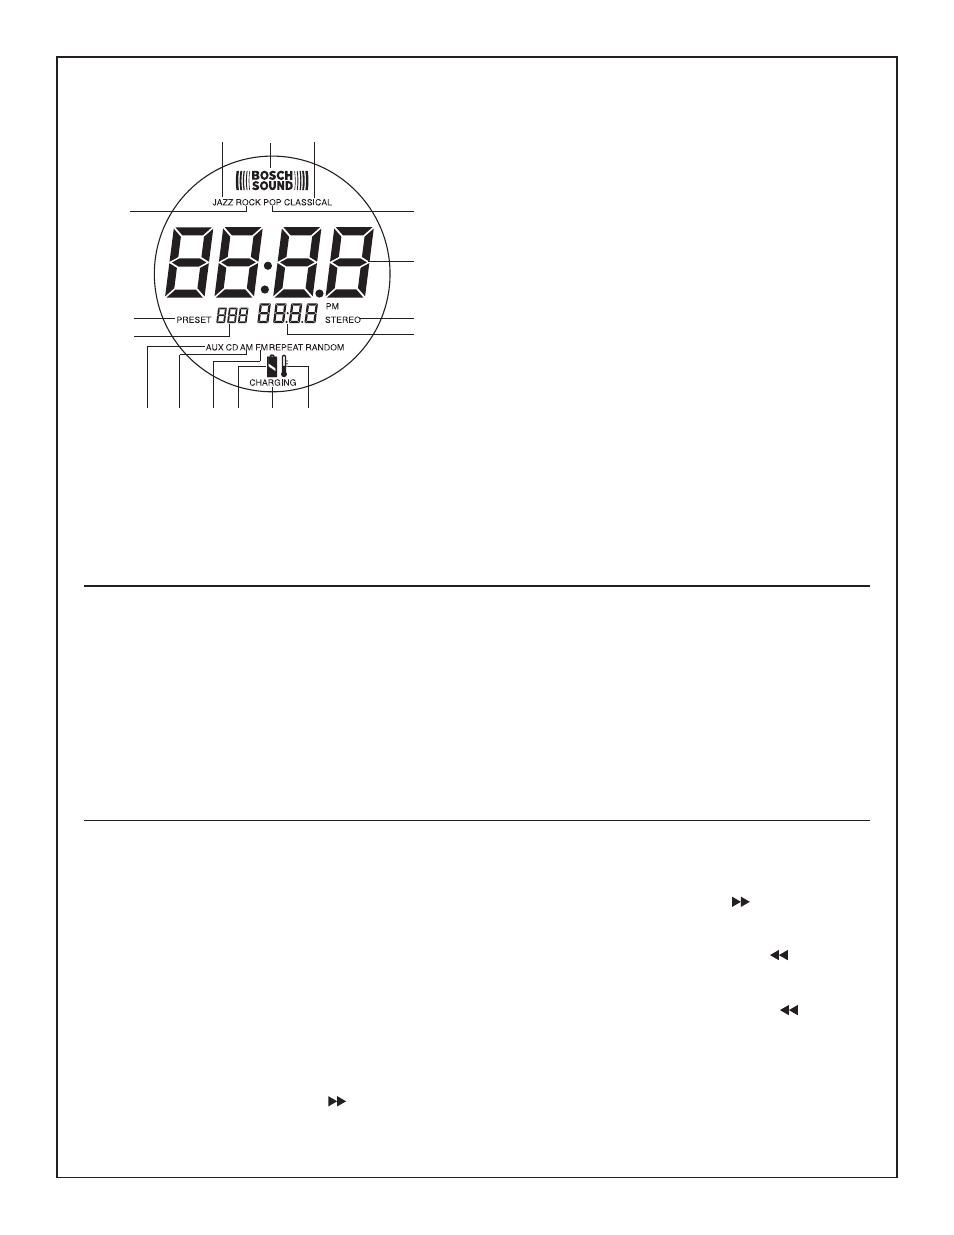
LCD Display
1
JAZZ -illuminates when Jazz is selected in EQ.
2.
ROCK-illuminates when Rock is selected in EQ mode.
3.
BOSCH SOUND-illuminates when you select BOSCH
SOUND.
4.
POP-illuminates when Pop is selected in EQ mode.
5.
CLASSICAL-illuminates when Classical is selected in EQ
mode.
6.
NUMERIC-shows the clock time once it is set.
7.
STEREO-illuminates when the radio station is
broadcasting in Stereo channel.
8.
NUMERIC-shows FM or AM frequency in tuner mode, or
running time of a CD track.
9.
THERMOMETER icon-indicates the battery is too hot or
too cold and the charger is not charging.
10.
CHARGING-flashes when the unit is charging the battery.
11.
BATTERY icon-indicates that the battery is in the unit. The
icon flashes when the battery is almost dead.
12.
FM-indicates FM band in tuner mode.
13.
AM-indicates AM band in tuner mode.
14.
AUX-illuminates when you select AUX mode.
15.
NUMERIC-shows the number of a preset station/CD track
number selected.
16.
PRESET-illuminates when you have a preset station
selected and flashes while setting a station into memory.
10
9
11
7
6
12
13
14
15
1
2
3
4
5
8
16
Setting the Clock
When the AC plug or the battery pack is inserted, the unit
defaults to standby mode and the LCD shows
“12:00”.
Follow the steps below to set the correct local time.
1. Press
TIME SET button on the unit once, and “hour”,
“minute” is activated and “00:00”flashes on the LCD display.
2. Press
HOUR button repeatedly to choose the correct
hour number, the hour number adds “1” every step.
3. Press
MINUTE button repeatedly to choose the minute
number, the minute number adds “1” every step.
4. Press and hold
MINUTE button, and the minute time
increases continuously till you select the correct minute
time, and then release the button.
5. Press
TIME SET once more to save it, and a “beep”
sound is heard.
Note: 2 AAA batteries are supplied with the unit to keep
time current when unit is not plugged in. Replace AAA
batteries when unit no longer keeps proper time. (See
changing AAA clock battery section.)
Operating Instructions
Audio Portion
Radio
TO SELECT BAND AND STATIONS
The tuner is operated in standard AM frequency from 520-
1710MHz and in standard FM frequency from 87.5-107.9KHz.
Follow the steps below to tune the station:
1.
For model PB10: Press “AM/FM” button on the unit to
select AM or FM band.
For model PB10-CD: Press
Aux/CD/Radio button repeatedly until radio is selected, then
press
AM/FM button if needed
2. Turn right (clockwise)
TUNE SEEK
knob on the front
panel 1/8th of a turn once, and the frequency increases by one
every step
3. Turn right (clockwise)
TUNE SEEK
knob and hold it for
three seconds, the unit seeks forward automatically until a
station with a strong signal is received.
4. Turn left (counterclockwise)
TUNE SEEK
knob on the
front panel 1/8th of a turn once, and the frequency decreases
by one every step.
5. Turn left (counterclockwise)
TUNE SEEK
knob and
hold for three seconds, the unit seeks backwards automatically
until a station with a strong signal is received.
Note: If there is no station received when it stops seeking,
repeat the steps mentioned above to seek for the preferred
stations.