Listening to the ipod, iphone or ipad, Ipod, iphone and ipad connection (usb only) – Sharp GX-M10HOR User Manual
Page 42
12/10/26
12_GX-M10H_OM_EN.fm
E-7
Setting the clock (Remote control
only) (continued)
To confirm the time display:
Press the CLOCK/TIMER button. The time display will
appear for about 5 seconds.
Notes:
● When power supply is restored after unit is plugged in
again or after a power failure, confirm the clock, if
required, reset the clock (pages 6 - 7).
● The clock will continue counting for a few hours should
there be a power failure or the AC power lead becomes
disconnected.
To readjust the clock:
Perform “Setting the clock” from step 1. If the “CLOCK” does
not appear in step 2, step 4 (for selecting the 24-hour or 12-
hour display) will be skipped.
To change the 24-hour or 12-hour display:
Listening to the iPod, iPhone or iPad
Made for:
Caution:
Please update your iPod, iPhone and iPad unit to the latest
software version before using it. Please visit Apple’s
homepage to download the latest version for your iPod,
iPhone and iPad.
Notes:
● Charging terminal for iPod, iPhone and iPad:
● Fully charge the iPod, iPhone and iPad with AC power
before using GX-M10H battery operation.
● The message “This accessory is not made to work with
iPhone” or similar, may appear on the iPhone screen
when:
- battery is low.
- the iPhone is not properly docked (eg. slanting).
If this occurs, remove and re-dock the iPhone.
● This product is made for iPod, iPhone and iPad. To
prevent random interference when iPod, iPhone or
iPad is connected, the headphone output is disabled,
and “HPINVALID” will be displayed.
You may also experience brief audio interference
during incoming calls.
● The headphone output is switched off during inserting
iPod, iPhone and iPad unit. This is an Apple product
specification.
Note:
USB/iPad terminal does not support VIDEO out.
5
To adjust the hour, press the
or
button
and then press the ENTER button. Press the
or
button once to advance the time by 1 hour. Hold
it down to advance continuously.
6
To adjust the minutes, press the
or
button and then press the ENTER button. Press the
or
button once to advance the time by 1
minute. Hold it down to advance the time by 5 minutes
interval.
1
Clear all the programmed contents. [Refer to “Factory
reset, clearing all memory” on page 21 for details.]
2
Perform “Setting the clock” from step 1 onwards.
● iPod touch (4
th
generation)
● iPod touch (3
rd
generation)
● iPod touch (2
nd
generation)
● iPod touch (1
st
generation)
● iPod classic
● iPod nano (6
th
generation)
● iPod nano (5
th
generation)
● iPod nano (4
th
generation)
● iPod nano (3
rd
generation)
● iPod nano (2
nd
generation)
● iPhone 4S
● iPhone 4
● iPhone 3GS
● iPhone 3G
● iPhone
● iPad (3
rd
generation)
● iPad 2
● iPad
Condition
DOCK
USB/iPad terminal
USB function
YES
YES
(without iPod
or iPhone docking)
Other function
(iPod / CD / Tuner /
Audio In )
YES
NO
Stand-by
YES
NO
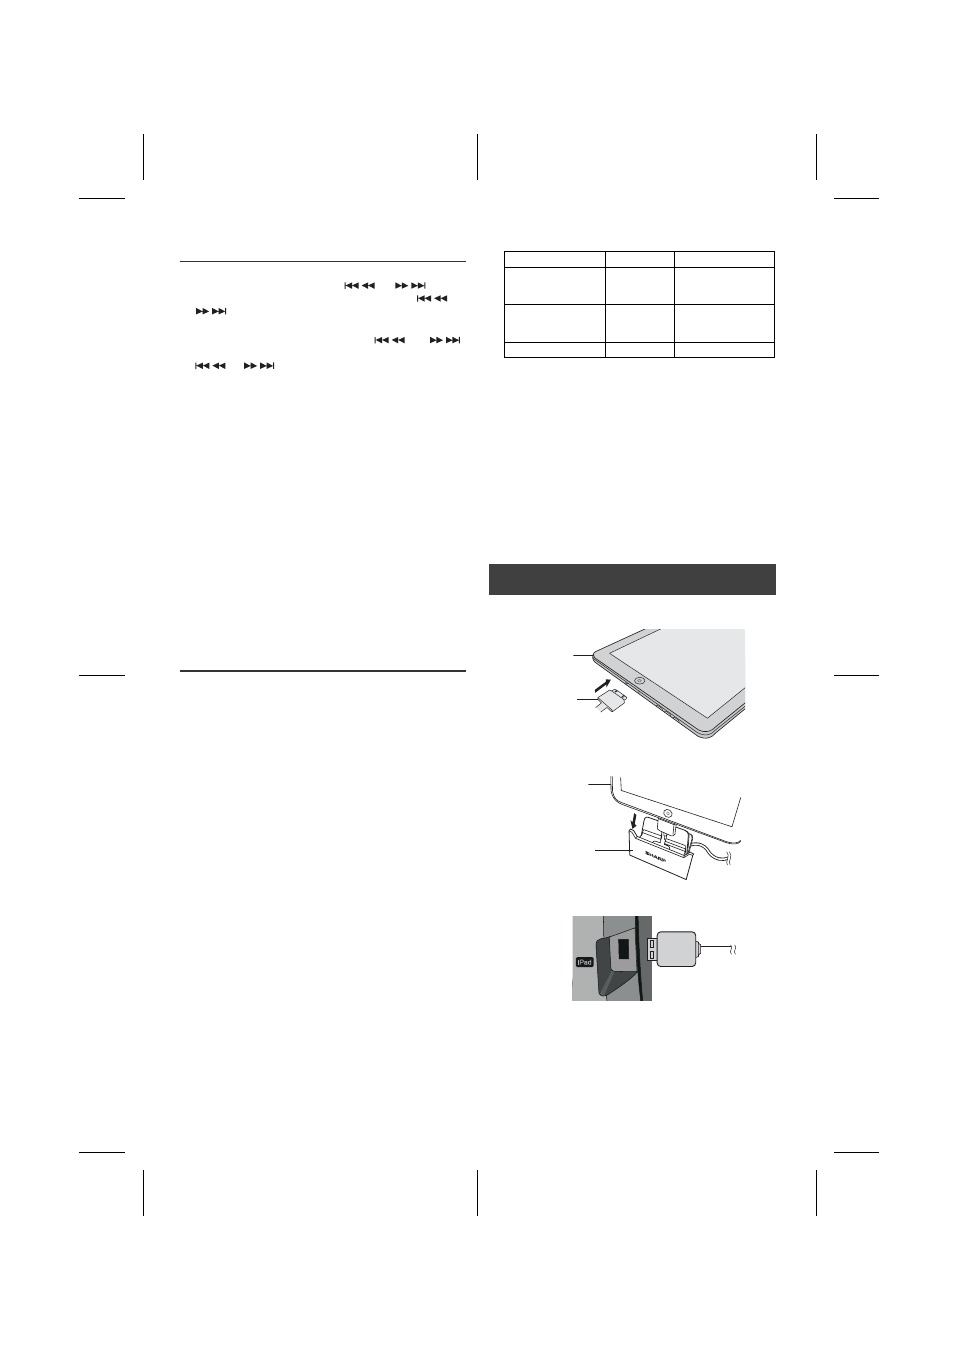
■ iPod, iPhone and iPad connection (USB
only)
1
Insert the connector to the iPod, iPhone or iPad.
2
Place the iPad to the stand for iPad.
3
Connect the iPod, iPhone or iPad to the unit via USB
connector.
iPad
Connector
iPad
Stand for iPad