Installation instruction, Assembly instructions, Operating instructions – BIONAIRE BSF152T08EM1 User Manual
Page 2: Oscillation instructions, Fcc statement, Remote control
PLEASE READ AND SAVE THESE
IMPORTANT SAFETY INSTRUCTIONS
F E AT U R E S - O P E R AT I O N S
F E AT U R E S - O P E R AT I O N S
When using electrical appliances, basic safety precautions
should always be taken including the following:
1. Read all instructions before using this appliance.
2. Use fan only for purposes described in the instruction
manual.
3. To protect against electrical shock do not immerse
unit, plug or cord in water or spray with liquids. Plug
the appliance directly into a 120V AC electrical outlet.
4. Close supervision is necessary when any appliance is
used by or near children.
5. Unplug from outlet when not in use, when moving
fan from one location to another, before putting on
or taking off parts and before cleaning.
6. Avoid contact with moving parts.
7. Do not operate in the presence of explosive and/or
flammable fumes.
8. To avoid fire hazard, NEVER place the cord under
rugs or any parts near an open flame, cooking or
other heating appliance.
9. Do not operate any appliance with a damaged cord
or plug after the appliance malfunctions, or has been
dropped/damaged in any manner. Discard fan or
return to an authorized service facility for
examination and/or repair.
10. The use of attachments not recommended or sold by
the appliance manufacturer may cause hazards.
11. Do not use outdoors.
12. Do not let the cord hang over the edge of a table,
counter or come in contact with hot surfaces or leave
exposed to high traffic areas.
13. To disconnect, grip plug and pull from wall outlet.
Never yank on cord.
14. Always use on a dry, level surface.
15. Do not operate fan until fully assembled with all
parts properly in place.
16. This product is intended for household use ONLY and
not for commercial or industrial applications.
17. WARNING: To reduce the risk of electrical shock
injury to persons, do not use in window.
18. WARNING: This fan is provided with an internal
electronic fan speed control. To reduce the risk of fire
or electric shock, do not use this fan with any other
solid-state speed control device.
INSTALLATION INSTRUCTION
PLEASE READ AND SAVE
THESE IMPORTANT
SAFETY INSTRUCTIONS
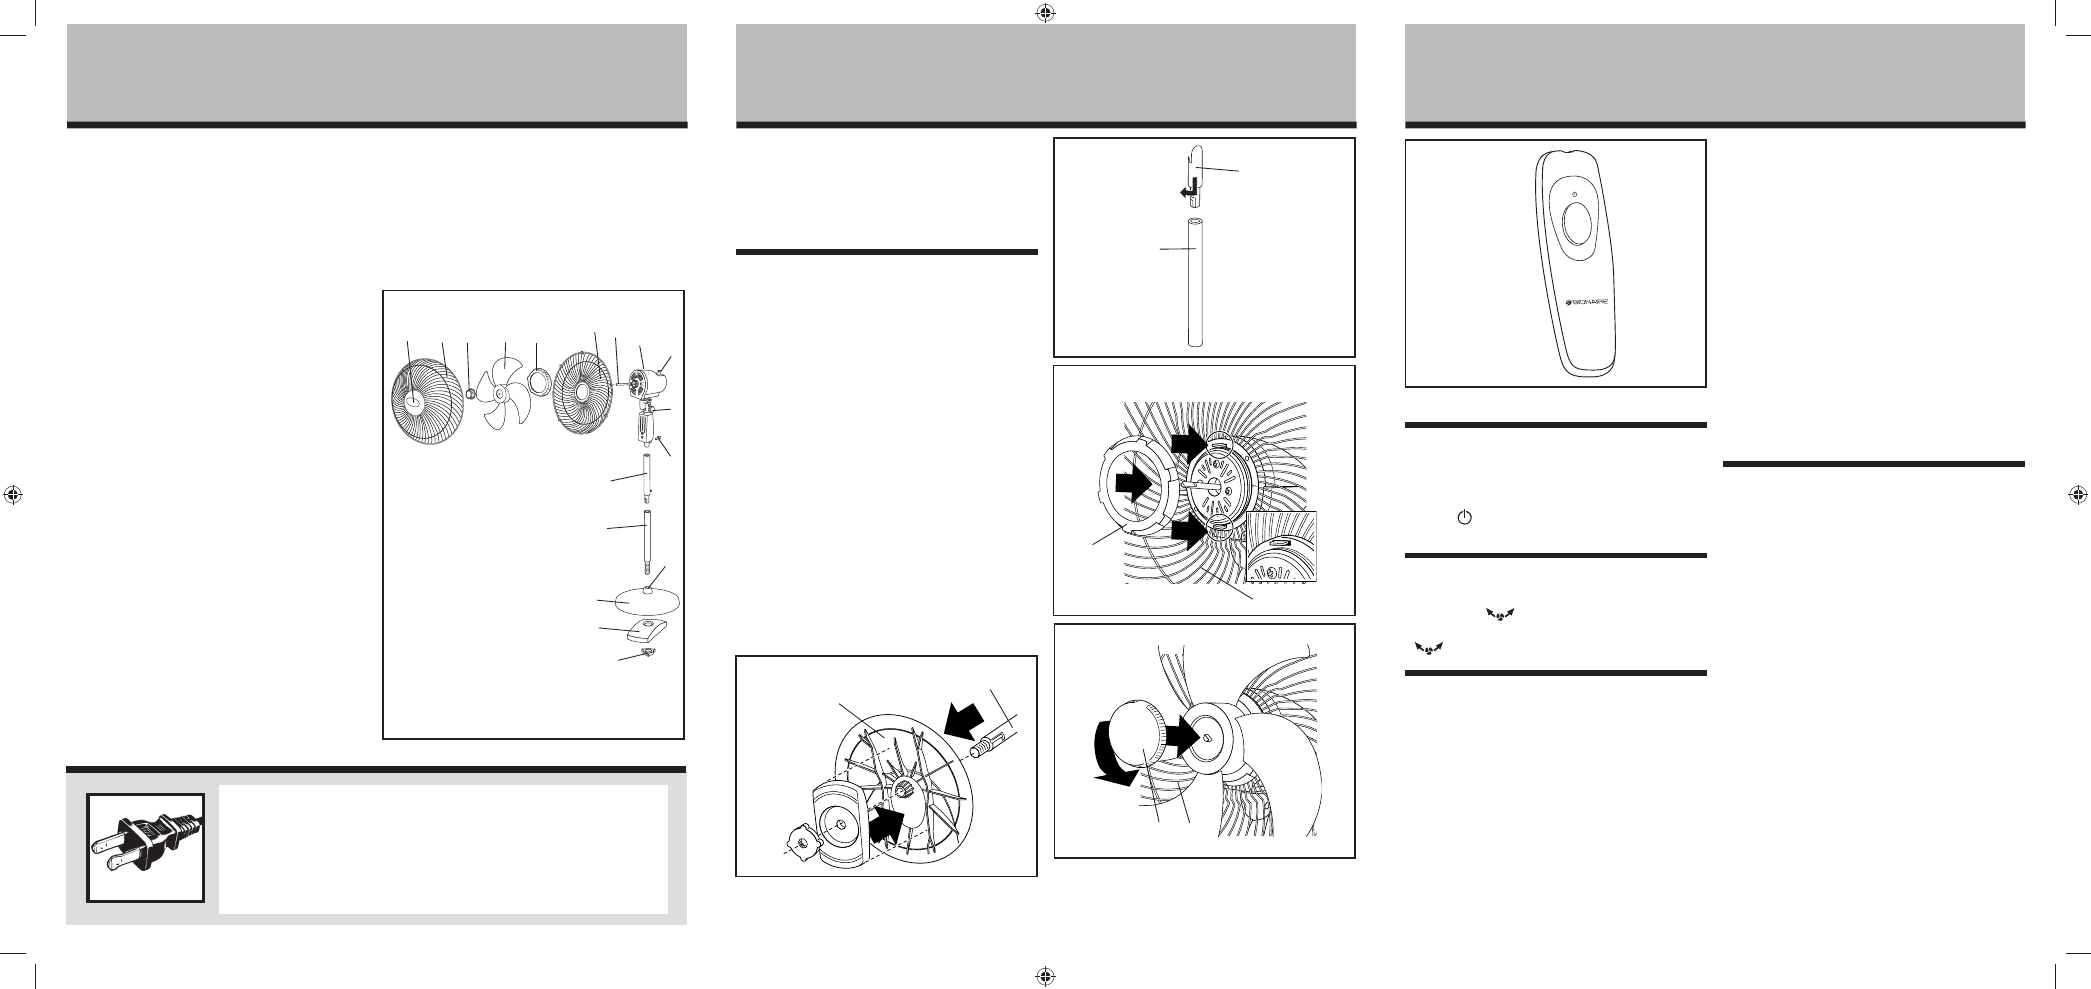
ASSEMBLY INSTRUCTIONS
Assembly Time: 5-10 Minutes
NOTE: Check all packaging materials and make sure
that you have all of the parts necessary for assembling
your fan.
1. Insert the threaded end of the Lower Pole into the
Base. Refer to Figure 2.
2. Secure the Base Weight to the threaded end of the
Lower Pole with the Base Weight Nut. Refer to Figure 2.
3. Insert the threaded end of the Upper Pole into the
Lower Pole. Twist clockwise to lock. Refer to Figure 3.
4. Slide Neck of the Motor Housing over the Upper Pole
and secure by tightening the Thumb Screw.
5. Secure the Rear Grill to the Motor Housing by
tightening the Rear Grill Mounting Nut. Refer to
Figure 4 for the correct positioning of the Rear Grill
to the Motor Housing.
6. Secure the Fan Blade to the Motor Shaft by
tightening the Fan Blade Cap. Refer to Figure 5.
7. Secure the Front Grill to the Rear Grill by snapping
the Front Grill into the clips around the perimeter of
the Rear Grill.
OPERATING INSTRUCTIONS
1. Set fan on a dry, level surface.
2. Plug cord into any standard 120 volt AC outlet.
3. The speed/mode is adjustable by pushing the Mode/
Off ( ) button either from the fan housing or the
remote control.
OSCILLATION INSTRUCTIONS:
To turn the oscillation feature off pull the Oscillation
Control Knob (
) all the way up. To turn the
oscillation feature on push the Oscillation Control Knob
(
) all the way down.
FCC STATEMENT
Potential for Radio/Television interference
This product has been tested and found to comply with
the limits for a Class B digital device, pursuant to part 15
of the FCC rules.
These limits are designed to provide reasonable
protection against harmful interference in a residential
installation. The product generates, uses, and can radiate
radio frequency energy and, if not installed and used in
accordance with the instructions, may cause harmful
interference to radio communications. However, there is
no guarantee that the interference will not occur in a
particular installation. If the product does cause harmful
interference to radio or television reception, which can be
determined by turning the product on or off, the user is
encouraged to try to correct the interference by one or
more of the following measures:
• Reorient or relocate the receiving antenna.
• Increase the separation between the product and the
receiver.
• Connect the product into an outlet on a circuit
different from that to which the receiver is
connected.
• Consult the dealer or an experienced radio/TV
technician for help.
Changes or modifications not expressly approved by the
party responsible for compliance could void the user’s
authority to operate the equipment.
REMOTE CONTROL
This unit includes two (2) AAA batteries.
Battery Replacement
a) Locate the battery cover on the back of the remote
control handset. Slide the battery cover off with your
thumb.
b) Use the tip of a pen to loosen each battery. Hold the
remote control handset at an angle to allow the
batteries to slide out.
c) Insert two new batteries, pressing them firmly into
their slot.
d) Replace the battery cover.
NOTES:
• Do not mix old and new batteries.
• Do not mix alkaline, standard (carbon-zinc), or
rechargeable (nickel-cadmium) batteries.
• Replace all batteries of a set at the same time.
• Clean the battery contacts and the devices’ contacts
prior to installing the batteries.
• Remove the batteries from the equipment when it is
not being used for an extended period of time.
• Remove the used batteries promptly.
THIS APPLIANCE HAS A POLARIZED PLUG (one blade is wider than the
other). To reduce the risk of electric shock, this plug is intended to fit in
a polarized outlet only one way. If the plug does not fit fully in the
outlet, reverse the plug. If it still does not fit, contact a qualified
electrician to install the proper outlet.
DO NOT ATTEMPT TO MODIFY THIS PLUG OR DEFEAT THIS
SAFETY FEATURE IN ANY WAY.
Figure 2
M
K
Figure 6
Figure 4
F
E
Figure 5
C
D
Figure 3
I
K
A. Logo Plate
B. Front Grill
C. Fan Blade Cap
D. Fan Blade
E. Rear Grill Mounting Nut
F. Rear Grill
G. Motor Shaft
H. Motor Housing
I. Upper Pole
J. Grill Clips (6)
K. Lower Pole
L. Decorative Cap
M. Base
N. Base Weight
O. Base Weight Nut
P. Oscillation Control Knob
Q. Tilt-Adjustment Knob
R.
Thumb
Screw
S.
Mode/Off button
T.
IR Lens
A
B
C
D
E
F
G
H
I
L
Q
M
R
Figure 1
P
K
N
O
BSF152T-U_08EM1.indd 2
BSF152T-U_08EM1.indd 2
12/22/08 3:49:39 PM
12/22/08 3:49:39 PM