Pioneer DEH-P8600MP User Manual
Page 5
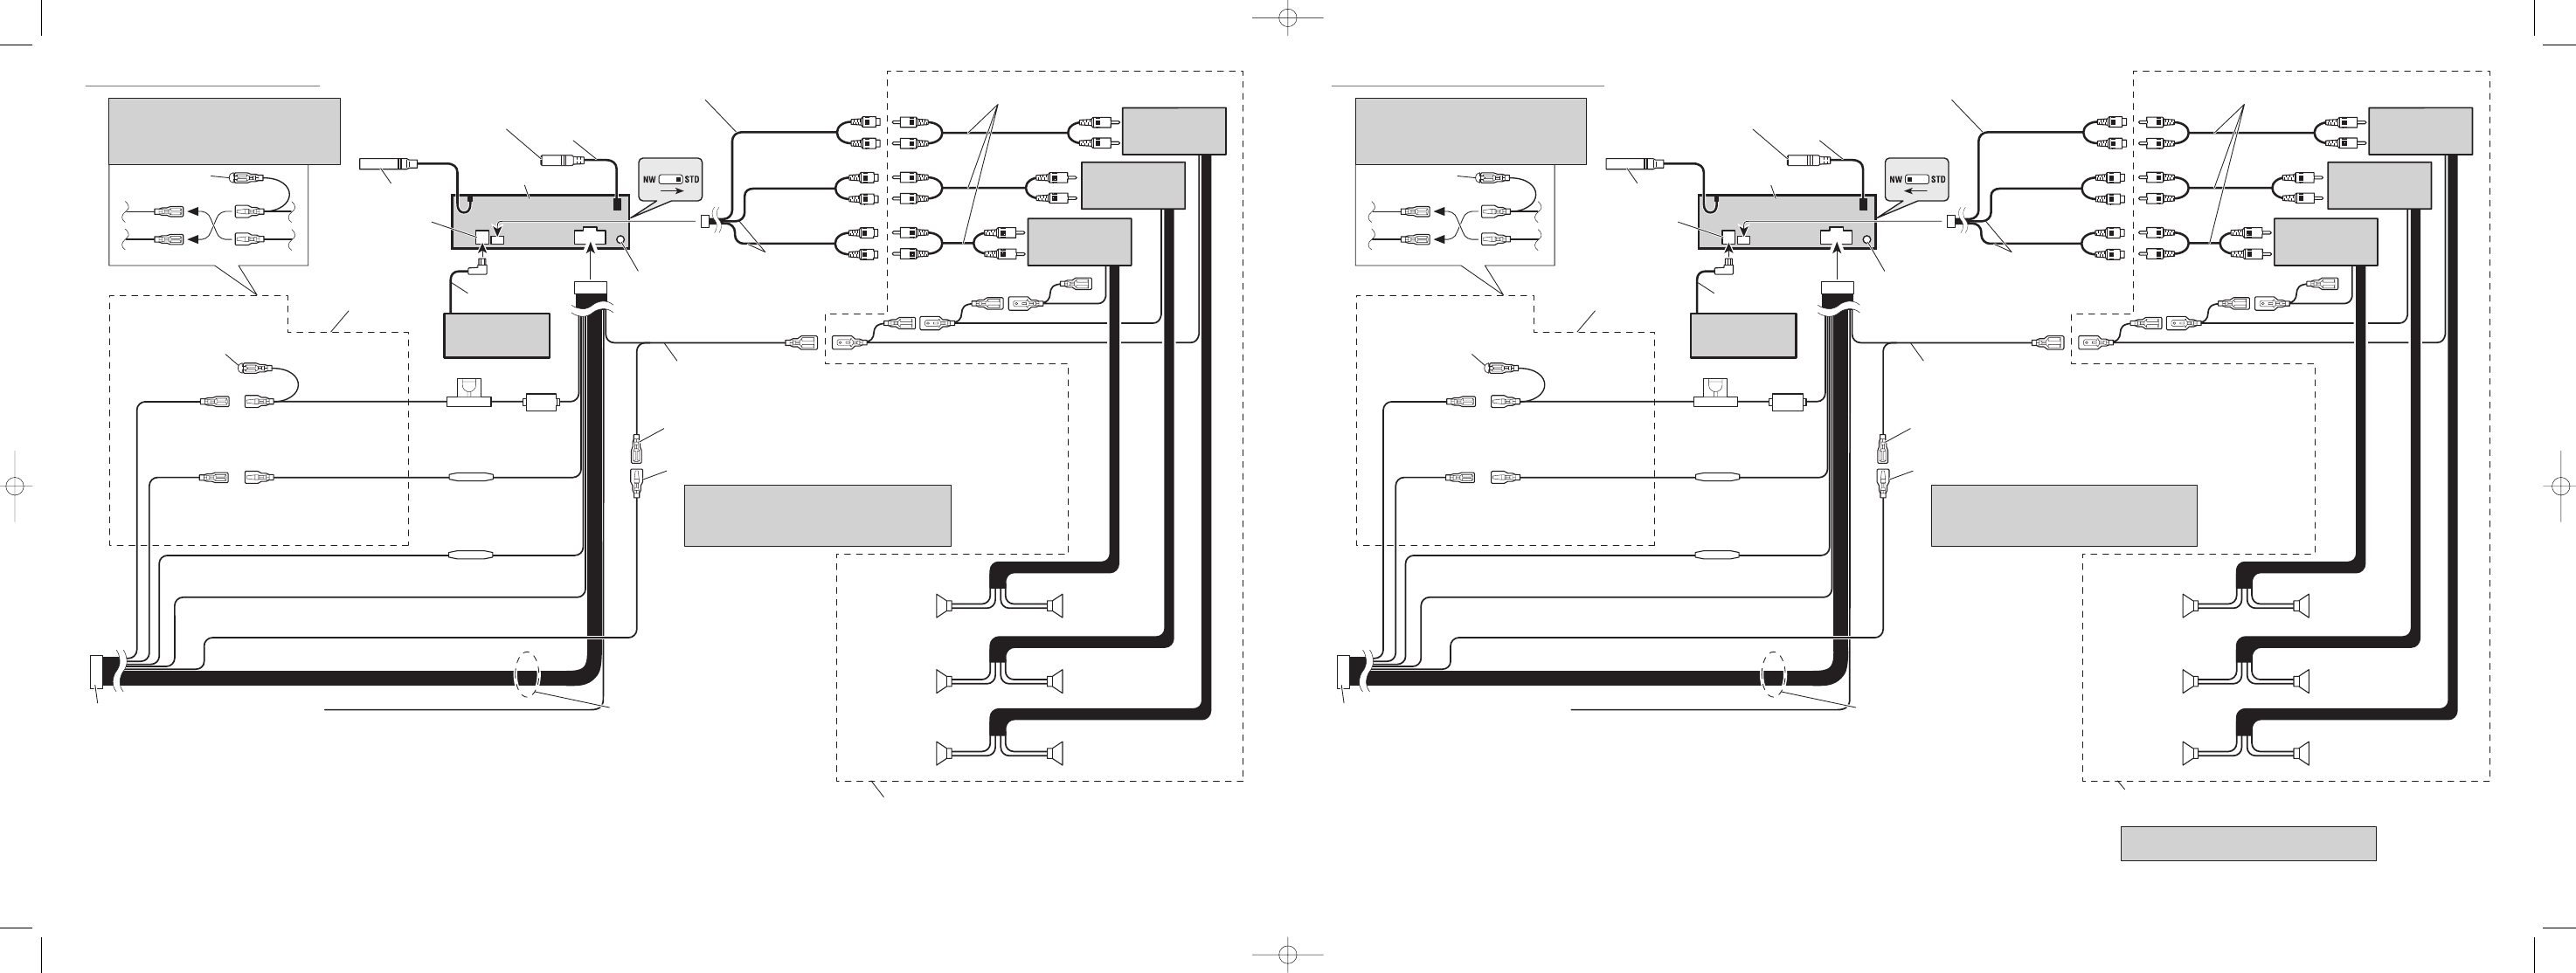
Connection diagram for 3-way network mode
Connection diagram for standard mode
Fig. 11
Abb. 11
Afb. 11
23 cm
20. Fuse resistor
1*
2*
4*
3*
5*
33. Left
34. Right
20. Fuse resistor
17. Fuse holder
15 cm
12.
4. DSP switch
Switch the DSP switch
as illustration below.
+
≠
+
≠
+
≠
+
≠
+
≠
+
≠
25. Speaker leads
White
: Front left +
White/black : Front left ≠
Gray
: Front right +
Gray/black
: Front right ≠
Green
: Rear left +
Green/black : Rear left ≠
Violet
: Rear right +
Violet/black : Rear right ≠
38. Perform these connections when using
the optional amplifier.
23. ISO connector
Note:
In some vehicles, the ISO connector may be
divided into two. In this case, be sure to
connect to both connectors.
24. Yellow/black
If you use a cellular telephone, connect it via the
Audio Mute lead on the cellular telephone. If not,
keep the Audio Mute lead free of any connections.
22. Black (ground)
To vehicle (metal) body.
21. Orange/white
To lighting switch terminal.
19. Red (4*)
To electric terminal controlled
by ignition switch (12 V DC)
ON/OFF.
16. Yellow (2*)
To terminal always supplied
with power regardless of
ignition switch position.
18. Red (5*)
Accessory
(or back-up)
15. Yellow (3*)
Back-up
(or accessory)
14. Cap (1*)
When not using this terminal,
do not remove the cap.
Note:
Depending on the kind of vehicle, the function
of 3* and 5* may be different. In this case, be
sure to connect 2* to 5* and 4* to 3*.
13. Connect leads of the same
color to each other.
37. Subwoofer
35. Front speaker
36. Rear speaker
37. Subwoofer
35. Front speaker
36. Rear speaker
32. The pin position of the ISO connector will differ
depends on the type of vehicle. Connect 6* and 7*
when Pin 5 is an antenna control type. In another
type of vehicle, never connect 6* and 7*.
31. Blue/white (6*)
30. Blue/white (7*)
To Auto-antenna relay control terminal
(max. 300 mA 12 V DC).
29. System remote control
28. Blue/white
To system control terminal of the
power amp (max. 300 mA 12 V DC).
27. Power amp
(sold separately)
27. Power amp
(sold separately)
27. Power amp
(sold separately)
26. Connecting cords with RCA pin
plugs (sold separately)
2. Antenna jack
15 cm
5. IP-BUS input
(Blue)
6. Multi-CD player
(sold separately)
7. IP-BUS cable
3. This product
8. Jack for the Wired Remote Control
Refer to Wired Remote Control’s manual
(sold separately).
15 cm
1. TEL terminal (TEL)
Refer to handsfree telephone
unit’s manual (sold separately).
10. Rear output
(MID/REAR
OUTPUT)
11. Front output
(HIGH/FRONT
OUTPUT)
9. Subwoofer output
(LOW/SUBWOOFER
OUTPUT)
Fig. 12
Abb. 12
Afb. 12
23 cm
20. Fuse resistor
1*
2*
4*
3*
5*
33. Left
34. Right
20. Fuse resistor
17. Fuse holder
15 cm
12.
4. DSP switch
Switch the DSP switch
as illustration below.
+
≠
+
≠
+
≠
+
≠
+
≠
+
≠
38. Perform these connections when using
the optional amplifier.
23. ISO connector
Note:
In some vehicles, the ISO connector may be
divided into two. In this case, be sure to
connect to both connectors.
24. Yellow/black
If you use a cellular telephone, connect it via the
Audio Mute lead on the cellular telephone. If not,
keep the Audio Mute lead free of any connections.
22. Black (ground)
To vehicle (metal) body.
21. Orange/white
To lighting switch terminal.
19. Red (4*)
To electric terminal controlled
by ignition switch (12 V DC)
ON/OFF.
16. Yellow (2*)
To terminal always supplied
with power regardless of
ignition switch position.
18. Red (5*)
Accessory
(or back-up)
15. Yellow (3*)
Back-up
(or accessory)
14. Cap (1*)
When not using this terminal,
do not remove the cap.
Note:
Depending on the kind of vehicle, the function
of 3* and 5* may be different. In this case, be
sure to connect 2* to 5* and 4* to 3*.
13. Connect leads of the same
color to each other.
32. The pin position of the ISO connector will differ
depends on the type of vehicle. Connect 6* and 7*
when Pin 5 is an antenna control type. In another
type of vehicle, never connect 6* and 7*.
31. Blue/white (6*)
30. Blue/white (7*)
To Auto-antenna relay control terminal
(max. 300 mA 12 V DC).
29. System remote control
28. Blue/white
To system control terminal of the
power amp (max. 300 mA 12 V DC).
27. Power amp
(sold separately)
27. Power amp
(sold separately)
27. Power amp
(sold separately)
26. Connecting cords with RCA pin
plugs (sold separately)
2. Antenna jack
15 cm
5. IP-BUS input
(Blue)
6. Multi-CD player
(sold separately)
7. IP-BUS cable
3. This product
8. Jack for the Wired Remote Control
Refer to Wired Remote Control’s manual
(sold separately).
15 cm
1. TEL terminal (TEL)
Refer to handsfree telephone
unit’s manual (sold separately).
41. High range output
(HIGH/FRONT
OUTPUT)
40. Middle range output
(MID/REAR
OUTPUT)
39. Low range output
(LOW/SUBWOOFER
OUTPUT)
42. Speaker leads
White
: High range left +
White/black : High range left ≠
Gray
: High range right +
Gray/black
: High range right ≠
Green
: Middle range left +
Green/black : Middle range left ≠
Violet
: Middle range right +
Violet/black : Middle range right ≠
44. Middle range
speaker
43. High range
speaker
45. Low range
speaker
44. Middle range
speaker
43. High range
speaker
45. Low range
speaker
46. External amp is required for connecting the low
range speaker.
CRD3827-AN 12/5/03 11:15 Page 17