How to use – Black & Decker PowerPro II FP1611SCKT User Manual
Page 10
5. Fill food chute with food and position the pusher over food.
6. Firmly press the HIGH or LOW speed button, then press down lightly but
firmly on food pusher.
Note: Let processor do the work. Heavy pressure will not speed up operation.
7. After processing food, press the control to OFF. Allow disc to stop rotating.
Twist food chute/cover clockwise to UNLOCK and remove.
8. Carefully pull slice/shred disc off the stem, remove stem, unlock container by
turning it clockwise, and lift it off.
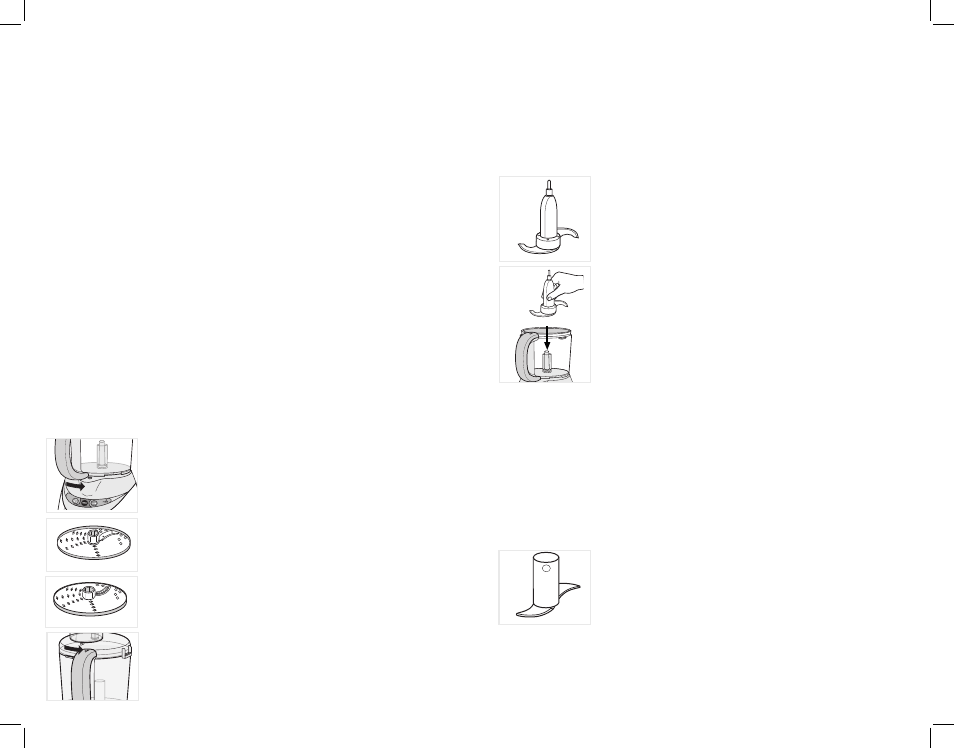
CHOPPING BLADE (E)
1. Place container over center post in base with handle at
the left. Turn container toward base until it drops down
into place. Turn container counterclockwise until it locks
into place (Handle aligns with HIGH speed button) (A).
2. Grasp chopping blade by its center shaft and slide it
down onto center post
(F).
3. Place food into container.
4. Place food chute/cover onto container with food tube to
the left of the handle. Twist food chute/cover
counterclockwise until you hear it click into place and
LOCK (D).
5. Plug cord into an electrical outlet.
6. Press HIGH, LOW or PULSE. When pulsing, hold pulse
position for about 2-3 seconds at a time. Check results
and repeat for desired consistency. It is better to use
several short operations rather than a single long one,
unless mixing ingredients that require longer processing
times.
7. After processing food, press control to OFF or release PULSE button. Allow
chopping blade to stop rotating. Twist food chute/cover clockwise to
UNLOCK and remove cover.
8. Grasp blade by its shaft and remove. Unlock container by turning it
clockwise, and lift it off. Empty the processed food.
Note: You can empty the contents of the container without removing the
chopping blade. From the bottom place one finger through the center opening
to hold the blade in place. Invert container or use a spatula to remove food.
DOUGH BLADE (G)
Important: Follow the instructions under "CHOPPING BLADE" to install
and remove the dough blade.
1. The dough blade can be used to make yeast breads,
pizza dough, or yeast rolls that are made with 3 cups
(750 ml)
of flour or more. Use the 2 dough recipes in this manual
as a guide when making bread or pizza dough. Be sure
to add liquid ingredients slowly as the dough will not form
properly if liquid is added too fast.
2. You may have to stop the unit at times to scrape down the sides of the
processing bowl.
3. Do NOT use the dough blade to make pie crust. Use the chopping blade for
pie pastry (see recipes).
18
G
E
F
17
How to Use
This product is for household use only.
• Before first use, unpack the product and remove packing material. Handle
sharp chopping blade and slice/shred discs carefully.
• Wash all parts except base.
Important: For warranty verification, please do not remove line cord
sticker.
Note: Do not attempt to chop ice in this food processor; it will damage
container and dull chopping blade. This unit will not whip cream, beat egg
whites to a desirable volume, grind coffee beans or spices with a high oil
content, or slice or shred hard-cooked eggs, marshmallows, or soft cheeses.
CONTROLS
HIGH or LOW — When these buttons are pressed, unit runs continuously until
OFF button is pressed.
OFF — Processor should always be left in OFF position when unit is not in use.
PULSE — PULSE button must be pressed and held for unit to operate. When
released, unit will stop. Use PULSE for short processing tasks, such as
chopping nuts, raw meats, or vegetables. This lets you check processed results
and control the fineness.
Important: For your protection, this unit has an Interlock system. The
processor won't operate unless container is properly locked onto base.
Be sure to to attach the container to the base before attaching the food
chute/cover. The tab on cover must be correctly locked into the slot on
base. Be sure cover is turned fully into slot toward LOCK until you hear it
click into place. Do not attempt to operate unit without container and
cover correctly locked in place. Be sure base is on a flat, dry, clean
surface before you begin processing.
SLICING/SHREDDING DISCS
Either the slice/shred disc or the extra-thin slice/fine shred
disc may be used for slicing or shredding, depending on
consistency desired.
1. Place container over center post in base with handle at
left. Turn container toward base until it drops down into
place. Turn container counterclockwise until it locks into
place (Handle aligns with HIGH speed button)
(A).
2. Place the disc stem onto the center post in the container,
then grasp the slice/shred disc by its hub and push it
down onto the disc stem.
For slicing - Slicing blade is raised
(B).
For shredding – Shredding holes are raised
(C).
3. Place food chute/cover onto container with food tube to
the left of the handle. Twist food chute/cover
counterclockwise until you hear it click into place and
LOCK. Arrow on handle aligns with arrow on the chute/
cover
(D).
4. Plug cord into an electrical outlet. Use the Food Guide to
help you prepare food for slice/shred processing.
D
A
C
B