Kodak FUN SAVER FD3 User Manual
Quick start guide, English français canadien, Kodak fun saver digital camera / fd3
Quick Start Guide
For more information, go to: www.kodak.com/go/fd3support
© Eastman Kodak Company, 2011. TM: Kodak, Fun Saver.
KODAK FUN SAVER Digital Camera / FD3
4H8767
English
Français canadien
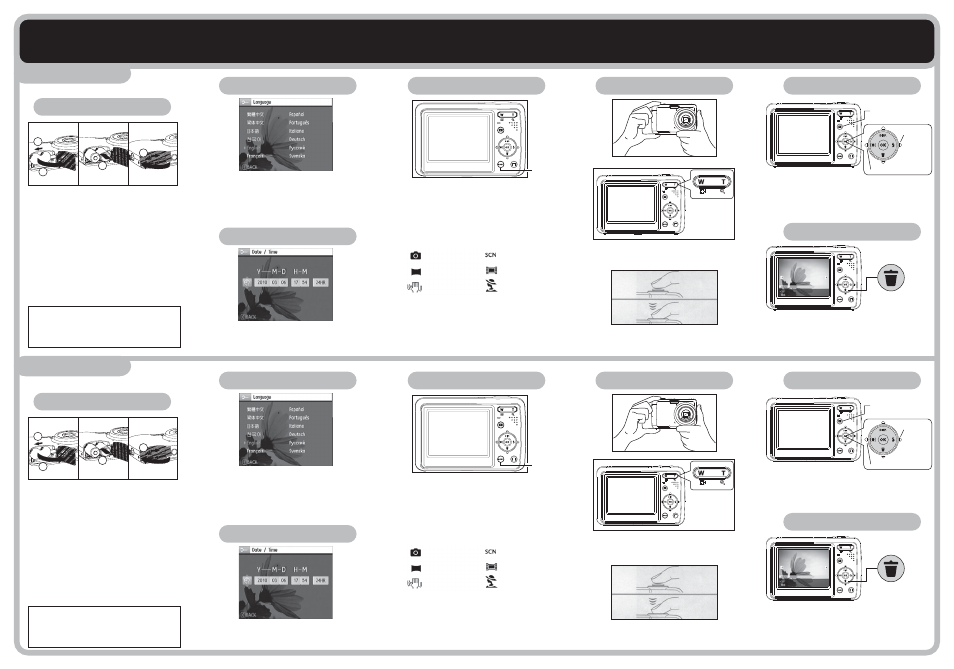
Step 1. Inserting the battery
Step 2. Setting the language
Slide open the battery cover in the direction
shown by ➀ and then lift the cover in the
direction ➁ as shown.
Insert the battery as shown by ➂.
Close the battery cover and slide it to the
right to lock ➃.
Press
Power to turn on the camera, and the
language menu will appear.
Use
Up/Down/Left/Right to select a
language, then press
ok to confirm the
language.
Step 3. Setting the time and date
Use
Up/Down/Left/Right again to set the
date and time, and press
ok to confirm.
Step 4. Using the Mode button
Step 5. Taking a picture
Step 6. Viewing your picture
Step 7. Deleting a picture
The camera provides a convenient Mode
button that allows you to switch between
different modes with ease.
Press the
Left/Right button to choose the
mode, then press
ok to confirm.
Press the
Playback button to switch to Playback
mode.
Use
Left/Right to browse through your photos.
Press
Delete to delete the picture currently on screen.
Press the
Up button to select “Yes”, then press the ok
button to confirm deletion.
Press the
Zoom button on either the Wide or
Tele position of the camera to zoom in or out
on your subject while taking pictures.
Lightly press the shutter button half way to
focus on the subject, then press the button
fully to take a picture.
Mode
button
Auto Mode
Panorama
Stabilization
Scene Mode
Movie Mode
Portrait Mode
1
2
3
4
Playback button
Next
picture
Previous picture
Étape 1. Insertion de la pile
Étape 2. Réglage de la langue
Faites glisser le couvercle de la pile dans la
direction indiquée en ➀ et soulevez le
couvercle dans la direction ➁ comme illustré.
Insérez la pile comme indiqué en ➂.
Fermez le couvercle de la pile et faites-le
glisser vers la droite pour le verrouiller ➃.
Appuyez sur le bouton
d'alimentation pour
mettre sous tension l'appareil photo et afficher
le menu des langues.
Utilisez les flèches
Haut/Bas/Gauche/Droite
pour choisir une langue, puis appuyez sur
ok
pour confirmer la langue.
Étape 3. Réglage de l'heure et de la date
Utilisez les flèches
Haut/Bas/Gauche/Droite
pour régler la date et l'heure et appuyez sur
ok pour confirmer.
Étape 4. Utilisation du bouton Mode
Étape 5. Prise d'une photo
Étape 6. Visionnement de vos photos
Étape 7. Suppression d'une photo
L'appareil photo est équipé d'un bouton Mode
pratique, qui vous permet de naviguer
facilement entre les différents modes.
Appuyez sur le bouton
Gauche/Droite pour
choisir le mode, puis appuyez sur
ok pour
confirmer.
Appuyez sur le bouton de
lecture pour lancer le
mode lecture.
Utilisez les flèches
Gauche/Droite pour parcourir
vos photos.
Appuyez sur l'icône de
Supprimer pour effacer la
photo affichée sur l'écran.
Appuyez sur la flèche vers le
haut pour sélectionner
« Oui », puis appuyez sur le bouton ok pour confirmer
la suppression.
Appuyez sur le bouton
Zoom de l'appareil photo,
soit sur W pour élargir le champ, soit sur T pour
rétrécir le champ, lors de la prise de la photo.
Appuyez légèrement sur le bouton de l'obturateur
à mi-chemin pour mettre au point sur le sujet, puis
appuyez entièrement pour prendre la photo.
Bouton
Mode
Mode auto
Panorama
Stabilisation
Mode scène
Mode vidéo
Mode portrait
1
2
3
4
Bouton lecture
Photo
suivante
Photo précédente
FCC compliance and advisory
This equipment has been tested and found to comply with the
limits for a Class B digital device, pursuant to Part 15 of the FCC
Rules. These limits are designed to provide reasonable
protection against harmful interference in a residential
installation.
Canadian DOC statement
DOC Class B Compliance—This Class B digital apparatus
complies with Canadian ICES-003.
Observation des normes-Classe B—Cet appareil numérique de
la classe B est conforme à la norme NMB-003 du Canada.