English, Caution, Warning – Vollrath Cayenne Gas Flat Top Griddles User Manual
Page 3
3
ENGLISH
O
peratOr
’
s
M
anual
The installation of this appliance must conform with local codes, or
in the absence of local codes, with the National Fuel Gas Code, ANSI
Z223.1/NFPA 54, or the Natural Gas and Propane Installation Code, CSA
B149.1, as applicable.
The appliance and its individual shutoff valve must be disconnected from
the gas supply piping system during any pressure testing of that system
at test pressures in excess of ½ psi (3.5 kPa).
The appliance must be isolated from the gas supply piping system by
closing its individual manual shutoff valve during any pressure testing
of the gas supply piping system at test pressures equal to or less than
½ psi (3.5 kPa).
Clearance and positioning around the appliance:
This appliance
must be installed adjacent to non-combustible surfaces only with a minimum
spacing of 6” from all sides. This appliance must be a minimum distance of
6” from another appliance. The appliance must have the supplied 4” legs
installed and be placed on a non-combustible surface.
Air supply and ventilation:
The area in front and around the appliances
must be kept clear to avoid any obstruction of the flow of combustion and
ventilation air. Adequate clearance must be maintained at all times in front of
and at the sides of the appliance for servicing and proper ventilation.
Pressure regulator:
All commercial cooking equipment must have
a pressure regulator on the incoming service line for safe and efficient
operation. The regulator provided for this appliance is adaptable for both
Natural gas and LP gas. A conversion kit with separate instructions is
included explaining this procedure in detail.
Regulator information: ¾” NPT inlet and outlet; factory adjusted for 5” WC
Natural Gas standard and may be converted by qualified personnel to be
used for Propane at 10” WC.
Prior to connecting the regulator, check the incoming line pressure. The
regulator can only withstand a maximum pressure of ½ PSI (14” WC). If
the line pressure is beyond this limit, a step down regulator before the
regulator provided will be required. The arrow forged into the bottom of the
regulator body shows gas flow direction, and should point downstream to the
appliance.
Gas conversion:
Conversion from Natural Gas to Liquid Propane (LP)or
vice versa may only be performed by a qualified technician or service agent.
In the case of troubleshooting, ensure that the correct orifice sizes of the
spuds have been provided.
Natural Gas Orifice
#40
LP Gas Orifice
#52
NOTE:
The orifice size is marked on the spud.
Gas connection:
The appliance comes fitted with a ¾” N.P.T male adapter
for connection to the pressure regulator.
Maintenance: A qualified service company should check the unit for safe
and efficient operation on an annual basis. Contact the factory representative
or local service company to perform maintenance and repairs
.
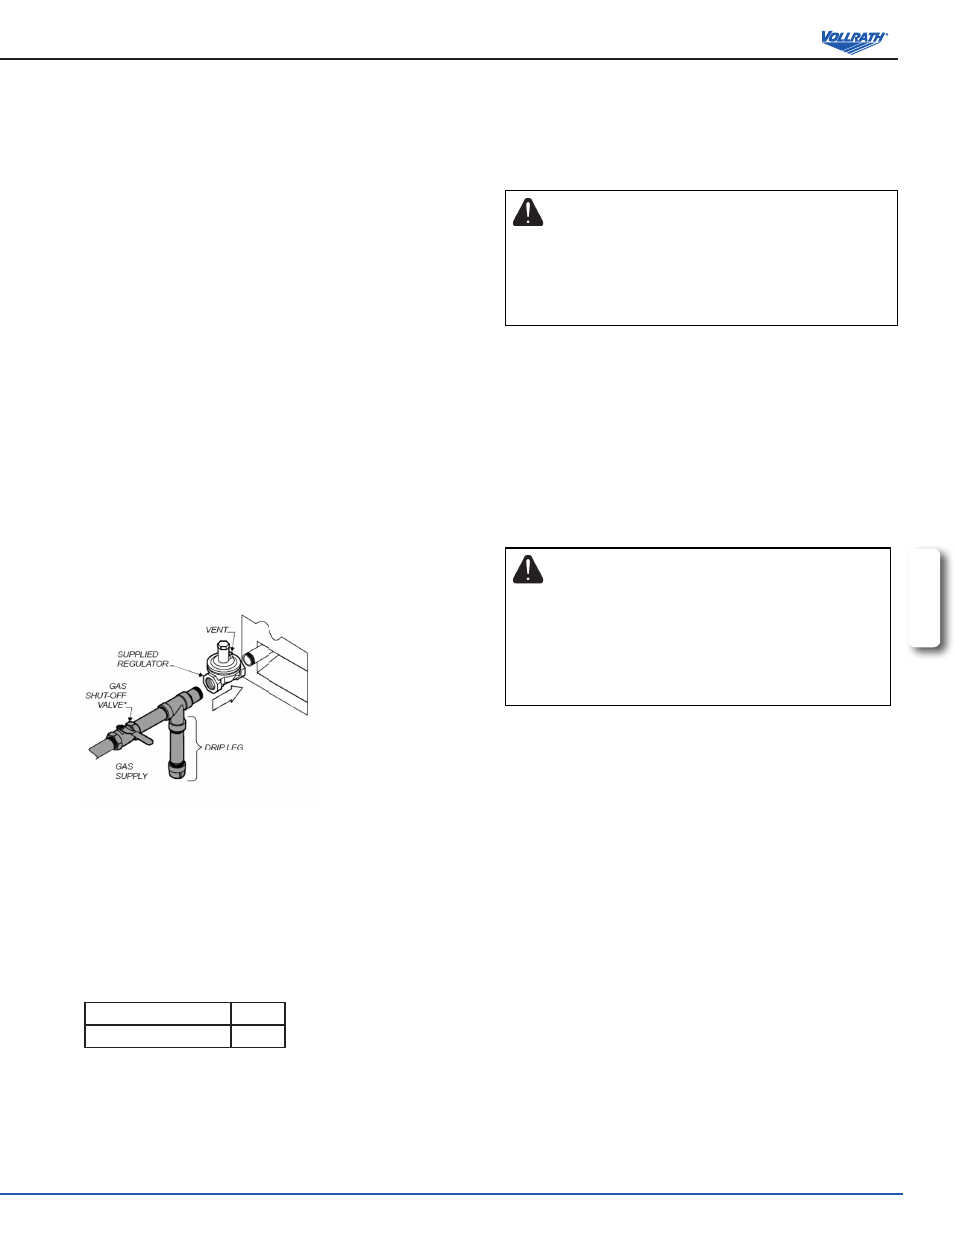
Connection
diagram
Gas piping :
Gas piping shall be of such size and so installed as to provide
a supply of gas sufficient to meet the full gas input of the appliance. If the
appliance is to be connected to existing piping, it shall be checked to determine
if it has adequate capacity. Joint compound (pipe dope) shall be used sparingly
and only on the male threads of the pipe joints. Such compounds must be
resistant to the action of LP gases.
CAUTION
Any loose dirt or metal particles, which are allowed to enter the gas lines
on this appliance, will damage the valve and affect its operation. When
installing this appliance, all pipe and fittings must be free from any internal
contaminates. It is recommended that a “drip leg” be installed in-line
before the regulator.
Manual shut off valve:
A manual shut off valve should be installed
upstream from the manifold, within 4 ft. (1.2 m) of the appliance and in a
position where it can be reached in the event of an emergency.
Checking for gas leaks:
Using a gas leak detector or a soapy water
solution is recommended for locating gas leaks. Matches, candle flame or
other sources of ignition shall not be used for this purpose. Check entire piping
system for leaks.
Exhaust canopy:
Cooking appliances inherently create a good deal of heat
and smoke and should be installed under an efficient exhaust hood with flame
proof filters. A vertical distance of not less than 4 ft. (1.2m) shall be provided
between the top of the appliance and filters or any other combustible material.
WARNING
FIRE DEATH HAZARD
If you smell gas follow the instructions provided by the gas
supplier.
Do not touch any electrical switch; do not try to light the
burner; do not use a telephone within close proximity.
Lighting the pilot:
The manifold units are equipped with standing pilots, and
each should be lit immediately after the gas is supplied to the appliance.
1. Before attempting to light pilots, turn off the main gas valve to the appliance
and wait 5 minutes to clear the gas.
2. Turn off all gas control knobs (E). See Figure 1.
3. Turn on control valve and light all pilots.
4. The pilot burner must be lit at the end of the tube. Hold an ignition source
through the pilot light hole (D) in the front panel at the pilot tube. When the
flame is established remove ignition source.
5. To shut down the appliance turn off the main gas valve to the appliance.
NOTE:
Smoke appearing on initial use of the appliance is normal. This is as a
result of the rust preventative coating burning off. Allow the appliance to ‘burn
in’ for at least 15 minutes before the first use.
Pilot flame regulation:
The pilot flame on the appliance has been factory
adjusted. When adjustment is necessary, adjust the pilot flames as small as
possible, but high enough to light the burner immediately when burner valve
is turned to the ‘High’ setting. Access to the pilot flame adjustment screw is
obtained by removing the front panel.
Burner adjustment:
Remove the front panel to gain access. Turn burner
valve knob to ‘High’ position. Slowly decrease mixing ring aperture to give a
soft blue flame having luminous tips, then slowly increase opening to a point
where the yellow tips disappear and a hard blue flame is obtained.