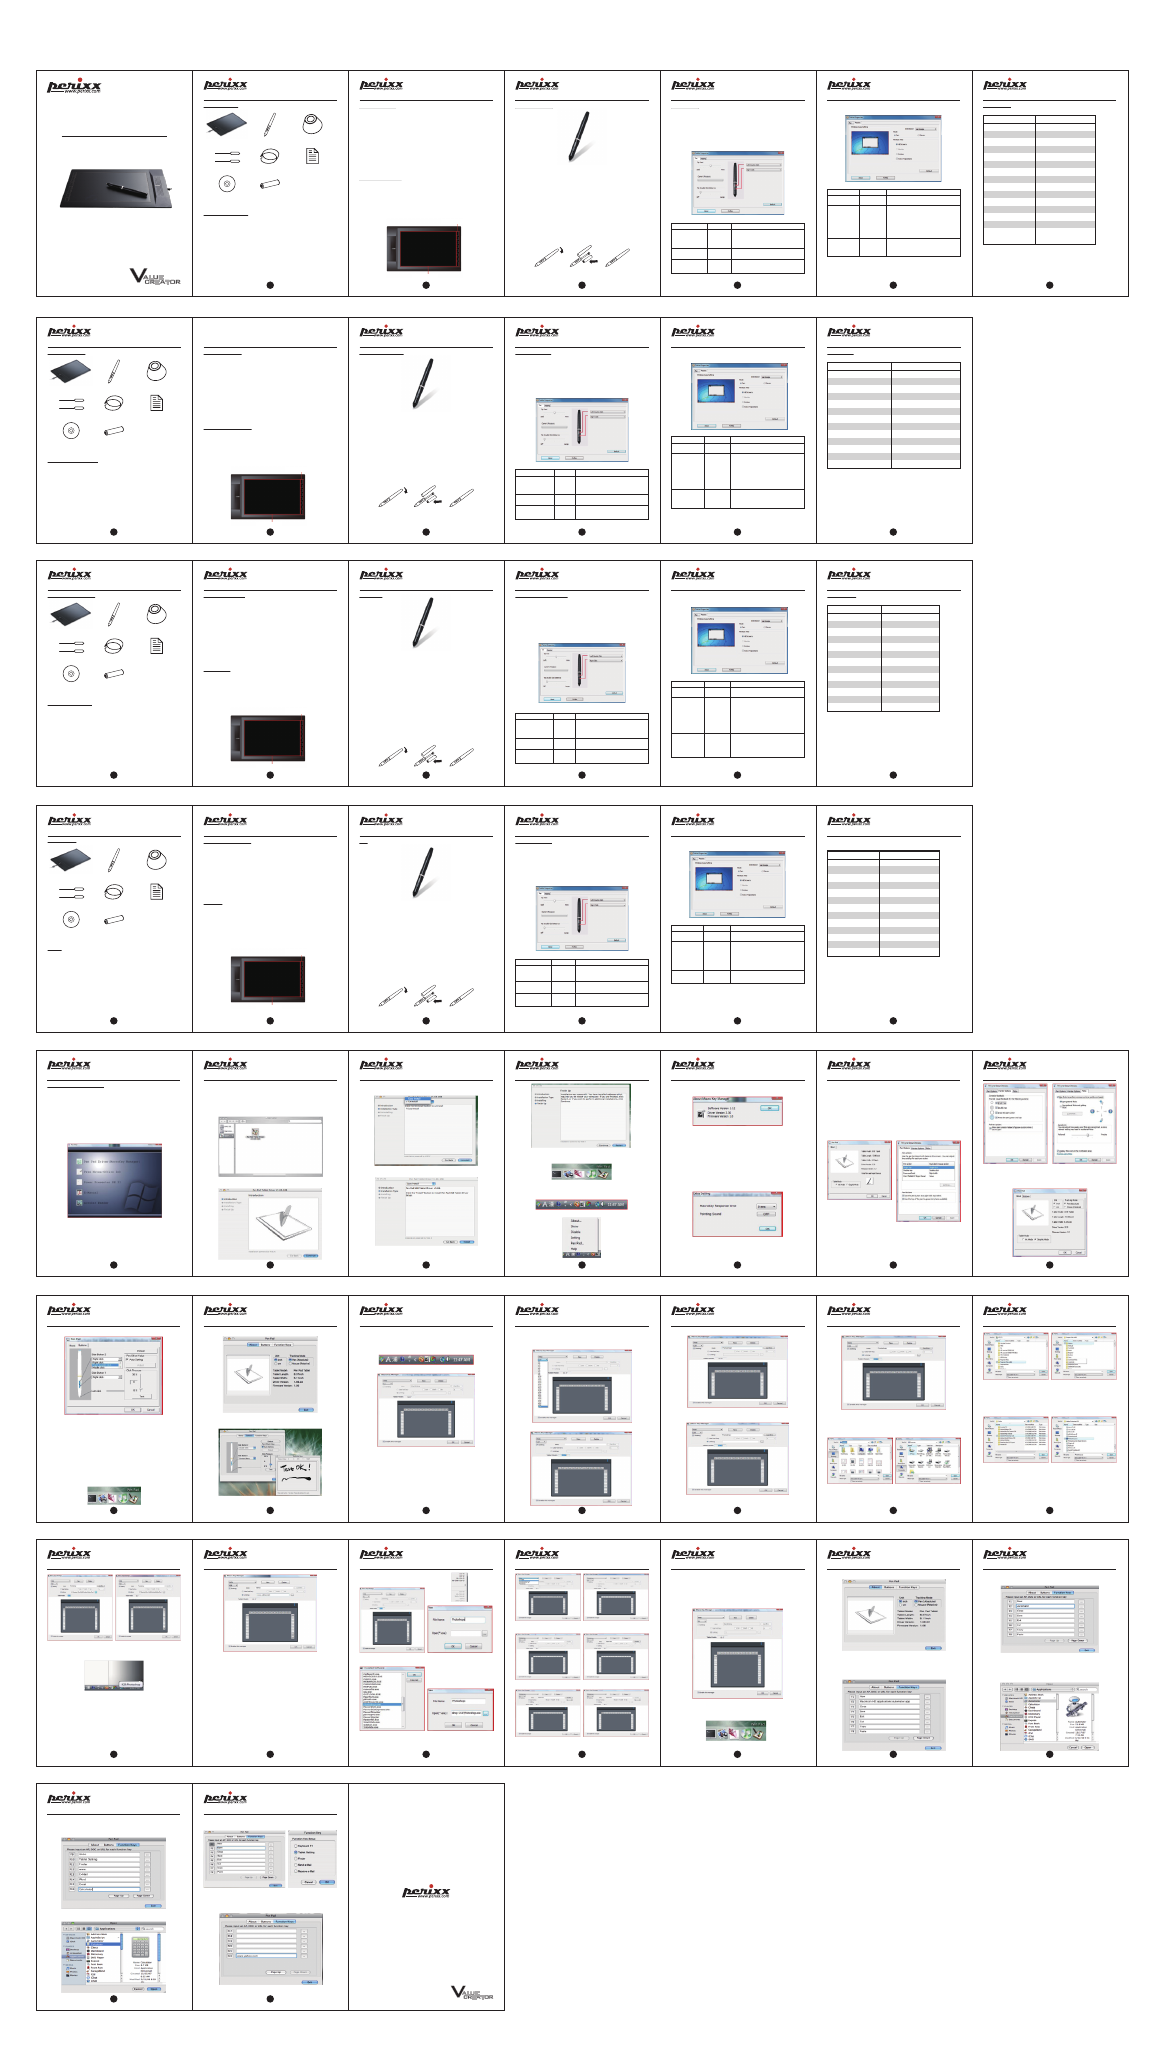
Perixx PERITAB-302 User Manual
Peritab-302, User's guide
b. Pen
a. Peritab-302
c. Pend Holder
e. Pen Tweezers
d. 2 * Extra Pen Tips
g. CD for windows & MAC
f. Quick Start Guide
h. AAA Battery
Working Area
Marco Key
1.
2.
3.
b. Stylet
a. Peritab-302
c. Porte-stylet
e. Pincette pour stylet
d. 2 x pointes de stylet
supplémentaires
g. CD pour Windows et Mac
f. Guide de démarrage rapide
h. Pile AAA
Working Area
Marco Key
1.
2.
3.
b.
ペン
a. Peritab-302
ペンタブレット
c.
ペン立て
e.
ピンセット
d.
ペン替え芯2本
g. windows
及び MAC
用ドライバーCD
f.
取り扱い説明書
h. 乾電池
Working Area
Marco Key
1.
2.
3.
b. Stift
a. Peritab-302
c. Stifthalter
e. Pinzette
d. 2 extra Stiftminen
g. CD für Windows & MAC
f. Schnellstartanleitung
h. AAA Batterie
Working Area
Marco Key
1.
2.
3.
English (US/UK)
Package Content
System Requirements
For successful use and installation of your tablet the following system requirements
are required:
Windows PC
- Optical DVD drive
- Free USB Port
- Win 7 / Win Vista (SP1 or higher) / Win XP (SP2 or higher)
MAC
- Optical DVD drive
- Free USB Port
- MAC OS X 10.4 or higher
English (US/UK)
Specifcations
English (US/UK)
Driver Installation
Before starting with the driver installation please make sure that the tablet i s not
connectec to your PC or MAC.
Windows system:
1. Insert the Driver CD into your CD driver and wait until the auto start window
appears. On Windows Vista nad Windows 7 you may confirm the Action by pressing
>> Continue << if the User Access Control window appear.
2. Simply follow the steps on the screen and finish the installation with restarting your
system.
MAC system:
1. Insert the Driver CD into your CD driver and wait until the Drive is loaded.
2. Click on the Table Icon and simply follow the steps on the screen and finish the
installation with restarting your system.
Knowing your Tablet
1. Working Area:
The working area is the active area where the pen responses.
The usage is different to mouse usage. The working area is equal with your monitor,
you can directly point on the place you like to move the mouse to. If you move the pen
to left bottom corner, the pointer on your display directly ges to this point. This makes
work much more efficient and much quicker than using a mouse.
2. Marco Key:
Please refer to E-manual on CD for Set up quidelines.
English (US/UK)
Knowing your Pen
The Pen of PERTAB-302 is the connection between your hand and the graphic tablet.
Just use and hold the pen like a normal pen. If you move over the tablet in max 10mm
distance with out touching it you can see the movement of the pointer. The pen tip is
like left mouse buttons which also offer double click funttion. Further, the pen offers
two buttons witch can be programmed in Control Panel. After a time it’s necessary to
exchange the pen tip. If the tip is not soft any more or leaves scratches (scratch
noise) on the graphich tablet it’s recommedn to exhcange the tip to avoid any damage
on your tablet.
1. Use the pen tip remover tool like a classical tool you know from home. Grap the tip
with the open end of the remover tool and pull out the tip with care.
2. Place the new tip in the pen and gently push it in until the end is reached. Don’t use
to much pressure to avoid damage of the pen.
3. How to cahgne the battery.
English (US/UK)
Control Panel
This paragraph describes the Windows control panel but can be adopt to MAC control
panel as well.
After driver installation, restart and successful connection of your Graphic table you
will find a small Table Icon in the quick start bar close to your clock. Click on the Icon
to open the Control Panel. The Contrrol Panel is diveided into 2 main parts
1. Pen:
This page offers you a wide range of pen settings to customize the pen to
your needs. Setup the functions like followed.
English (US/UK)
2. Mapping:
This page offers a function to adjust the area on monitor you’d like to
define as active area for the pen.
Function
Tip Feel
Button Configuraton
Tip Double Click
Distance
Values
Soft ~ Firm
Off ~ Large
Desciption
Adjusts the sensitivity of the pen tip and see the
result in Current Pressure bar.
Use >> Details << to setup more specific
values for the pen tip.
Adjusts the funciton of the two buttons on pen
by choosing from drop-down list.
Adjusts the time you have for a double click on
pen tip. You can also disablel the function by
choosing off.
Function
Mode
Monitro Area
Force Proportions
Values
Pen, Mouse
All screens,
Monitor,
Portion
On, Off
Desciption
Select if the Tablet should function like a Pen or
Mouse.
Select >> All Screesn << to define the complete
monitro as working area. If you have more than
one monitor connected, you can choose >>
Monitor << and select which monitor is the
active one. If you want to define a specific area
of the monitro choose >> Portion << and select
the active area by dragging the red frame under
>> Working Area Settings << field.
When Force Proportion option is on, Table will
auto-adjust according to the aspect ratio of
PC/NB Monitors to maximize draqing and
writing accuracy.
Model
Dimension
Weight
Working Area
Color
Hot Keys
Marco Keys
LED Indicator
Pressure Level
Resolution
Report Rate
Maximum Reading Height
Interface
Power Consumption
Certification
Support
PERITAB-302
339 * 204.9 * 8.5 mm
515 g
10 * 6.25“
Black
NA
8
1 White LED
2048
4000 Lpi
200 rps
10mm (0.39 Inch)
USB 1.1 (Full Speed)
35 mA(Max)
CE, FCC, BSMI, VCCI
Windows 7 / Vista / XP / 2000
Mac OS X 10.4 and above
English (US/UK)
Macro Manager PC and Mac
1.Before using your tablet
Uninstall any tablet drivers already on the system.
ALWAYS install the driver before plugging in ….
Attention:
On MAC / Windows XP / Vista / 7, you should install the driver first before using your
Tablet.)
2 .How to install Pen Pad with MacroKey Manager (for PC)
• Insert Driver CD or double click “setup.exe” on your CD drive
• Click “Pen Pad Driver (MacroKey Manager)” icon
• After clicking the icon, installation begins automatically.
• After finishing, you will be prompted to restart your computer. Click “Yes”.
• After restarting your computer, plug your tablet into your computer USB port.
Attention:
Most problems reported by our customers with tablet are originated from incorrect
installation. A majority of reported problems come from incorrect installations. Most a
resolved by first uninstalling the driver completely and then reinstalling it. If you try this
and are still having issues, please contact us through our email [email protected]
English (US/UK)
“Graphic Mode” on Window XP and Vista.
• You can alter “Unit” from “Inch” to “Cm” and alter “Tracking Mode” from “Pen” which
is absolute mode for cognition of pen’s movement to “Mouse” which is relative mode
for cognition of pen’s movement on “Graphic Mode”.
English (US/UK)
3. How to install Pen Pad with MacroKey Manager (for MAC)
Attention:
Install the driver prior to plugging in your tablet.Verify that your driver is version 10.80.
If it is not, go to www.perixx.com and download the latest driver
• Insert Driver CD and Click the Pen Pad Tablet Driver Icon.
• Click “continue” on pop up window of Pen Pad Tablet Driver.
English (US/UK)
• Make sure that you choose “Easy Install” located on top of the pop up window of
Pen Pad Tablet Driver.
• Click “Install”
• Follow the instruction of Pen Pad Tablet Driver.
• Restart your MAC.
English (US/UK)
• Do not plug your tablet into your MAC until you have restarted and you can find Pen
Pad Icon on your Dock.
4. How to change setting for MacroKey Manager (for PC)
After the tablet driver is installed, you can change a number of settings for
MacroKey Manager by using the Icon on the Tray placed on bottom of Window
Bar.
If you press the button located in the bottom of pen up, the Menu is appeared.
English (US/UK)
• About - About shows the version, driver version and firmware versions of the
software.
• Show - Show reveals the MacroKey Manager User interface. Setting up shortcuts for
MacroKey is detailed later in this manual
• Disable / Enable - You can disable or enable MacroKey Manager. On enable
MacroKey Manager, the MacroKey Manager Icon’s color becomes white and gray
and on disable MacroKey Manager, the Icon’s color becomes black and gray. On
disable MacroKey Manager, you can’t use MacroKey Manager Functions.
• Setting - MacroKey Response Time. You can set timer for how long MacroKey
function will work. There are 5 different choices; 0, 0.5, 1, 2 and 3 seconds. The
timing you choose will determine how long you must hold pen on MacroKey before it
activates.
• Pointing Sound - You can choose to get the pointing sound or not while the pen tip
is pointing on the tablet
English (US/UK)
Pen Pad
1. About
Only on Window Vista, under the “Tablet Mode”, you can choose “Ink Mode” or
“Graphic Mode”.)
“Ink Mode” only on Window Vista
• You can use tablet with original tablet’s functions. Pen icon in circle below only
appears on “Ink mode”. You can change Pen options, Pointer options and Pen Flick
in this mode only.
Français (FR)
Contenu de l'emballage
Configuration requise
Pour une bonne utilisation et l'installation de votre tablette, il est nécessaire de
satisfaire aux exigences de système suivantes:
PC Windows
- Lecteur optique DVD
- Port USB libre
- Windows 7 / Windows Vista (SP1 ou version ultérieure) / Windows XP (SP2 ou
version ultérieure)
MAC
- Lecteur optique DVD
- Port USB libre
- MAC OS X 10.4 ou version ultérieure
Français (FR)
Spécifications
Français (FR)
Installation du pilote
Avant de commencer l'installation du pilote, veuillez vous assurer que la tablette n'est
pas connectée à votre PC ou votre MAC.
Windows:
1. Insérez le CD d'installation dans votre lecteur de CD et attendez que la fenêtre de
démarrage automatique s'affiche. Sur Windows Vista et Windows 7, vous pouvez
confirmer l'action en appuyant sur >> Continuer << si la fenêtre Contrôle d'accès
utilisateur s'affiche.
2. Il vous suffit de suivre les instructions à l'écran et de terminer l'installation en
redémarrant le système.
MAC:
1. Insérez le CD d'installation dans votre lecteur de CD et attendez que le disque soit
chargé.
2. Cliquez sur l'icône Tableau et il vous suffit de suivre les instructions à l'écran, puis
de terminer l'installation en redémarrant le système.
Votre tablette
1. Zone de travail:
La zone de travail est la zone active qui réagit au stylet.
L'utilisation est différente de l'utilisation de la souris. La zone de travail est l'équivalent
de votre moniteur, vous pouvez pointer directement sur l'endroit où vous souhaitez
déplacer la souris. Si vous déplacez le stylet vers le coin inférieur gauche, le pointeur
sur l'écran se déplace directement sur ce point. Cela rend le travail beaucoup plus
efficace et beaucoup plus rapide qu'avec l'utilisation d'une souris.
2. Touche macro:
Veuillez vous reporter au manuel électronique sur le CD pour
consulter les instructions relatives à la configuration.
Français (FR)
Votre stylet
Le stylet de PERTAB-302 est la connexion entre votre main et la tablette graphique. Il
vous suffit d'utiliser et de tenir le stylet comme un stylo normal. Si vous faites un
mouvement au-dessus de la tablette à une distance maximale de 10 mm sans la
toucher, vous pouvez voir le mouvement du pointeur. La pointe du stylet est
semblable au bouton gauche de la souris, et permet également la fonction de double
clic. En outre, le stylet offre deux boutons qui peuvent être programmés dans le
Panneau de configuration. Après un certain temps, il est nécessaire de changer la
pointe du stylet. Si la pointe n'est plus souple ou laisse des rayures (bruit de
grattement) sur la tablette graphique, il est recommandé de changer la pointe pour
éviter d'endommager votre tablette.
1. Utilisez l'outil de retrait de la pointe du stylet comme un outil classique que vous
utilisez chez vous. Attrapez la pointe avec l'extrémité ouverte de l'outil de retrait et
retirez la pointe avec précaution.
2. Placez la nouvelle pointe dans le stylet et poussez-la délicatement jusqu'à ce
qu'elle soit complètement enfoncée. N'exercez pas trop de pression afin d'éviter
d'endommager le stylet.
3. Comment change la batterie
Français (FR)
Panneau de configuration
Ce paragraphe décrit le panneau de configuration de Windows, mais peut également
convenir pour le panneau de configuration de MAC.
Après installation du pilote, redémarrez et suite à la connexion réussie de votre
tablette graphique, vous verrez s'afficher une petite icône Tableau dans la barre de
lancement rapide, près de votre horloge. Cliquez sur l'icône pour ouvrir le Panneau
de configuration. Le Panneau de configuration se divise en 2 parties principales
1. Stylet:
Cette page vous offre un large éventail de paramètres de configuration du
stylet pour personnaliser le stylet selon vos besoins. Configurez les fonctions de la
manière suivante.
Français (FR)
2. Cartographie:
Cette page propose une fonction pour ajuster la zone sur l'écran
que vous souhaitez définir comme zone active pour le stylet.
Fonction
Sensibilité de la pointe
Configuration des boutons
Distance du double clic de
la pointe
Valeurs
Souple ~
Ferme
Désactivée ~
Grande
Description
Permet de régler la sensibilité de la pointe du stylet et
de voir le résultat dans la barre de pression actuelle.
Utilisez >> Détails >> pour configurer des valeurs plus
précises de la pointe du stylet.
Règle la fonction des deux boutons du stylet en
choisissant dans la liste déroulante.
Règle le temps que vous avez pour un double-clic sur
la pointe du stylet. Vous pouvez également désactiver
la fonction en choisissant Désactivé.
MODÈLE
Dimensions
Poids
Zone de travail
Couleur
Touches macro
Indicateur LED
Niveaux de pression
Résolution
Taux de rapport
Hauteur de lecture maximale
Interface
Consommation
Certification
日本語 (JP)
パッケージ内容
対応OS
Peritab-302
のご使用にはお手持ちのコンピューターが以下の要件を満たしていることが
必要になります。
Windows
- 光学式DVDドライブ
- USBインターフェイス
- Win 7 / Win Vista (SP1以上) / Win XP (SP2以上)
MAC
- 光学式DVDドライブ
- USBインターフェイス
- MAC OS X 10.4 またはそれ以上
日本語 (JP)
仕様詳細
日本語 (JP)
ドライバーのインストール
ご注意:タブレットをPCに接続する前にドライバーをインストールしてください
Windows:
1.
ドライバーCDをCDドライブに挿入後、ウィンドウが開くまでお待ちください。
Windows Vista
またはWindows 7 の場合、|続行|を押してください。
2.
画面表示の手順に従ってインストールを完了し、PCを再起動してください。
MAC:
1.
ドライバーCDをCDドライブに挿入後、読み取り完了までお待ちください。.
2.
画面表示の手順に従ってインストールを完了し、PCを再起動してください。
タブレット
1. 入力エリア:
入力エリアはペンが反応する範囲です。入力エリアはパソコンの画面と
対応しています。マウスご使用時と異なり、ペンをタブレットから離したままカーソルを
移動したい点を直接タッチして下さい。例えば入力エリア左下をペンでタッチすると、
カーソルが直接パソコンの画面左下に移動します。マウスを使用するより操作が素早く
簡単になります。
2. マクロキー設定:
ドライバーCDの E-マニュアルをご覧ください。.
日本語 (JP)
ペン
ペンは手とタブレットをつなぐ媒体です。普通の鉛筆と同じように握ってご使用ください。
ペンをタブレット画面から離して(最大約 10mm まで)動かしてみてください。パソコンの
画面上でカーソルが動きます。ペン先でタッチすることでマウスの左ボタンのダブルクリ
ック機能が使用できます。 さらにペンにはコントロールパネルでプログラミング可能のボ
タンが二つついています。 ペン先は消耗しますので交換の必要があります。使用時に滑り
が悪くなったり摩擦音が出るようになったら芯を交換してください。そのまま使用されま
すとタブレットを傷つける恐れがあります。
ペン先の交換方法:
1.
付属のピンセットを使って磨耗したペン先を引き抜いてください.
2.
替え芯を挿入し、止まるまでそっと押してください。芯が折れることのないよう、力のい
れすぎにご注意ください
電池の交換方法:
日本語 (JP)
コントロールパネル
以下はWindowsに即しての説明ですが MAC でもご参照いただけます。
ドライバーをインストールした後、PCを再起動し、タブレットを接続します。画面右下のメ
ニューキーにアイコンが表示されますので、クリックしてコントロールパネルを開いてくだ
さい。コントロールパネルは二つの部分から成っています。
1. ペン:
ペンの機能を幅広く設定することができます。以下の表をご参照ください。
日本語 (JP)
2. マッピング:
パソコン画面内でペンの反応するエリアを設定することができます。
機能
ペン先感度
ファンクションボタン
ダブルクリック感度
設定範囲
ソフト 硬め
普通 高
説明
ペン先の押し具合に対する反応を調節します。.
>> Details <<
を押してさらに詳しい設定ができ
ます
ペンに搭載の二つのボタンの機能を設定します。
ドロップダウンリストから選んでください.
ペンのダブルクリック機能の精度を調節します。
ダブルクリック機能をオフにすることもできます
機能
モード
入力エリア
フォースプロポーシ
ョン
設定範囲
ペンまたはマ
ウス
全画面、モニタ
ー、部分
入、切
説明
ペンとマウスどちらかの機能を選べます
パソコン画面全体を使用する場合は全画面を選
択します。モニターを二つ以上使用する場合は >>
Monitor <<
でどれを使用するか選べます。画面の
一部分のみを使用したい場合は >> Portion <<を
選択し、 >> Working Area Settings <<の赤のフレ
ームをドラッグして設定します.
この機能が入力されていると、使用画面が自動的
に調節されます
名称
サイズ
重量
入力エリア
色
マクロキー
LED
残量表示
筆圧レベル
解像度Resolution
読み取り速度
読み取り高さ(最大)
インターフェイス
消費電力
証明
PERITAB-302
339 * 204.9 * 8.5 mm
515 g
10 * 6.25“
インチ
黒
8
白色LED
2048
レベル
4000 Lpi
200 rps
10mm (0.39 Inch)
USB 1.1
35 mA(
最大)
CE, FCC
PERITAB-302
339 x 204,9 x 8,5 mm
515 g
10 x 6,25 pouces
Noir
8
1 LED blanche
2048
4000 Lpi
200 rps
10 mm (0,39 pouces)
USB 1.1
35 mA (max.)
CE, FCC
Deutsch (DE)
Verpackungsinhalt
Systemvoraussetzungen
Für den erfolgreichen Einsatz und Installation des Tablets sind folgende
Systemvoraussetzungen erforderlich:
Windows PC
- Optisches DVD-Laufwerk
- Freier USB-Anschluss
- Win 7 / Win Vista (SP1 oder höher) / Win XP (SP2 oder höher)
MAC
- Optisches DVD-Laufwerk
- Freier USB-Anschluss
- MAC OS X 10.4 oder höher
Deutsch (DE)
Spezifikation
Deutsch (DE)
Treiber-Installation
Stellen Sie vor Beginn der Treiber-Installation sicher, dass Ihr Tablet nicht mit dem PC
verbunden ist.
Windows:
1. Legen Sie die CD in Ihr CD-Laufwerk und warten Sie, bis das Auto-Start-Fenster
angezeigt wird. Bei Windows Vista und Windows 7 können Sie die Aktion durch
Drücken der >> weiter << Taste bestätigen, wenn das Fenster
Benutzerkontensteuerung angezeigt wird.
2. Folgen Sie den Schritten auf Ihrem Bildschirm und schließen Sie die Installation
durch einen Neustart Ihres Systems ab.
MAC:
1. Legen Sie die CD in Ihr CD-Laufwerk und warten Sie, bis das Laufwerk geladen
wird.
2. Klicken Sie auf das Auswahlsymbol und folgen Sie den Anweisungen auf dem
Bildschirm. Beenden Sie die Installation mit einem Systemneustart.
Arbeiten mit dem Tablet
1. Arbeitsbereich:
Der Arbeitsbereich ist der aktive Bereich. Dort benutzen Sie
den Stift. Die Verwendung unterscheidet zur Nutzung mit der Maus. Der
Arbeitsbereich gleicht Ihrem Bildschirm und Sie können mit dem Stift direkt auf die
Stelle tippen, auf die Sie die Maus bewegen möchten. Wenn Sie den Stift zur linken
unteren Ecke bewegen, springt der Zeiger auf dem Bildschirm direkt zu diesem
Punkt. Dies macht die Arbeit wesentlich effizienter und schneller als mit einer Maus.
2. Marco Key:
Die Anleitung für Software-Abkürzungen finden Sie im Handbuch
auf der CD.
Deutsch (DE)
Arbeiten mit dem Stift
Der Stift für das PERITAB-302 ist die Verbindung zwischen Ihrer Hand und dem
Grafik-Tablet. Halten und benutzen Sie den Stift wie einen normalen Stift. Wenn Sie
den Stift in max. 10mm Abstand über das Tablet bewegen, sehen Sie die
Bewegungen des Zeigers. Die Stiftspitze ist wie die linke Maustaste auch mit
Doppel-Klick-Funktion. Darüber hinaus hat der Stift zwei Schaltflächen, die über die
Systemsteuerung programmiert werden können. Es ist wichtig die Stiftspitze nach
einiger Zeit auszutauschen. Ist die Spitze nicht mehr weich und hinterlässt Kratzer auf
dem Tablet, sollte die Stiftspitze zur Vermeidung von Schäden gewechselt werden.
- Zum Wechseln der Spitze nehmen Sie die Pinzette. Ziehen Sie die Spitze mit der
Pinzette vorsichtig heraus.
- Setzen Sie die neue Spitze ein und drücken Sie vorsichtig bis es nicht mehr weiter
geht. Verwenden Sie nicht zu viel Druck, damit Sie den Stift nicht kaputt machen.
Deutsch (DE)
Systemsteuerung
Dieser Absatz beschreibt die Windows-Systemsteuerung. Für MAC-Systeme gilt das
gleiche.
Nach Treiberinstallation, Neustart und erfolgreicher Verbindung zum Grafik-Tablet
finden Sie ein kleines Anzeige-Symbol in der Schnellstartleiste nahe der Uhr. Klicken
Sie auf das Symbol, um die Systemsteuerung zu öffnen. Die Systemsteuerung ist in
zwei Hauptteile unterteilt.
1. Stift:
Diese Seite bietet Ihnen eine Vielzahl von Stifteinstellungen, um den Stift an
Ihre Bedürfnisse anzupassen. Die Einrichtung funktioniert wie folgt.
Deutsch (DE)
2. Mapping:
Diese Seite bietet eine Funktion an, um den Bereich auf dem Monitor
anzupassen, den Sie als aktive Fläche des Stiftes definieren möchten.
Funktion
Empfindlichkeit der
Stiftspitze
Schaltflächenkonfiguration
Doppelklickdistanz des
Stifts
Werte
Weich - Hart
Lang - Aus
Beschreibung
Passt die Empfindlichkeit der Stiftspitze an. Das
Ergebnis sehen Sie in der aktuellen Druck-Leiste.
Verwendung >> Details << Setup - weitere
spezifische Werte für die Stiftspitze.
Passt die Funktion der beiden Schaltflächen für
den Stift an. Auswahl aus der Dropdown-Liste.
Passt die Zeit für einen Doppelklick mit der
Stiftspitze an. Sie können die Funktion auch
ausschalten.
Funktion
Modus
Monitorbereich
Auto.
Seitenverhältnis
Werte
Stift/Maus
Bildschirm-/Mo
nitor-Bereiche
An/Aus
Beschreibung
Wählen Sie, ob das Tablet mit einem Stift oder
einer Maus bedient werden soll.
Wählen Sie >> den ganzen Bildschirm <<, um
den kompletten Monitor als Arbeitsbereich zu
definieren. Wenn Sie mehr als einen Monitor
angeschlossen haben, können Sie einen >>
Monitor << wählen. Wenn Sie einen
bestimmten Bereich des Monitors definieren
möchten wählen Sie >> Teil << und bestimmen
Sie die aktive Fläche durch Ziehen des roten
Rahmens unter >> Arbeitsbereich
Einstellungen <<.
Wenn die Option aktiviert ist, wird die
Bildautomatik des Tablets entsprechend dem
Seitenverhältnis des PC/NB-Monitors
angepasst.
Modell
Maße
Gewicht
Arbeitsfläche
Farbe
Marco Keys (Software-Abkürzungen)
LED Indikator
Druckpegel
Auflösung
Datenübertragungsrate
Maximale Lesehöhe
Schnittstellen
Stromverbrauch
Zertifizierung
PERITAB-302
339 * 204.9 * 8.5 mm
515 g
10 * 6.25“
Schwarz
8
1 LED (weiß)
2048
4000 Lpi
200 rps
10mm (0.39 Inch)
USB 1.1
35 mA(Max)
CE, FCC
Fonction
Mode
Zone du moniteur
Proportions de force
Valeurs
Stylet, Souris
Tout l'écran,
Moniteur,
Portion
Activée,
Désactivée
Description
Sélectionnez cette option si la tablette doit
fonctionner comme un stylet ou la souris.
Sélectionnez >> Tout l'écran << pour définir la
totalité du moniteur comme zone de travail. Si
vous avez plus d'un moniteur connecté, vous
pouvez choisir >> Moniteur << et sélectionner
le moniteur qui est celui qui est actif. Si vous
souhaitez définir une zone spécifique du
moniteur, choisissez >> Portion << et
sélectionnez la zone active en déplaçant le
cadre rouge sous le champ >> Configuration
de la zone de travail <<.
Lorsque l'option Proportion de force est
activée, le tableau est automatiquement ajusté
en fonction du rapport d'aspect des moniteurs
PC / NB pour maximiser la précision du
déplacement et de l'écriture.
English (US/UK)
2. Buttons for Pen Setting
• Button 1 and 2: You can set up the button effect when you press each button.
• Default Icon: Restores settings to initial set up.
• Pen Offset Value: Above Driver Version 3.0, you don’t need to change setting. It’s
already fixed by auto setting.
• Click Pressure: We recommend a setting between 0 and 4.
• Tapping or clicking your pen tip directly on tablet surface is always same response
as clicking left mouse button.
5. How to change setting for MacroKey Manager (for MAC)
Click the Pen Pad icon on Dock tray.
English (US/UK)
English (US/UK)
About - You can change “Unit” of measurement or “Tracking mode” for pen.
Buttons for Pen Setting
English (US/UK)
6. How to set up shortcuts for opening programs using MacroKeys
(for PC)
Setting for shortcuts of MacroKey for PERITAB-300 Series are exactly the same.
1. Double click “Icon” on tray.
2. Make sure your verifying Operating System and select Operating System’s type
You can set up any shortcut on your computer or any software application which has
“Executable file” as “*.exe” file.
PERITAB-301 has total 29 MacroKeys.
1. 15 MacroKeys are already preset (K1~K13, K14 and K15) to your operating
system. Remaining 14 MacroKeys are not preset (K15~21 and K23~K29) and
available for you to use as any shortcuts you desire. All keys including preset keys
can be reset to your preference. Most users find 14 extra keys sufficient enough
flexibility.
2. As an example, now we are going to demonstrate set up of shortcuts with m
“Adobe Photoshop” using MacroKeys.
English (US/UK)
3. We recommend that you select any of the white MacroKeys not gray ones because
remember gray keys have been preset. Of course you can override the gray keys
and reset to your needs but we recommend that you use all non preset keys first.
We selected “K29” as an example.
4. Check “Setting”
English (US/UK)
5. Fill any file’s name you want in “Hint” section. This example we typed in Photoshop.
6. Mark “Linking”
English (US/UK)
7. Click the Icon which has 3 dots.
8. Search the location of exe file. All of exe files are located in “Program files” or
“Program files x86” folder in which you’ve installed the programs.
9. To find follow the steps as pictures below:
Click “Computer” icon Click “C hard drive” or other hard drive.
Double click “Program files
or Program files” (*86)
Double click “Adobe” folder.
Double click
“Adobe Photoshop CS3” folder
Double click “Photoshop.exe” file
or click “open” Icon
English (US/UK)
When you place your pen above “K29” MacroKey, your shortcut setting will appear as
bubble above.
If you click “K29” on VisTablet, the Photoshop programs is activated.
English (US/UK)
Click one section as an example “F2” surrounded by blue circle.
Fill program’s name in the section surrounded by blue circle.
And then, click the “3 Dots” Icon.
After clicking “3Dots” Icon, you should search the application files matched with the
name you filled in.
Most application’s files are in “Applications” folder.
You can find a proper application file surrounded by gray shadow. And then, click
“Open” Icon located on the bottom of right corner. When you click the Function key
you modified on tablet, the application program is operated.
English (US/UK)
You can also set up website address on MacroKey as a picture.
• Choose one of MacroKey, mark “Setting” and fill in “Hint” section.
• In this case, you just type the address in “Linking” section instead of clicking “3 dots”
Icon.
• Click “Confirm” Icon and click “OK” Icon.
7. How to set up shortcuts of MacroKey within software applications
(for PC)
You can set up shortcuts for MacroKey in some programs that have their own short
cut keys. We will continue using Photoshop for an example. Before you set up any
shortcuts, you should be familiar with the shortcuts in whichever program software
you are using or working with. You can find information about Photoshop built-in
shortcuts when you search the Photoshop toolbar.
English (US/UK)
English (US/UK)
English (US/UK)
You have now learned how to set up a short cut for Photoshop the program using
Macro Keys as well as setting up more shortcuts which are particular to the
Photoshop program using additional Macro Keys…..
When you exit your software program, remember to change the profile (see below)
back to your original OS like Vista or XP. If you do not, the original OS MacroKey
settings will not work properly.)
8. How to set up shortcuts of Function Keys (for MAC)
Click “Pen Pad” Icon on dock tray.
English (US/UK)
Click “Function Keys”
PERITAB-301 has 29 Function keys and 302 have 8s.
F1 through F16 is preset on tablet. However, you can modify F1~F15 function keys
preset as following the next step.
If you click “Page Up” or “Page Down” Icons, you can look at all of the Function keys.)
You can look at the direction completely
linked on “Linking” section Click
“Confirm” Icon
You can find that “K29” color is changed
from gray to black Click “OK” Icon
Click “New” Icon
Type program’s name in “File name”
Click “3 Dot” Icon
You should choose “Photoshop”
created by you
In this case, you can use all of the
MacroKeys K1 through K29
Check “Setting” Icon
Fill shortcut’s name in “Hint” section
Mark “Use hot key, and then mark the
direction of shortcut like “Ctrl+N”
Click “Confirm” Icon,
and then click “OK” button
You can find “Photoshop.exe”
Click the file and click “OK”
Click “OK”
English (US/UK)
You can also create Function keys on empty section like F16~F29 for PERITAB-301
and F1~F8 for PERITAB-302.
Fill a program’s name in the section surrounded by a blue circle.
And then, click “3 Dots” Icon at the end.
Choose a proper application file you want.
And then, click “Open” Icon.
English (US/UK)
You can also set up Function keys designation options by click ‘F1-F29’. In this
example, F1 is selected.
You can also set up directly accessible interest addresses.
In this case, you just fill in the exact internet address and then click the ‘Exit’ icon.
When you click the Function key on tablet, you can access the internet website
directly.
PERITAB-302
User's Guide
1
2
3
4
5
6
26
25
27
28
29
30
31
33
32
34
35
36
37
38
40
39
41
42
43
44
45
47
46
13
14
15
16
17
19
20
21
22
23
24
18
7
8
9
10
11
12
尺寸: 110X160 MM 裝釘方式: 騎馬丁