Applica LitterMaid Elite LME5000 User Manual
Page 5
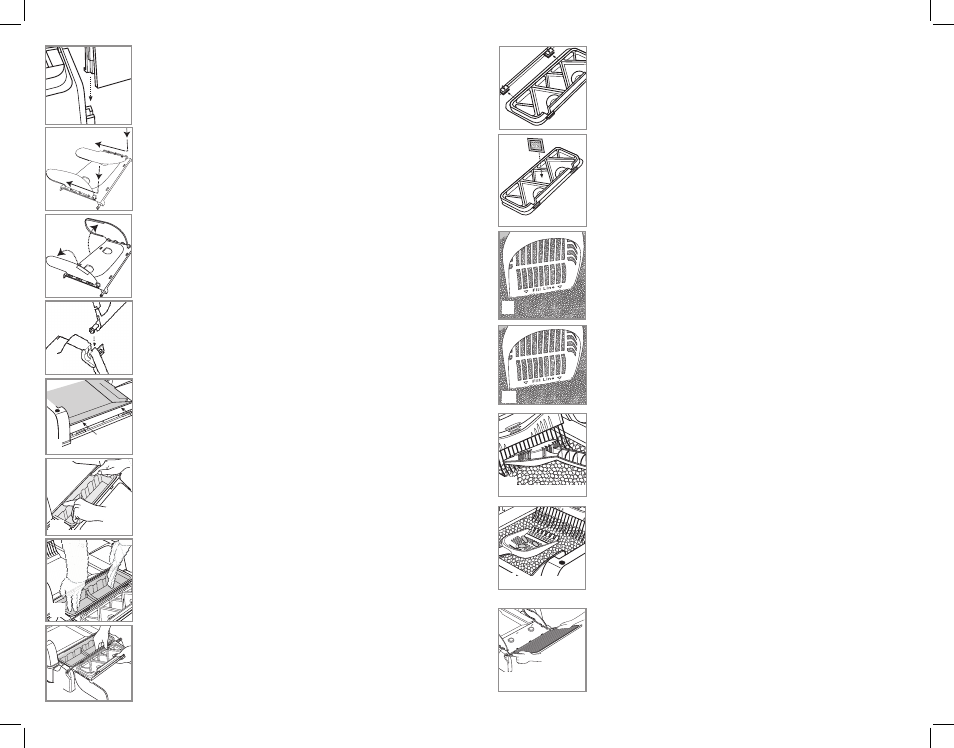
Assembly
1. Slide receptacle supports (marked L (left) and R (right)) into
grooves on the bottom tray until they lock into place
(A).
2. Place both left and right flaps flat on top of the waste
receptacle compartment panel.
3. Push the flaps in and up until they click into place
(B).
4. Lift the flaps until they lock into place
(C).
5. Snap each pivot of the waste receptacle compartment cover,
one at a time, into notches in the receptacle supports
(D).
6. Open waste receptacle compartment cover.
Important: Waste receptacle compartment cover must be
opened to remove and install top housing.
7. Lift top housing. Angle into position bracket end of top
housing under tray ledge.
Important: 5 tabs of the tray
should be on top of the white bar in front of the top
housing (E). Bring the other end of top housing down so
that it snaps into place. Check to be sure top housing is
positioned securely on the tray.
8.
Insert waste receptacles.
• Open waste receptacle compartment cover.
• Insert a disposable waste receptacle into the waste
receptacle compartment.
• Insert the edge of the waste receptacle in an inclined
position and place it between the edge of the tray and the
bar of the top housing
(F).
• Press the waste receptacle down into position
(G).
• There should be no gap between the unit and the waste
receptacle.
• Attach the waste receptacle lid by inserting the push tabs
into the round holes. To secure, press on positions indicated
(H).
8
7
Make sure lid edges are under the cover tabs
(J).
9.
Install carbon filter.
• Peel off the paper strip on the carbon filter to expose the
adhesive.
• Place filter adhesive-side down in the diamond-shaped insert
in the center of the waste receptacle lid
(K). Close the waste
receptacle compartment cover.
10. Fill the LitterMaid
®
litter box to just below the Full Line
marked inside of litter tray.
Important: Use only premium clumping litter. Do not use non-
clumping litter, crystal or pearl-like litters.
Do not overfill the unit or it will not operate properly.
• Use the Fill Line on the LitterMaid™ triple-action tool to
check that the litter is at the correct level in the center of the
unit
(L).
The LitterMaid™ Triple-Action Tool
This handy 3-way tool helps you measure:
• Level of litter
(M).
• Assists in cleaning the rake
(N).
• Aids in the removal of small waste particles
(P).
11.
Install paw cleaning ramp:
• The paw-cleaning ramp has two pivot pins that fit into holes
on the sides of the waste receptacle compartment cover.
• Position the paw-cleaning ramp with carpet-side facing up.
• Insert the pivot pins into the holes
(Q).
• Tug slightly on the ramp to ensure that it is firmly in place.
D
J
K
L
M
N
P
Q
A
B
C
E
F
G
H