Skew adjustment (continued) – Adder Technology X2 User Manual
Page 23
22
Skew adjustment (continued)
3 Simultaneously, press the hotkeys (by default,
and
) along with
to enter configuration mode.
The three keyboard indicators (‘Num Lock’, ‘Caps Lock’
and ‘Scroll Lock’) will now begin to flash in sequence.
4 [OPTIONAL STEP] By default, your skew adjustments are applied equally
to all of the video channels. However, if required, you can select individual
channels and adjust them separately.
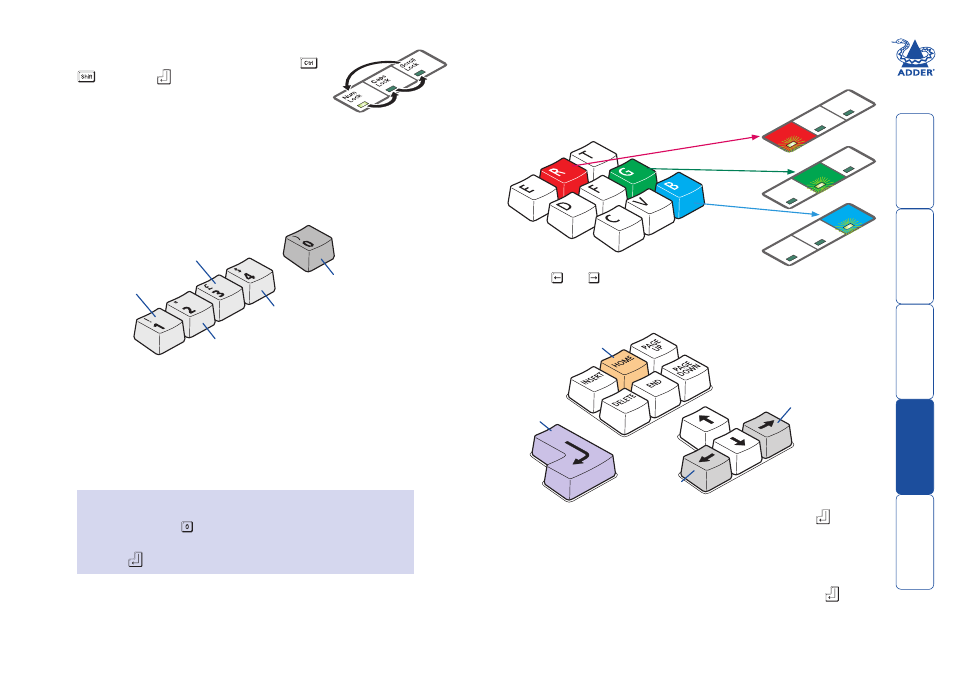
To select video channels: Using the numeric keys of the main keyboard (not
the keypad keys), press the number of the video channel to adjust. When a
numeric key is pressed, all three of the keyboard indicators will illuminate for
a moment before continuing with their flashing sequence.
5 As appropriate, press either the R, G or B keyboard keys to
select the appropriate colour channel. Corresponding
keyboard indicators will flash rapidly to show which
channel is currently selected for adjustment:
Num Lock for Red, Caps Lock for Green
and Scroll Lock for Blue.
6 Press the and keys to retard or advance the timing of the selected
colour channel respectively. On screen you will see a change in the position
of the selected colour crosses in relation to the other two.
Num
Loc
k
Caps
Loc
k
Scrol
l
Loc
k
Num
Loc
k
Caps
Loc
k
Scrol
l
Loc
k
Num
Loc
k
Caps
Loc
k
Scrol
l
Loc
k
Advance
colour
timing
Retard
colour
timing
Restore
default
skew
settings
Exit image
controls
and save
settings
7 When the selected colour crosses are correctly positioned, press
to
exit that colour channel. The keyboard indicators will return to flashing in
sequence.
8 If required, repeat steps 5 to 7 to select and adjust any colour channel until
the vertical lines of the red, green and blue crosses are all aligned.
9 When all colours are correctly aligned on all video channels, press
to exit
configuration mode and permanently save all settings.
Note: Once you have made the skew adjustments, it may be necessary to
re-adjust the image controls to attain optimum screen images.
Note: When entering configuration mode, all video channels are
automatically selected. You can change the video channel at any time.
Re-select all
channels
Select video
channel 1
Select video
channel 3 (MS4
model only)
Select video
channel 2
Select video
channel 4 (MS4
model only)
Note: Use the main keyboard
numeric keys, NOT the keypad
keys on the right hand side.
To reset all skew adjustments to their default states
1 Enter configuration mode (if you are already in image control
mode, press the key to ensure that all channels are selected).
2 Press the Home key
3 Press
to exit configuration mode.