Setting up your vgx-xl3 digital living system, Component – Sony VGX-XL3 User Manual
Page 2
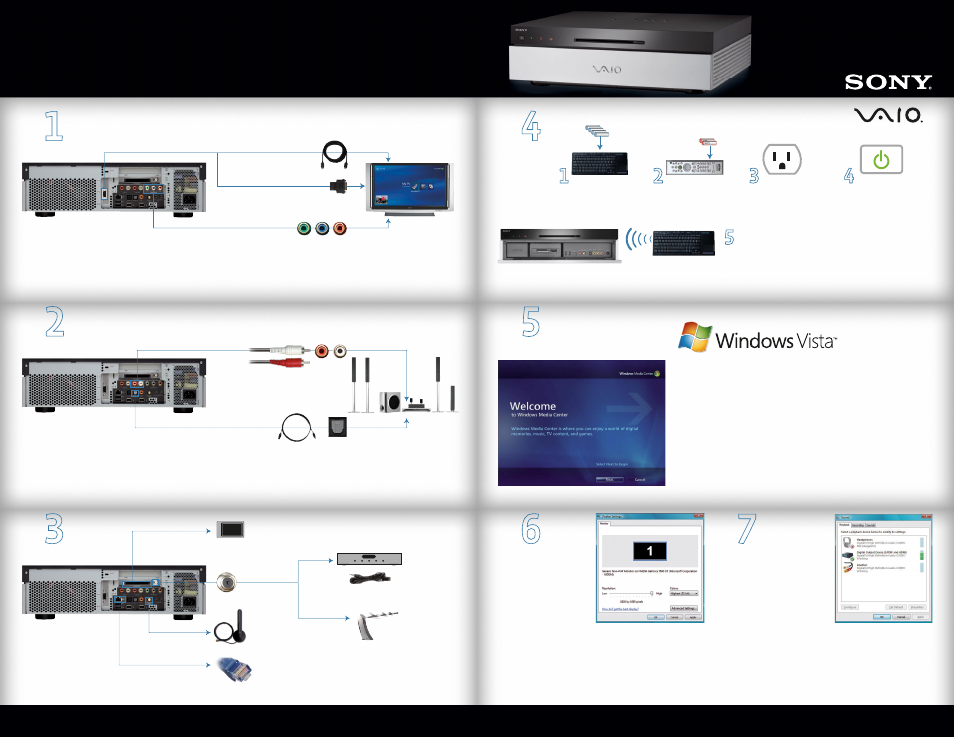
Step
Software Setup
Step
Audio Setup
Step
Resolution Setup
Step
Audio Setup
Step
Signal Setup
Step
Power Up
Step
Connect Your TV
To set the resolution for your TV
or Monitor, do the following:
1.
Using the pointing device on
your wireless keyboard,
right click
anywhere on
the Windows desktop.
2.
From the menu, point to
or
click
Personalize.
A new menu option opens.
3. Click
on the Display Settings option. The screen shown above appears.
4.
From the resolution slider,
choose
a resolution that looks best for your TV
or Monitor and
click
Apply. After selection, you will be prompted to
click
Yes to approve the change. If you see a blank screen after the selection, wait
~15sec until the old resolution is reset.
For High Definition televisions, the
following HD resolutions are suggested: 720p:1176 x 664 or 1080i:1768 x 992
5. Click
the OK button when done selecting your optimum resolution
The PC should be setup automatically for the
HDMI/Optical/Coaxial audio outputs. If you
need to setup the analog LINE OUT or make
any changes, do the following:
1.
Click
on the Windows Start button on
the taskbar.
2.
Click
on Control Panel.
3.
Click
on Hardware and Sound.
4.
Click
on Sound.
5.
Choose
either LineOut for the rear analog stereo output, or choose the Digital
Output Device for Optical, Coaxial, and HDMI rear audio outputs.
6.
Click
Set Default to change the audio output.
7.
Click
OK to continue when completed.
The headphone output will be enabled whenever the headphones are plugged in.
✔
Microsoft
®
Windows
®
operating system Setup
The first time you start your computer you will be presented with a series of
screens for Windows
®
Setup.
Please follow the on-screen instructions.
✔
Sony Registration
Please complete all information to register your Sony product. This makes it easier
to keep your products updated and obtain technical support, if necessary.
Note: Once you complete Windows Setup, do the following:
✔
Check the picture quality of your TV or monitor. If it is not correct, go to Step 6
Resolution Setup.
Media Center Wireless Network Note:
If you have an existing wireless network, and you wish to add the VGX-XL3 personal
computer to the network, start Media Center and from
Task > Settings
, go to:
General >
Windows Media Center Setup > Join Wireless Network
.
Then follow the on-screen
instructions.
HDMI
™
Cable
(Included)
HDMI
™
Cable with DVI Adapter
(Included)
OR
Component
(Not included)
SPDIF Cable
(Included)
RCA Cable
(Not Included)
OR
OR
1
Wireless Network
802.11a/b/g
CableCARD
™
(Not Included)
Contact Cable provider for CableCard
™
Wired Network
10/100/1000Base-T
Cable/Satellite
Set-top Box
(If Applicable)
NTSC/ATSC
Off Air Antenna
You can find more setup information in your computer's User Guide and in your TV or audio system documentation.
Support Resources:
The VAIO Help and Support Center on your VGX-XL3 provides you with a single location for all of your information and support needs.
Click
the Start button in the Windows taskbar, and then
click
Help and Support.
Click
Manuals and Specifications for accessing your documentation.
Note:
•
If your TV has a HDMI connector and a DVI-D connector, Sony recommends
using the HDMI connector.
•
The HDMI cable carries both video and audio signals.
•
You cannot use HDMI and Component connections at the same time.
Note:
•
An optical/coaxial connection will provide a higher quality output than a
RCA/line OUT connection.
•
Not necessary to use the optical or RCA/line OUT audio connections if you use the
HDMI connection and prefer audio to come from your TV set.
This step is optional if you use HDMI cable to connect to your TV.
The HDMI cable carries both video and audio signals, but you may
wish to connect directly to your home audio system instead to
enjoy multi-channel audio.
Back of VGX-XL3
TV
Back of VGX-XL3
Back of VGX-XL3
2 Channel Audio
Multi Channel Audio
Audio System
(Not Included)
WLAN Antenna (Included)
Ethernet Cable (Not Included)
Coax Cable (Not Included)
Insert
four (4) Alkaline AA
batteries (Supplied) into
bottom of keyboard oriented
as shown in the battery
compartment.
Insert
two (2) Alkaline AA
batteries (Supplied) into back
of remote oriented as shown
in the battery compartment.
Make sure all hardware
is connected and that power
cables are plugged into
properly grounded electrical
outlets. (three prong outlets)
Turn on the power
to the
computer, TV, and speakers.
Activate Wireless Keyboard Communication
✔
Slide the keyboard
Power switch to ON
.
✔
From the back of the keyboard, slide the
Pointing Device switch to ON
.
✔
From the back of the keyboard, and the front panel of the DLS computer,
press the Connect buttons
simultaneously and hold a few seconds.
✔
Test the keyboard to make sure it is functioning properly.
Setting up your
VGX-XL3 Digital Living System
™
CableCARD™
Infrared Blaster
(Included)
OR