Installation, Setting up, Customizing the digital audio nursery monitor – Sony NTM-DA1 User Manual
Page 2: Troubleshooting, Transmitter, Receiver (when using it with the ac adaptor), Carrying the receiver, Built-in battery (receiver only), Turning on the power, Adjusting the volume
Installation
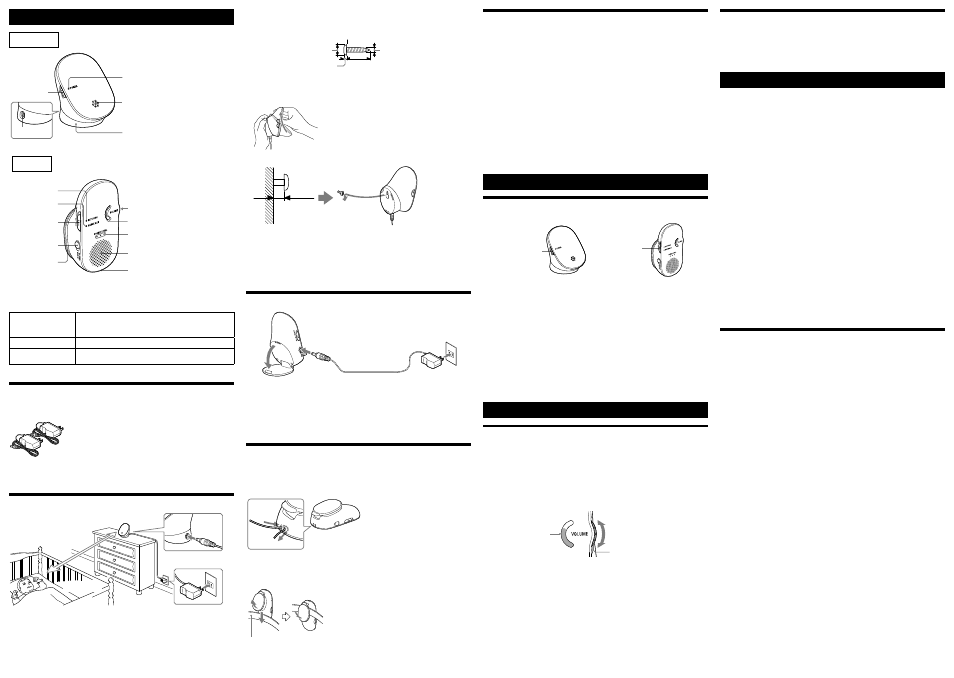
Transmitter
DC IN 5 V jack
Microphone
Power switch
Base
Power indicator
light
Receiver
RANGE ALM
(Range alarm)
indicator light
BATT/CHG
(Battery/Charge)
indicator light
Power/VOICE ACT
switch
Jack cover*/
DC IN 5 V jack
Built-in Stand/
Belt clip
VOLUME indicator
VOLUME control
SOUND LEVEL
indicator lights
Speaker
Strap hole
* If you use the product near water, close the jack cover of the DC IN 5V jack firmly. If it is left open, moisture may get
inside the product and may cause a malfunction.
Indicator information (Receiver only)
BATT/CHG indicator light
Off: power off
Green: power on
Orange: charging
Flashing in red: low battery
RANGE ALM indicator light
Red: indicates the receiver has been moved out of the reception range.
SOUND LEVEL indicator lights
Red: indicates the input sound volume level from the transmitter (off [low] to 3
[high]).
In the box
Transmitter (1)
Receiver (1)
AC adaptors (2)
Operating Instructions (this sheet)
Tip
ˎ
ˎ The same AC adaptor is supplied for the transmitter and the receiver.
Transmitter
More than 0.9 m (3 ft)
Place the transmitter more than 0.9 m (3 feet) away from your child.
1
Connect the supplied AC adaptor to the DC IN 5 V jack and plug it into a wall outlet.
Notes
ˎ
ˎ The transmitter clicks when it is turned to the maximum angle. Do not try to turn it any further.
ˎ
ˎ Do not place the transmitter or the AC adaptor cord within reach of children.
ˎ
ˎ Do not place the transmitter or the AC adaptor cord in, or attach it to, a crib or playpen.
ˎ
ˎ Never use extension cords with the AC adaptor. Use only the AC adaptor provided.
ˎ
ˎ Make sure that the transmitter is not covered or obstructed in picking up sounds.
Mounting the transmitter on a wall
A screw is not supplied. Prepare commercially available screw (diameter: 3.1 mm to 3.5 mm
(1/8 in to 9/64 in), length: more than 20 mm (25/32 in)) suitable for the mounting hole at the
bottom of the transmitter.
3.1 mm – 3.5 mm
(1/8 in – 9/64 in)
More than 20 mm
(More than 25/32 in)
5.7 mm – 6.5 mm
(7/32 in – 17/64 in)
2.3 mm – 2.5 mm
(3/32 in – 7/64 in)
1
Screw the screw into the wall.
Be sure the screw head protrudes between 2.5 mm and 3 mm (1/8 in) from the surface of
the wall.
2
Hold the transmitter and turn it until it clicks.
3
Mount the transmitter on the screw.
Between 2.5 mm
and 3 mm (1/8 in)
CAUTION
ˎ
ˎ The transmitter clicks when it is turned to the maximum angle. Do not try to turn it any further.
ˎ
ˎ When mounting the transmitter on a wall, use the screw suitable to the wall material or strength. Attaching screw
may damage the wall. Attach the screw firmly to a pillar or a stud in a wall, if possible.
ˎ
ˎ Connect the AC adaptor cord to the transmitter, mount the transmitter on the wall, then connect the AC adaptor to
a wall outlet.
ˎ
ˎ Sony is not responsible for accidents or damage caused by improper installation, insufficient wall strength or
improper screw installation, natural calamity, etc.
ˎ
ˎ Fasten the screw securely so that the transmitter does not fall off the wall.
Receiver (when using it with the AC adaptor)
1, 2
2
3
1
Open the jack cover of the DC IN 5V jack.
2
Connect the supplied AC adaptor to the DC IN 5 V jack and plug it into a wall outlet.
3
Open the stand, and adjust the receiver angle.
Notes
ˎ
ˎ Place the receiver on a stable surface. If the receiver is placed on an unstable surface or in an inclined position, it
may fall or topple over, and may cause injury.
ˎ
ˎ Adjust the receiver angle until it is stable. If you incline the receiver too much, the it may topple over.
Carrying the receiver
When you carry the receiver by hanging it on your neck or attaching it to your belt, the receiver
operates on the built-in battery. The BATT/CHG indicator light will show the remaining battery
power.
Attaching a strap to the receiver
Note
ˎ
ˎ No strap is supplied. Use a strap of sufficient strength.
Attaching the receiver to your belt
Belt
Note
ˎ
ˎ If you attach the receiver to your belt using the belt clip, handle it carefully to avoid dropping it.
Built-in battery (Receiver only)
When the receiver is connected to the AC adaptor and the built-in battery has discharged to a
certain level, the built-in battery starts charging automatically and is charged up to full charge.
Battery life
It will last about 16 hours after it has been fully charged (when operated with the medium
volume level, and Voice Activation off).
Charging duration
About 7 hours are required to charge the empty battery to its full capacity, in an ambient
temperature of 25 °C (77 °F). Charging may take longer, depending on whether or not the
receiver is turned on and other ambient conditions.
Checking the remaining battery power
When the battery power is getting low, a beep sounds and the BATT/CHG indicator light of the
receiver flashes in red.
Notes
ˎ
ˎ If you consume the battery power completely and leave it like that, the battery life may be affected. Charge the
battery by connecting it to the AC adaptor as soon as it has been used up.
ˎ
ˎ Even if you do not intend to use the receiver for a long period, charge the battery to its full capacity once every
6 months to maintain its performance.
Setting up
Turning on the power
Power/VOICE ACT
switch
Power switch
Transmitter
Receiver
1
Set the power switch of the transmitter to ON.
2
Set the Power/VOICE ACT switch of the receiver to ON or VOICE ACT.
You will hear sound from the speaker.
Notes
ˎ
ˎ When the receiver is turned on while the transmitter is not on, an alarm sounds in the receiver as no signal can be
transmitted. We recommend turning the transmitter on first.
ˎ
ˎ Do not turn the power on when the receiver is close to the transmitter. Feedback noise will be generated.
Tips
ˎ
ˎ According to the level of sound detected by the microphone of the transmitter, more SOUND LEVEL indicator lights
(up to 3 lights) turn on in red.
ˎ
ˎ The receiver sounds an alarm when it is moved out of the transmission range.
Turning off the power
1
Set the Power/VOICE ACT switch of the receiver to OFF.
2
Set the power switch of the transmitter to OFF.
Customizing the Digital Audio Nursery Monitor
Adjusting the volume
The volume of the sounds you receive varies depending on the loudness of the baby’s voice,
distance between the transmitter and the baby, direction of the built-in microphone of the
transmitter, obstructions, etc.
Set the volume as required using the VOLUME control. If the volume level is set too high and is
accompanied by a shrill noise, reduce the volume.
To increase sound volume, turn the VOLUME control downward. The green area of the
VOLUME indicator is extended.
To decrease sound volume, turn the VOLUME control upward. The green area of the VOLUME
indicator is reduced.
VOLUME indicator
(Green)
VOLUME control
The sound volumes decreased.
The sound volumes increased.
Note
ˎ
ˎ The SOUND LEVEL indicator lights turn on according to the input sound level received from the transmitter. The
level setting of the VOLUME control does not affect it.
Using the Voice Activation function
The Voice Activation function ensures that when the transmitter has detected sound of more
than a certain volume, monitor sound is automatically output from the speaker of the receiver.
This function is usable when it is not required for the receiver to constantly check for sounds
from the nursery, such as when the baby is sleeping quietly or the parents are sleeping.
1
Set the Power/VOICE ACT switch to VOICE ACT to turn the function on.
Troubleshooting
Should any problem persist after you have made the following checks, consult your nearest
Sony dealer. For checking or repairing the Digital Audio Nursery Monitor, the Sony dealer must
have your transmitter and receiver together, even if only one of them seems to have a
problem.
No sound
ˎ
ˎ The AC adaptor is disconnected from the wall outlet.
ˎ
ˎ The battery of the receiver is used up.
ˎ
ˎ The receiver is too far from the transmitter.
ˎ
ˎ Volume is low. (The volume is turned down.)
ˎ
ˎ In quiet surroundings, the Power/VOICE ACT switch of the receiver is set to the VOICE ACT
position.
Too much noise
ˎ
ˎ The receiver is too far from the transmitter.
ˎ
ˎ Interference from another device (microwave oven, Wi-Fi device, BLUETOOTH device, etc.)
using 2.4 GHz frequency.
ˎ
C Turn off the device, or move it further from the transmitter and receiver.
Weak reception
ˎ
ˎ The transmitting distance of the radio is 270 m (900 ft) in the line of sight, however, it may be
shortened by obstructions between the transmitter and the receiver, such as walls or
furniture.
ˎ
C Change the location of the transmitter and receiver so that they are close to each other.
Feedback noise
ˎ
ˎ The receiver is too close to the transmitter.
ˎ
ˎ Volume is too high.
The alarm sounds
ˎ
ˎ The transmitter is not turned on.
ˎ
ˎ The receiver is too far from the transmitter.
ˎ
ˎ There is an obstruction between the transmitter and the receiver.
ˎ
ˎ The battery charge is getting low.
Warning alarm
The receiver sounds the warning alarm in the following cases.
Take appropriate action, according to the alarm.
Ą When the receiver is moved out of the reception range:
ˎ
ˎ The receiver sounds 4 beeps per second consecutively.
ˎ
ˎ The RANGE ALM indicator light turns in red.
ˎ
C Move the receiver closer to the transmitter.
Ą When the power of the built-in battery of the receiver is running out:
ˎ
ˎ If the battery power is getting low, the receiver sounds 3 beeps per second 3 times. If you
continue using the receiver, the receiver sounds a beep for several seconds then turns off
automatically.
ˎ
ˎ The BATT/CHG indicator light flashes in red.
ˎ
C Connect the receiver to the AC adaptor.
When the problem indicated by the alarm is corrected, the alarm stops automatically.
If you want to turn off the alarm, set the Power/VOICE ACT switch to OFF to turn off the
receiver.
Notes
ˎ
ˎ You cannot adjust the alarm volume.
ˎ
ˎ There is no setting allowing you to disable the alarm function.