The rear panel, B2/b2r bass amplifier – Ampeg B2R User Manual
Page 5
5
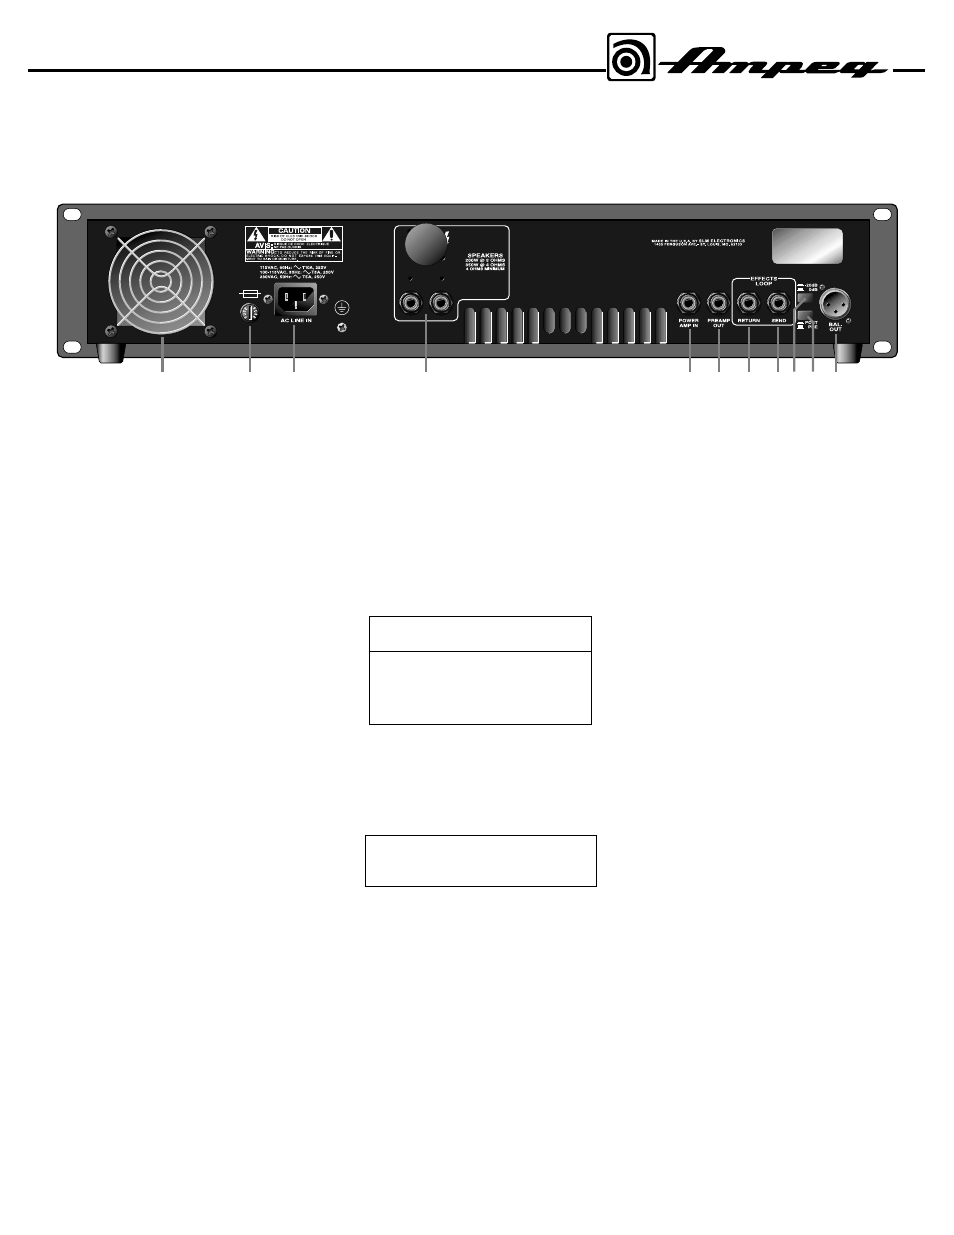
The Rear Panel
B2/B2R Bass Amplifier
MODEL:
SERIAL:
LINE: V ~ Hz
WATTS: MAX
B2R
Q2ZZ650022
120 60
15
16
18
19
20
21
23
24
22
14
17
14. FAN: This temperature controlled, vari-
able speed fan draws cool air into the
amplifier, which forces heat out through the
exhaust vents. Never block the vent holes
or the fan opening.
15. FUSE: This protects the unit from dam-
age due to overload conditions or power
line surges. If the fuse blows, replace it
only with the same size and type.
16. AC LINE IN: Firmly insert the supplied
AC power cord into this socket until it is
fully seated. Plug the male end of the cord
into a grounded AC outlet. DO NOT
DEFEAT THE GROUND PRONG OF THE
AC PLUG!
17. SPEAKER OUTPUTS: Use these
jacks to connect the amplifier to your
speaker(s) using cables terminated with
1/4” connectors. For the B2 combo, use the
supplied speaker cable to connect the out-
put of the amplifier to the speaker jack. An
extension speaker with an impedance of 8
ohms or higher may be connected and
allows the amplifier to deliver its maximum
power.
NOTE: In some areas 1/4” jacks are not
acceptable for use as extension speak-
er jacks. For this reason the 1/4” jacks
on your amplifier may be factory-sealed.
In such cases use the Speakon
®
jack to
connect to external speaker cabinets.
For the B2R, connect the output(s) using
high quality speaker cables.
NOTE:
When connecting multiple
speaker cabinets to the B2/B2R, keep
the overall impedance at or above four
ohms! The following chart shows the total
impedance load when connecting speaker
cabinets in parallel:
18. POWER AMP IN: This mono jack
allows you to feed the preamp output of
another amplifier to the input of the
B2/B2R’s internal power amp. This bypass-
es the preamp circuitry of the B2/B2R.
WARNING: This jack goes directly into
the power amplifier. DO NOT connect
high level signals to it!
19. PREAMP OUT: A post-EQ signal may
be taken from this jack and sent to the
house mixing board, recording console or
external power amplifier.
20. EFFECTS RETURN: To use an exter-
nal effects device, connect the OUTPUT of
the device to this jack by means of a shield-
ed cable. This feeds the processed signal
into the Master section of the B2/B2R.
21. EFFECTS SEND: Connect the output
from this jack to the INPUT of your effects
by means of a shielded cable. This sends a
post-EQ signal to your effects.
22. -20dB SWITCH : This switch adjusts
the output level at the Balanced Line
Output jack (#24). The control works inde-
pendently from the front panel Master con-
trol. Depressing the switch activates the
20dB pad. The result is a signal that is
more compatible with the microphone
inputs on a mixer.
23. PRE/POST SWITCH: You can select
either Pre or Post EQ for the signal at the
Balanced Out jack (#24) with this switch.
With the switch in the OUT position, the
signal at the jacks will be Pre-EQ. This is a
direct output not affected by any EQ or
boost settings. With the switch depressed,
the signal is Post-EQ and is controlled and
modified by the tone controls, Graphic EQ,
and Effects Loop.
24. BALANCED OUTPUT: This XLR-type
connector supplies a balanced preamp out-
put signal for connecting to a house mixing
board, recording console or external ampli-
fiers with balanced inputs. The signal can
be set to Pre or Post EQ by the back panel
Pre/Post switch (#23). The level can be
adjusted for either mic or line type inputs
using the -20dB switch (#22).
Cabinet
# of
Total
Impedance
Cabs
Impedance
8
Ω
2
4
Ω
16
Ω
2
8
Ω
16
Ω
4
4
Ω
Speakon
®
is a registered trademark of Neutrik USA