Installation procedure, Typical installation of a well-nut – Samlex America SM5-KIT User Manual
Page 2
3
2
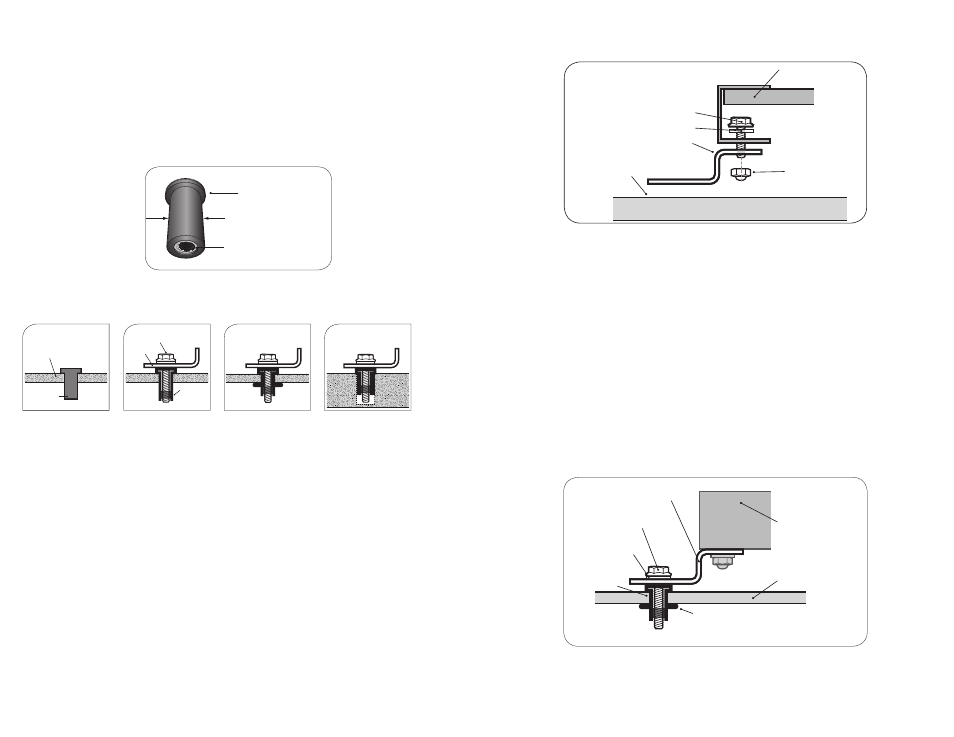
solar module
1/4” -20x3/4” flange bolt
1/4” flat washer
1/4” locknut
mounting bracket
RV roof
Fig. 7. Attaching solar panel to 5-hole mounting bracket
4. Position the panel with the attached mounting brackets at the desired location on the RV roof and
mark the position of the mounting holes by tracing the hole in the mounting bracket. Please ensure
that the mounting surface on the RV roof is strong enough to support the mounting hardware, solar
panel and wind loads.
5. The centre and end holes on the mounting brackets (Fig. 1) are sized to accept the ¼” hardware
supplied with the kit. If the use of larger sized hardware is desired, holes 2 and 4 can be used.
6. To install the Well-Nuts, for anchoring the brackets to the RV roof or a fl at surface, drill holes 1¼”
deep at the marked positions using a ½” size drill bit. Make sure that drilling does not interfere with
pre-existing wiring installations.
7. Apply silicone or any appropriate sealant recommended by your RV dealer generously to the drilled
holes for water-proofi ng.
8. Insert the ¼” Well-Nut into the drilled holes so that only the fl ange section remains above the roof
surface (Fig. 3).
9. Fasten the mounting brackets to the roof surface by inserting the ¼ x 1¼” serrated fl ange bolt into
the Well-Nut. Tighten using a 3/8” wrench to a recommended torque of 15 lbs. When the serrated
fl ange bolt is screwed into the Well-Nut, the material surrounding the well nut bulges slightly
securing the structure to the RV roof (Fig. 5, 8).
10. Ensure that all fasteners are tightened to the recommended tightening torque.
11. Make sure all bolts and mounting brackets are covered by good amounts of suitable RV sealant
recommended by your local RV dealer.
Rubber bushing material expands
when bolt is tightened to securely
anchor hardware
solar
module
¼”-20 x 1¼” flange bolt
¼” flat washer
Well-Nut
mounting bracket
RV roof material
up to approx. 3/8”
thickness
Fig. 8. Attaching 5-hole mounting bracket to RV roof
well Nut for anchoring mounting bracket to the RV Roof or fl at surface
A Well-Nut is a bushing of tough neoprene rubber with a fl ange at the top end and a captive brass nut
mounted within the bore at the bottom end (Fig. 2). This is used to anchor the mounting bracket (Fig.1)
on to the roof of the RV or to other fl at surface. Typical installation is shown in Figs 3 to 6. Tightening
a conventional machine bolt or screw engages the captive nut thereby causing the bushing to expand
outwards. This fastens securely to thinner RV roofs by bulging up and against the bottom surface of the roof
(Fig. 5). If used in a blind hole in a solid surface material, the rubber will expand outwards to create a secure
fastening (Fig. 6). The neoprene and brass resist most environmental conditions. Additionally, the Well-Nut
seals the drilled hole effectively against air and liquid leakage.
flange
1/2” diameter
1/4” captive brass nut
Fig. 2. Construction of a Well Nut
Typical Installation of a well-Nut
RV Roofing
Material
Well Nut
Fig. 3. Well-Nut is inserted
into a pre-drilled hole
with its fl ange against the
outer surface. There is no
need for access to the
inner side.
1/4”-20 x 1
1/4
”
Serrated
Flange Bolt
Mounting
Bracket
Captive
Brass Nut
Fig. 4. The 5-hole mounting
bracket is placed against
the fl ange of the Well-Nut
and is secured by the 1/4"-
20 x 1
1/4
" serrated fl ange
bolt engaging the captive
brass nut.
Fig. 5. As the bolt is tight-
ened, the neoprene body of
the Well-Nut is compressed
and expanded, forcing it
tightly into the bolt's threads
and against the inner surface
of the thin RV roof material.
Fig. 6. Installed in a
blind hole in a solid ma-
terial, the body of the
Well-Nut expands tightly
against the walls of the
hole, effecting a secure,
dependable fastening.
INSTALLATION PROCEDURE
1.
Determine the position of the solar panel on the RV roof or fl at surface. While positioning panels, avoid
shading of the solar panel by neighbouring obstacles such as vents, air-conditioners, TV antennas etc. As
far as possible, position the panels to minimize wiring distance between the solar panel and the charge
controller. Place the panel at least 8-10 inches away from the RV roof edges and leave suffi cient space to
walk around the panel and access the mounting hardware.
2.
Make sure the thickness of the roof at the installation location is at least ½” thick and the material
is strong enough to provide mechanical support to the solar panel and mounting hardware against
possible wind loading. Place the panel length-wise to reduce the effects of wind loading on the RV.
3.
Fix the mounting brackets to the frame of the previously positioned solar panel using the slotted
opening and the ¼”-20 x ¾" Flange Bolt, Nylon Locknut and fl at washer (Fig. 7). Using a 7/16” wrench,
tighten the nuts to secure the mounting brackets to the PV panel. Recommended tightening torque is
15 lbs.