Operation panel, Operation panel -4 – AGFA 1815 Copier User Manual
Page 30
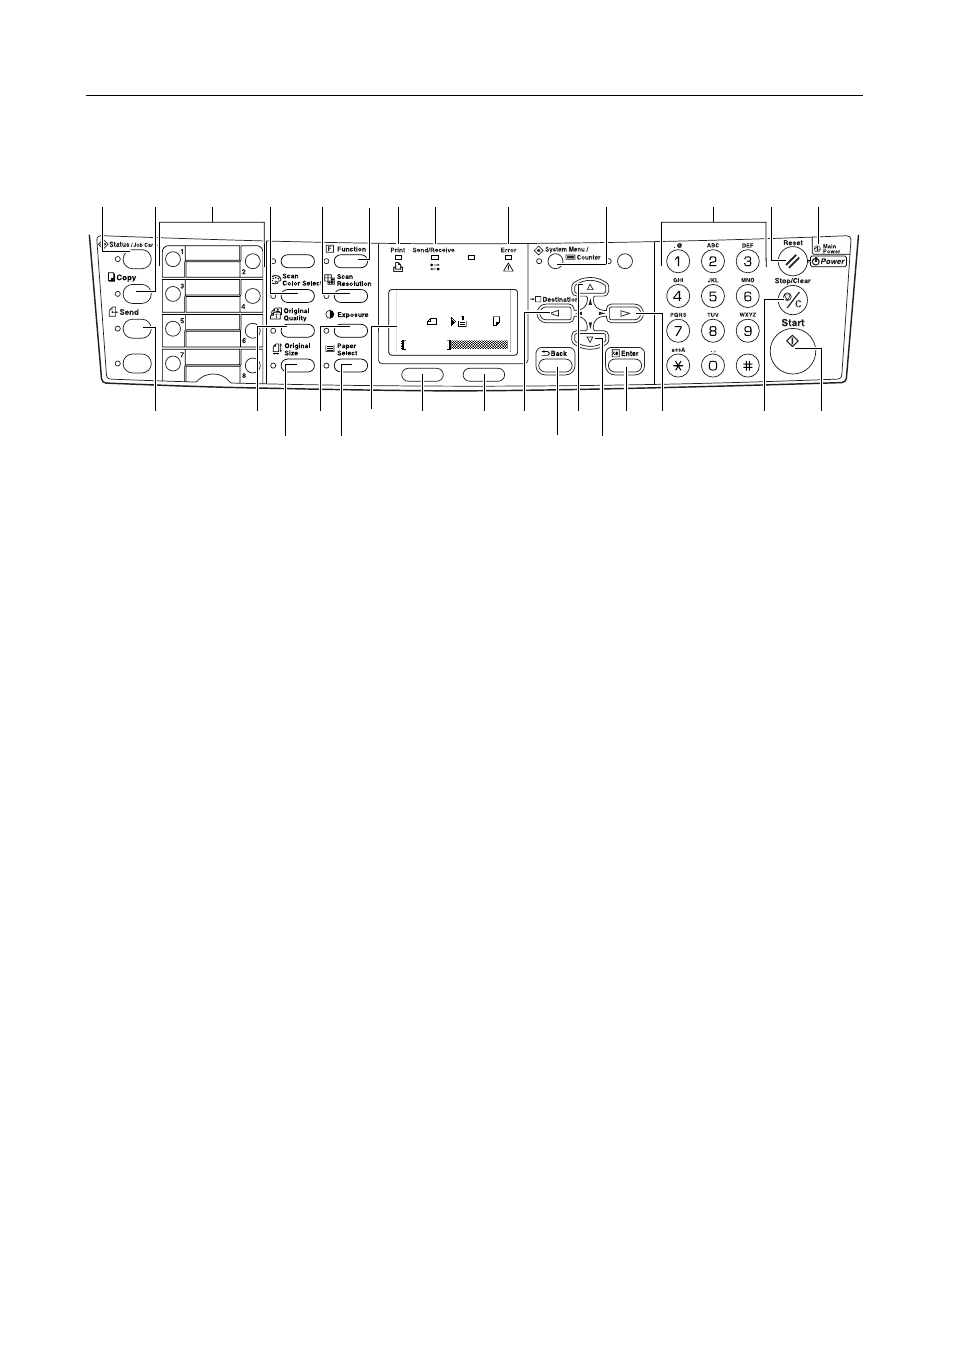
Names of Parts
2-4
Operation Panel
1
Status/Job Cancel Key and Indicator — Press this key to light the indicator to access the
Status menu screen. For details, refer to Chapter 4 in Advanced Operation Guide.
2
Copy Key and Indicator — Press this key to use the copier functions of this machine. The
indicator will light when the machine is in the copier operation mode.
3
E-Mail (Scan) Key and Indicator — Press this key to use the scanner functions of this
machine. The indicator will light when the machine is in the scanner operation mode.
4
One-touch Keys (1 to 8) — The one-touch keys can be used to register destination
information. For details, refer to Chapter 5, Advanced Operation Guide, Registering
Destination E-mail Address. Enter the information for the registered destinations onto the
supplied one-touch key sheet and insert the sheet between the one-touch keys from the bottom
side of the operation panel.
5
Scan Color Select Key and Indicator — Press this key to light the indicator to change the
Scan Color mode. For details, refer to Chapter 2 in Advanced Operation Guide, Selecting
Scan Color Mode.
6
Scan Resolution Key and Indicator — Press this key to light the indicator to change the scan
resolution. For details, refer to Chapter 2 in Advanced Operation Guide, Selecting the
Scanning Resolution.
7
Function Key and Indicator — Press this key to light the indicator to access the Function
screen.
8
Print Indicator — This indicator flashes green when the machine is processing a printing job.
9
Send/Receive Indicator — This indicator flashes green when the machine is sending or
receiving data.
10 Error Indicator — This indicator flashes red when an error has occurred. In this case, check
the message display and perform the appropriate procedure to correct the error. See page 7-3.
This indicator lights red when the machine is experiencing a mechanical problem. Turn the
power switch off ({) and then back on ( | ) again. If the Error indication does not go out, make
a note of the message that appears in the message display.
11 System Menu/Counter Key and Indicator — Press this key to light the indicator to perform
default settings, change the language on the display, etc. (For details, refer to Chapter 5 in
Advanced Operation Guide.)
12 Keypad — Use these keys to set the number of copies to be made or enter other values. You
can also use these keys to enter characters.
13 Reset/Power Key — Press this key to reset all temporary configurations previously made. The
machine returns to the initial mode
†
. Press down on this key for at least two seconds to engage
the sleep mode. To release the machine from the sleep mode, press the same key again. (See
page 4-12.)
1
2
3
13
14
10
7
9
8
11
5
6
28
15
16
12
23
22
18
20
21
17
19
24
25
27
26
29
*
Ready to copy.
A 4
A 4
: 1
Zoom
100%
Set