Kestrel, 4200 pocket air flow, Tracker 11 – Kestrel 4200 (HVAC) User Manual
Page 6
Kestrel
®
4200 Pocket Air Flow
®
Tracker
11
button to enter the Max/Average screen. Press the button to begin averaging, and traverse the
duct. When finished, press the button again to stop the averaging. Press to clear the data. See the
“Applications Examples” section for more information.
Relative Humidity
The Kestrel Meter is capable of measuring RH to a high accuracy: +/- 3% RH between 5 and 95%. To ensure
operation within these specifications, please follow these recommendations:
• Avoid taking measurements in direct sunlight, which will heat the air inside the humidity sensor
enclosure and cause inaccurate readings.
• If your circumstances force you to expose the Kestrel Meter to a large temperature swing prior to taking
a relative humidity reading (such as when taking a Kestrel Meter stored inside at 70° F outside to a
temperature of 40° F), you will need to take additional steps to ensure that the Kestrel Meter’s external
temperature sensor is in thermal equilibrium.
- Ideally, provide an airflow of at least 1 M/S (2.2 MPH), over the temperature sensor — point the
Kestrel Meter into the airflow. If there is no airflow, simply wave the unit back and forth so air
passes over the sensors. With airflow over the temperature sensors and humidity chambers,
readings within specifications will be provided within two to three minutes, even after a large
temperature shift.
- If no airflow can be provided, you must allow sufficient time for the RH value to stabilize. This can
take as long as 20 minutes — the greater the temperature change, the greater the time. You can
use the logging capability of the Kestrel Meter to confirm that the unit has stabilized to
a correct reading: Set the memory options to a relatively short logging interval (20 seconds
works well), select the graphical display of RH, and you can see when the value is no longer
changing significantly. At that point, the RH value is stable and can be relied upon to be within the
accuracy specifications.
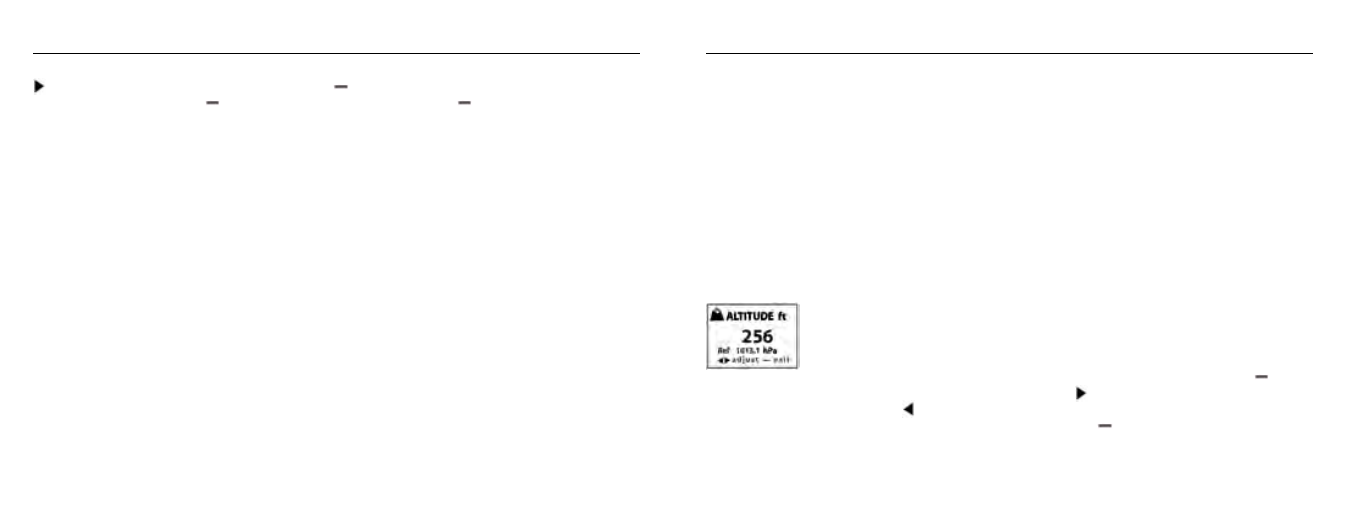
Barometric Pressure and Altitude Adjustment
The Kestrel Meter measures “station” pressure — the actual air pressure in the measurement location —
and uses this value to calculate barometric pressure and altitude. Station pressure changes in response to
two things — changes in altitude and changes in the atmosphere. Because the Kestrel Meter is constantly
changing location and altitude, it is important to enter adjustments or “references” when accurate pressure
and altitude readings are needed.
Barometric pressure is station pressure corrected to sea level. In order to make the correction, the Kestrel
Meter needs an accurate reference altitude. Altitude is the height above sea level. In order to correctly
calculate altitude, the unit needs an accurate barometric pressure reference, also known as an “altimeter
setting”. Fortunately, you only need to know ONE of these values (current barometric pressure or current
altitude) in order to set your Kestrel Meter up to show accurate readings.
Starting with the known barometric pressure for your location
You can obtain your current barometric pressure by checking an internet weather site
for a nearby location, or contacting a local airport. Set this value as your reference
pressure on the ALTITUDE screen to determine your correct altitude: Press the button
to enter the reference setting mode. Press the button to increase the reference
pressure or the button to decrease the reference pressure. You will notice that the
altitude will change with changes in the reference pressure. Press the button to exit the adjustment
mode. Set your Kestrel Meter down on a table and allow the altitude reading to stabilize. (Note: very small
changes in pressure generate noticeable changes in altitude. In order to provide meaningful readings for
activities where altitude changes quickly, the Kestrel Meter features rapid altitude response. This is why