Cinénova 7 front panel overview, Rear panel of cinénova 7 – EarthQuake Cinenova 7 User Manual
Page 16
specifications are subject to change without notice
16
Cinénova 7 Front Panel Overview
Earthquake Sound
RF
MAX
GND +12V
AC110V/60Hz
MIN
SPEAKER OUTPUT
INPUT SELECTOR
RCA
XLR
USE ONLY WITH A 250V FUSE
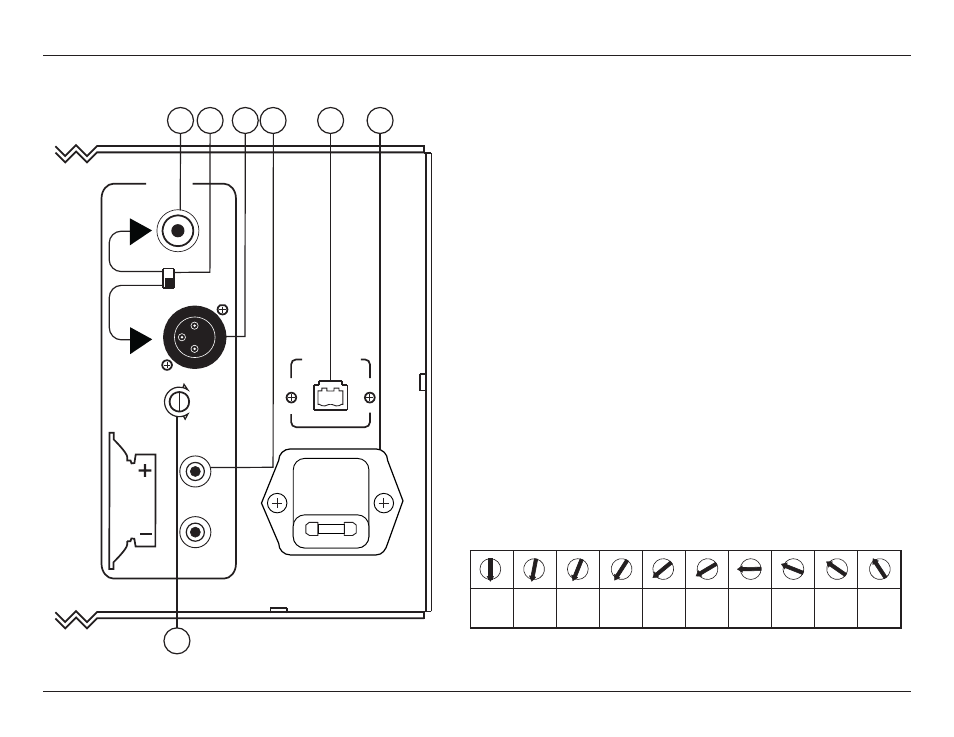
Rear Panel of Cinénova 7
4
Output Binding Posts:
. Gold Plated Speaker
We recommend that you use a high quality wire constructed of fine, multi-strand
copper 10-gauge and up. Wire with a gauge of 16 may be used for short runs of less
than twenty feet. We do not recommend that you use any wires with a gauge
equivalent of 18 or higher due to the power loss and performance degradation.
1. RCA Input:
Accepts low-level signal from any source, such as a processor or receiver. From 0.4
Vac up to 6 Volt AC.
2. Input Selector:
To maintain signal integrity Cinénova-7 provides you with an “Input Selector
Switch”. This gives you (installer) the option to select between RCA or XLR
inputs.
3. Fully Balanced XLR Inputs:
We recommend the use of fully balanced XLR inputs in cases when the distance
between the Cinénova and the audio source is excessive and susceptible to noise
interference.
6.
AC Input Connector:
IEC Power Receptacle
7.
Input Sensitivity:
In order for the Cinénova Turn-ON to be controlled via another source, connect the
12VDC trigger input to the 12VDC source output (polarity is not an issue). From
your source, 12VD should have over 20mA. Then set the manual power switch to
OFF and the circuit breaker to ON. Now any time the Cinénova detects an incoming
12VDC signal it will automatically power on.
5.
12VDC Trigger:
1
2
3
4
5
6
7
Input selector gain set is based on your processor output voltage. The table
shown below reflects the signal required from your processor if you were to set
this gain based on the displayed position.
Signal
required
6 Volts
Signal
required
5 Volts
Signal
required
4 Volts
Signal
required
3 Volts
Signal
required
2 Volts
Signal
required
1.5 Volts
Signal
required
1 Volts
Signal
required
0.75 Volts
Signal
required
0.5 Volts
Signal
required
0.4 Volts