Bracket installation, Instructions – Monoprice 6582 Motorized Projection Screen User Manual
Page 4
3
4
Without mounting bracket installation
Wall mount
(Suitable for all sizes)
Ceiling mount (Suitable for all sizes)
Hanger
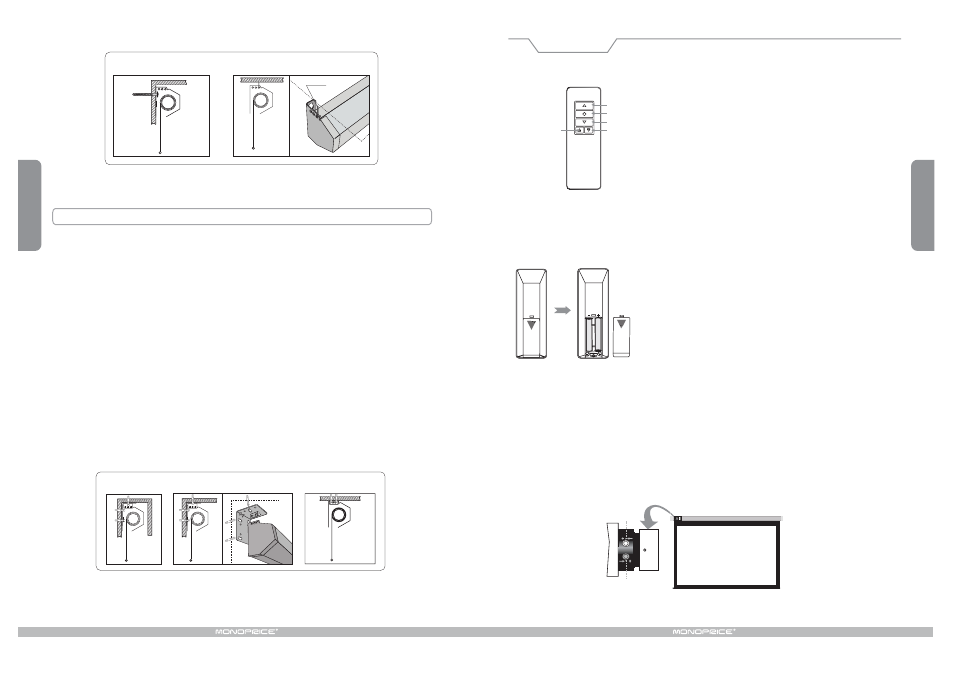
Bracket Installation
To ensure extra durability and safety installation brackets have been included. The necessity of
brackets will vary depending on the location of installation. For installations of sizes up to 150",
use the C1 bracket. For installations of over 150", use C2.
Installation For Sizes Up to 150"
The screen can be installed either on the wall or with a hidden installation. The wall installation uses 2 holes
on the C1 brackets while the hidden installation uses all 3. Measure the distance between the holes that will
be used on the left and right brackets. Using the measured distance, drill the appropriate holes in the wall
( and ceiling if necessary ). Install the brackets, then lift and match up the screen's end caps to the brackets.
Insert the two screws to join the bracket and screen casing for both sides.
Installation For Sizes Over 150"
Using the C2 brackets, the screen can installed from the ceiling. Measure the distance between the holes
on the left and right brackets. Using the measured distance, drill the appropriate holes in the ceiling. Install
the brackets, then lift and match up the screen's end caps to the brackets. Insert the screws to join the
bracket and screen casing for both sides.
With mounting bracket installation(
)
Optional
Hidden installation
(Suitable for all sizes)
150 inches and under hidden
wall mount installation
150 inches and up installation
Instructions
To avoid overheating the motor, do not continually retract and lower the screen for over 4 minutes at a time.
If the motor overheats, it will need a cool down time of 2 minutes. The motor does not need any lubricants.
The drop and retract limit of the screen is factory preset to an optimal configuration. Please ask our company
or professional to adjust settings to avoid damaging the motor.
Drop Limit
Retraction Limit
Front view
SLIGHT UP
UP
STOP
DOWN
SLIGHT DOWN
Remote controller instruction:
1. To retract screen, press "UP".
2. To stop screen, press "STOP".
3. To lower screen down, press "DOWN".
4.
5.
To retract screen slightly, press "SLIGHT UP".
To lower screen down slightly, press "SLIGHT DOWN”.
Remote controller guideline:
1. Working temperature: -20 C - +80 C
0
0
.
2. Protection index: IP30.
3. Batteries: 1.5V x 2pcs, model # AAA.
4. Working under normal polluted environment.
5. Take out batteries if the controller will not be used for a long time.
6. Please change the batteries when signal is weak.
Back view
How to install the batteries:
Please change the batteries as below when signal is weak.
1. Turn around the controller, push to pen the cover as guiding arrow.
2. Put the batteries in according to the guide of anode and cathode.
3. Close the cover.
Caution
The controller does not work if mistaking the anode and cathode of
batteries, please correct the direction according to the figure on the
left.