Assembly i nstr uc tions – Poolmaster 72776 Above-Ground Across Pool Badminton User Manual
Page 2
A
ssembly I
nstr
uc
tions
2
poolmaster.com
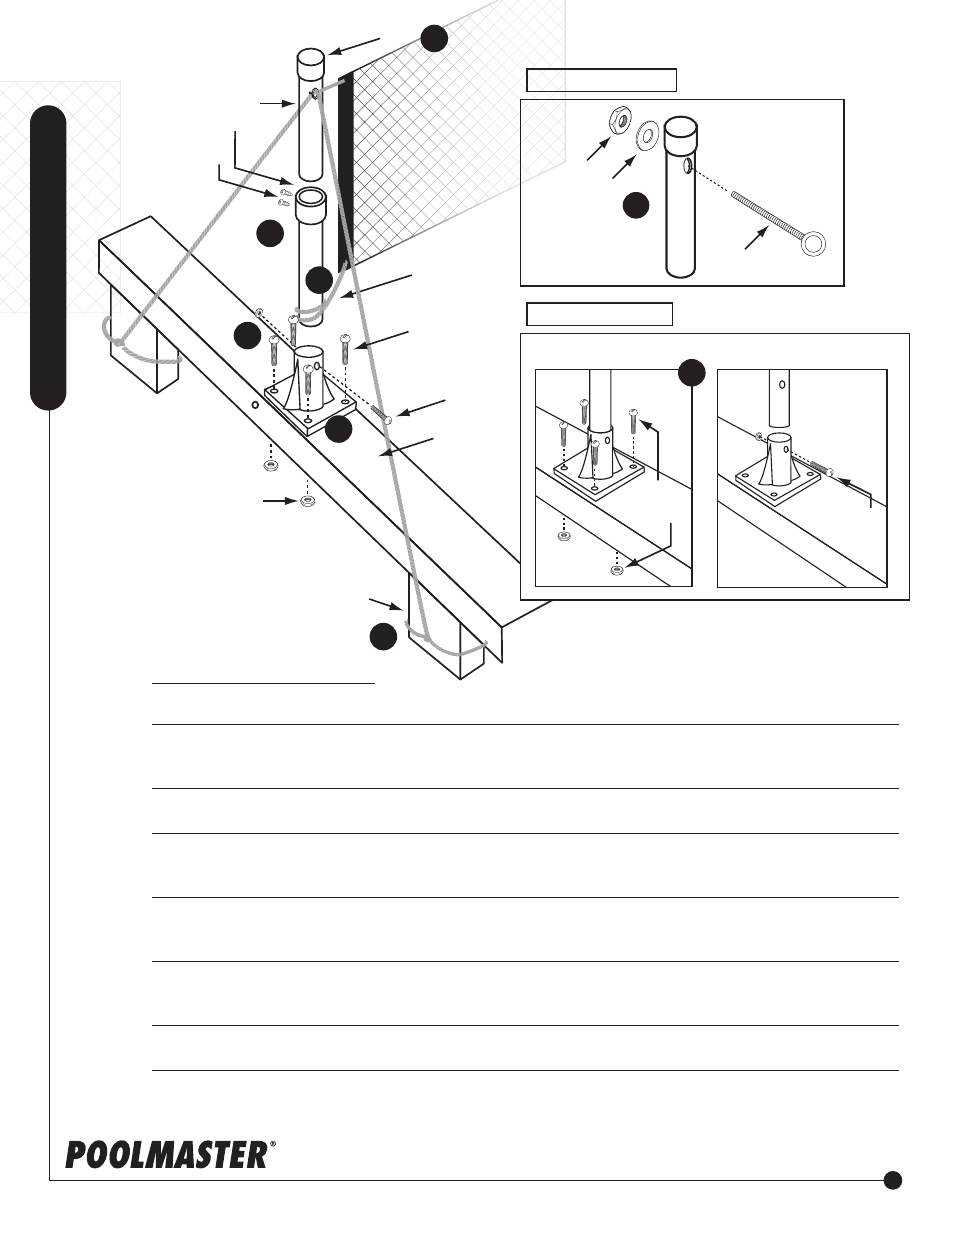
Pool Upright
Support
Pool
Top Rail
8
Connector Detail
Eyelet/Pole Detail
Hex Nut
Washer
Eyelet
4
Step 1
• Secure Coupling between two upright poles and secure with 2 Set Screws. Repeat for other set.
Step 2
• Situate the game on the pool top rail at your desired location. Using the holes in the Rail Connector
as a guide, drill eight 3⁄16" in top rail, four holes per connector.
Step 3
• Attach the connectors to the pool and secure with (8) 10-24 Nuts and Bolts. (Figure 5-A)
Step 4
• Insert Eyelet into the top holes on the Upright Pole Support (see Eyelet/Pole Detail) and fasten with
Washer and Hex Nut (repeat for other side).
Step 5
• Insert the Upright Pole into the Rail Connector, secure wih ¼" x 1 ¾" Bolts (repeat for other side.)
(Figure 5-B)
Step 6
• Extend the Net across the pool, pull tight and tie Net Ropes to the top of each pole through the
Eyelets. Net can be shortened by rolling on pole or lengthened by extending the Rope Ties.
Step 7
• Tie net ropes to the bottom of each pole.
Step 8
• Tie two 8ft. Ropes to the Eyelet at the top of the Upright Pole and extend diagonally and tie to the Pool
Upright Support (repeat for other side).
Rope
Net
Cap
6
1
7
Net
Ties
#8 Set
Screws
1” Coupling
Upright
Pole
Hex Nuts
1 ¾” Bolt
1” Bolts
3
2
Diagram A
Diagram B
1” Bolts
w/ Hex
Nuts
1
¾
” Bolt
w/ Hex Nut
5